Lab 10 - Windows File Server
In this lab, you’re going to create a Windows File Server and use Group Policy Objects to manage your domain computers.
Activities
Part 1 - Create Windows File Server
Create a new Windows server to act as the file server.
First, create a new Security Group for the File Server:
- Go into EC2 -> Network & Security -> Security Groups
- Create a new security group:
Tiger-SG-File-Server - VPC:
Tiger-VPC - Inbound rules - all of these only allow access from inside Tiger-VPC or via the VPN:
RDPfrom TCP port 3389 from source10.101.0.0/16(for remote desktop protocol - RDP)SMBfrom TCP port 445 from source10.101.0.0/16(Server Message Block)WinRM-HTTPfrom TCP port 5985 from source10.101.0.0/16(WinRM over HTTP)WinRM-HTTPSfrom TCP port 5986 from source10.101.0.0/16(WinRM over HTTPS)All ICMP - IPv4from source10.101.0.0/16(This permits ICMP pings for network debugging)
- Outbound rules - leave unchanged
Create a new EC2 instance meeting the following requirements:
- AMI Type: Microsoft Windows Server 2019 Base
- Instance type: t2.medium (2 vCPU, 4 GiB memory)
- Network: "Tiger-VPC"
- Subnet: "Tiger-VPC-Public"
- Auto-assign Public IP: Enable
- Even though the file server is only accessible from within Tiger-VPC, or via the VPN, it still needs a public IP in order to reach the internet itself (for purposes such as Windows Update).
- NEW: Under the Network interfaces section, for the “eth0” interface, specify the specific Primary IP
10.101.0.5instead of leaving it as "Auto-assign". We want the file server to stay at a fixed network address. - Storage: 30GiB with "Delete on Termination" enabled
- Yes, ~32GB is the MINIMUM for a bare bones Windows Server install...
- Tag: Name = “File Server: Windows Server 2019"
- Security Group: Use existing security group: “Tiger-SG-File-Server"
- Keypair: Existing keypair / “COMP-175-Lab-1"
Next, get the Windows password that AWS created for you.
- Go to EC2->Instances->Instances
- Right-click on your new desktop instance
- Choose Security->Get Windows Password
- Upload your “COMP-175-Lab-1.pem” private key as proof of ownership, and select “Decrypt"
- Make a careful note of your password!
- Make a careful note of your username (“Administrator”)
- Make a careful note of your private IP address
Finally, connect to the new Windows File Server over Remote Desktop. Activate your VPN connection (to gain access into the private subnet) and using a remote desktop client, establish a connection to the Windows File Server at its private IP address 10.101.0.5.
Part 2 - Configure Windows File Server
Now configure this new Windows instance to act as a file server, and join it to our new Domain.
References:
Initial Windows Setup
- Open the “Server Manager” application
- Ignore the ad for “Windows Admin Center"
- Select “Local Server” from the left panel
- Check Firewall Status
- Under "Windows Defender Firewall”, ensure it is set to
Public: On
- Under "Windows Defender Firewall”, ensure it is set to
- Run Windows Update
- Under "Windows Update", click on “Never check for updates” and then “Check for Updates” to run Windows Update now. Let Windows Update download and install updates.
- You don’t need to restart now - we’ll do that in a little bit.
- Change the network settings
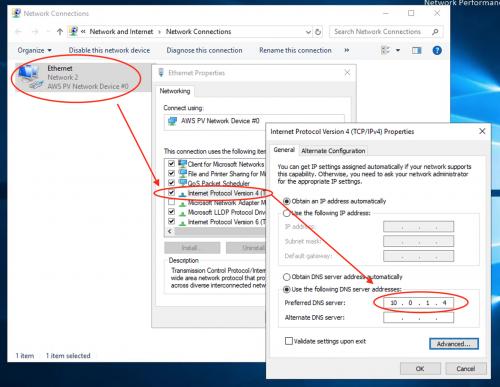
- Under Ethernet, select the Ethernet network interface, then Properties, and Internet Protocol Version 4 (TCP/IPv4). Change "Obtain DNS server address automatically" to "Use the following DNS server address":
10.101.0.4(the IP of the domain controller)
- Under Ethernet, select the Ethernet network interface, then Properties, and Internet Protocol Version 4 (TCP/IPv4). Change "Obtain DNS server address automatically" to "Use the following DNS server address":
- Change the computer hostname
- Under "Computer Name”, click on the existing gibberish like
EC2AMAZ-4EASABT. Enter a new computer description (File Server - Primary), and then select "Change…" to rename the hostname. Enter a new computer name likeTIGER-FILE(max 15 characters, by convention uppercase) and choose OK.
- Under "Computer Name”, click on the existing gibberish like
- Join the Domain
- Ensure the Domain Controller is running
- While under the “Computer Name / Domain Changes” window, change “Member Of” from Workgroup “Workgroup” to Domain
STUDENT-NAME.tigerenterprises.org(which was previously configured on the domain controller) - You will be prompted to “enter the name and password of an account with permission to join the domain"
- Use the Administrator login for the Domain controller
- Wait nervously for a while, and you should be greeted with “Welcome to the STUDENT-NAME.tigerenterprises.org domain"
- Ignore the error about “Changing the Primary Domain DNS name of this computer … failed. The RPC server is unavailable"

Restart the File Server now. It might take a moment to return (Windows Updates, Domain Setup, ….)
Launch Windows PowerShell and run a few commands to verify your configuration
- Verify the active domain trust relationships with:
netdom verify TIGER-FILE. You should see “The secure channel from TIGER-FILE to the domain TIGER has been verified" - Verify that you can login as an Active Directory user:
runas.exe /u:STUDENT-NAME.TIGERENTERPRISES.ORG\troar powershell.exe.- Enter the password you chose for the "troar" user
- You should see PowerShell running as the “troar” user.
- Enter
$env:UserNamein that new shell to confirm that the shell is running as the "troar" user, as desired
- Close that "troar" PowerShell. (The commands below should be run as the Administrator user)
Setup File Server
In Windows PowerShell:
- Get a list of windows features available for installation:
Get-WindowsFeature - Install the File Server and associated management tools:
Install-WindowsFeature -Name FS-FileServer -IncludeAllSubFeature -IncludeManagementTools
Create a File Share
In the "Server Manager" program:
- Select "File and Storage Service"
- Select "Shares"
- Select Tasks->New Share
- Select "SMB Share - Quick"
- Ensure that TIGER-FILE is the selected server
- Ensure that the
C:volume is selected. (The wizard will create a new folder in\Shares) - Select "Next"
- Enter a share name:
TIGER-SHARED - Accept all the other defaults and select "Create"
Test the File Share
Launch another remote desktop connection to the Domain Controller.
- On the Domain Controller, open "File Explorer"
- In File Explorer, enter the location
\\10.101.0.5\tiger-sharedin the address bar. (Tip: The address bar might have the label "Quick access" in it. Just type over that) - Right-click and create a new text file (
test.txt) in the shared location as a simple test
Deliverables:
- Submit a screenshot of PowerShell on the file server showing the output of
netdom verify TIGER-FILE - Submit a screenshot of PowerShell on the file server running as the
troaruser (with$env:UserNamevisible) - Submit a screenshot of the shared directory (as viewed on the domain controller) with the file
test.txtvisible.
Part 3 - Remote Management from Domain Controller
Thanks to Active Directory, and joining the Domain, you can remotely administer any computer in the Domain.
Ensure you still have a remote desktop connection to the Domain Controller
- On the Domain Controller, Launch the "Server Manager" program.
- Go to Manage->Add Servers
- Find the
TIGER-FILEserver under the Active Directory tab. (Click “Find Now” so it refreshes) - Select
TIGER-FILEand click the right-arrow so it is selected, and choose “OK" - You should now see two online servers in Server Manager -> All Servers: TIGER-DOMAIN and TIGER-FILE
- Right-click on TIGER-FILE and choose “Windows PowerShell"
- At the PowerShell prompt run some commands to convince yourself this is PowerShell on the file server
- What is my username?
$env:UserName(Should be Administrator) - What is my computer name?
$env:ComputerName(Should be TIGER-FILE) - What is my IP address?
Get-NetIPAddress | Format-Table(Should be 10.101.0.5)
- What is my username?
Deliverables:
- Submit a screenshot of Server Manger -> All Servers on the domain controller, showing both TIGER-DOMAIN and TIGER-FILE as online
- Submit a screenshot that shows
(a) you are connected via Remote Desktop to the Domain Controller, and from there (via Server Manager) have
(b) PowerShell connected to the File Server, with your username, computer name, and IP address clearly visible.
Part 4 - Change Group Policy in the Domain
We want to allow domain users like troar to connect via remote desktop to domain systems. The desired users are already part of the “Tiger Remote Desktop” group on the domain controller, but we need to synchronize that with the local "Remote Desktop Users” group on each domain computer in order for access to be granted.
- On the Domain Controller, Launch the "Group Policy Management" program
- Select your forest (STUDENT-NAME.tigerenterprises.org) and expand it
- Select your domain (STUDENT-NAME.tigerenterprises.org) and expand it
- Select your the GPO entitled “Default Domain Policy”
- Click to select the "Default Domain Policy" GPO
- Choose Action->Edit. The Group Policy Management Editor will launch
- Navigate through Computer Configuration -> Preferences -> Control Panel Settings -> Local Users and Groups

- Right-click in there and choose New->Local Group
- Leave the action as "Update"
- In the dropdown menu for Group Name, select the existing group of
Remote Desktop Users (built-in)(do not create a new Remote Desktop Users group, or you'll end up with conflicts) - Under “Members”, click Add, then
...for more search options, enter the nameTIGER\Tiger Remote Desktopand select OK. You should see a SID appear next to TIGER\Tiger Remote Desktop. (Don't see a SID? Are you sure you clicked on the...button before entering the desired search name?) - At this point we've indicated that we want to sync the domain list of “Tiger Remote Desktop” to the local list of "Remote Desktop Users"
- Apply and OK to save, and then close the Group Policy Management program.

This should take effect immediately (or be able to be pushed out manually via the PowerShell command gpupdate /force), but at least for me, I had to reboot the file server for it to take effect. #Annoying.
To test that the group policy change was successful, connect via Remote Desktop to the file server again, but this time as a domain user (troar), not the Administrator user that you previously connected as. The target is your File Server (10.101.0.5), the username is student-name.tigerenterprises.org\troar (or just TIGER\troar), and the password is whatever you previously set. After logging in as troar, launch PowerShell to demonstrate your accomplishment.
Deliverables:
- Submit a screenshot of PowerShell after you log onto the File Server via Remote Desktop as the "troar" user (not the Administrator user). PowerShell should show the following information:
(a)The user name via$env:UserName(should be troar),
(b)The computer name via$env:ComputerName(should be TIGER-FILE), and
(c)The list of cached Kerberos tickets that the troar user currently holds from the Domain Controller viaklist
The expected output of klist is at least one ticket (a Kerberos ticket granting ticket, or krbtgt), and potentially more:
PS C:\Users\troar> klist

Current LogonId is 0:0x19b25a

Cached Tickets: (1)

#0>     Client: troar @ STUDENT-NAME.TIGERENTERPRISES.ORG
        Server: krbtgt/STUDENT-NAME.TIGERENTERPRISES.ORG @ STUDENT-NAME.TIGERENTERPRISES.ORG
        KerbTicket Encryption Type: AES-256-CTS-HMAC-SHA1-96
        Ticket Flags 0x40e10000 -> forwardable renewable initial pre_authent name_canonicalize
        Start Time: 10/25/2020 18:11:01 (local)
        End Time:   10/26/2020 4:11:01 (local)
        Renew Time: 11/1/2020 18:11:01 (local)
        Session Key Type: AES-256-CTS-HMAC-SHA1-96
        Cache Flags: 0x1 -> PRIMARY
        Kdc Called: TIGER-DOMAIN.student-name.tigerenterprises.org
Troubleshooting: If you have "Unable to Connect" (access denied) errors when attempting to log onto the File Server via Remote Desktop as the student-name.tigerenterprises.org\troar user, try logging on as the Administrator user that you previously used. Then, go to "Edit Local Users and Groups" control panel, and under Groups->Remote Desktop Users, verify that you see TIGER\Tiger Remote Desktop as a member. If this is not present, then the troar domain user (which is part of that group), will not have permission to log onto the File Server via Remote Desktop.

Lab Deliverables
After submitting the Canvas assignment, you should STOP your virtual machines, not terminate them. We'll use them again in future labs, and thus want to save the configuration and OS data.
Upload to the Lab 10 Canvas assignment all the lab deliverables to demonstrate your work:
- Part 2 - Configure Windows File Server
- Submit a screenshot of PowerShell on the file server showing the output of
netdom verify TIGER-FILE - Submit a screenshot of PowerShell on the file server running as the
troaruser (with$env:UserNamevisible) - Submit a screenshot of the shared directory (as viewed on the domain controller) with the file
test.txtvisible.
- Submit a screenshot of PowerShell on the file server showing the output of
- Part 3 - Remote Management
- Submit a screenshot of Server Manger -> All Servers on the domain controller, showing both TIGER-DOMAIN and TIGER-FILE as online
- Submit a screenshot that shows
(a) you are connected via Remote Desktop to the Domain Controller, and from there (via Server Manager) have
(b) PowerShell connected to the File Server, with your username, computer name, and IP address clearly visible.
- Part 4 - Change Group Policy
- Submit a screenshot of PowerShell after you log onto the File Server via Remote Desktop as the "troar" user (not the Administrator user). PowerShell should show the following information:
(a)The user name via$env:UserName,
(b)The computer name via$env:ComputerName, and
(c)The list of Kerberos tickets that the troar user currently holds from the Domain Controller viaklist
- Submit a screenshot of PowerShell after you log onto the File Server via Remote Desktop as the "troar" user (not the Administrator user). PowerShell should show the following information: