Lab 3 - AWS Billing
In this lab, before we build too ambitious of a Tiger Enterprises, Inc. on AWS, we are going to do a deep dive into billing.
Objectives:
- Use the AWS Pricing Calculator to explore different usage scenarios
- Create CloudWatch billing alarms to monitor usage in (nearly) realtime instead of simply waiting for the monthly bill to arrive.
AWS Pricing Calculator
The AWS Pricing Calculator allows you to estimate costs for whatever system you are architecting on AWS. You can explore different service configurations and regions, view prices per service and hierarchically for different parts of your architecture, and find the right EC2 instance size for your workload. And the tool even “shows the math” to see how the estimate is calculated.
Resources:
Let’s walkthrough the tool now and create an estimate for a simple configuration that includes:
- Two EC2 instances with persistent network storage
- One public IPv4 address
- Outbound Internet traffic
Go to https://calculator.aws/ and select “Create estimate”
First, add your two EC2 instances
- Search for “EC2” and select configure under the “Amazon EC2” service
- Region: US East (N. Virginia) - The same region student accounts are in
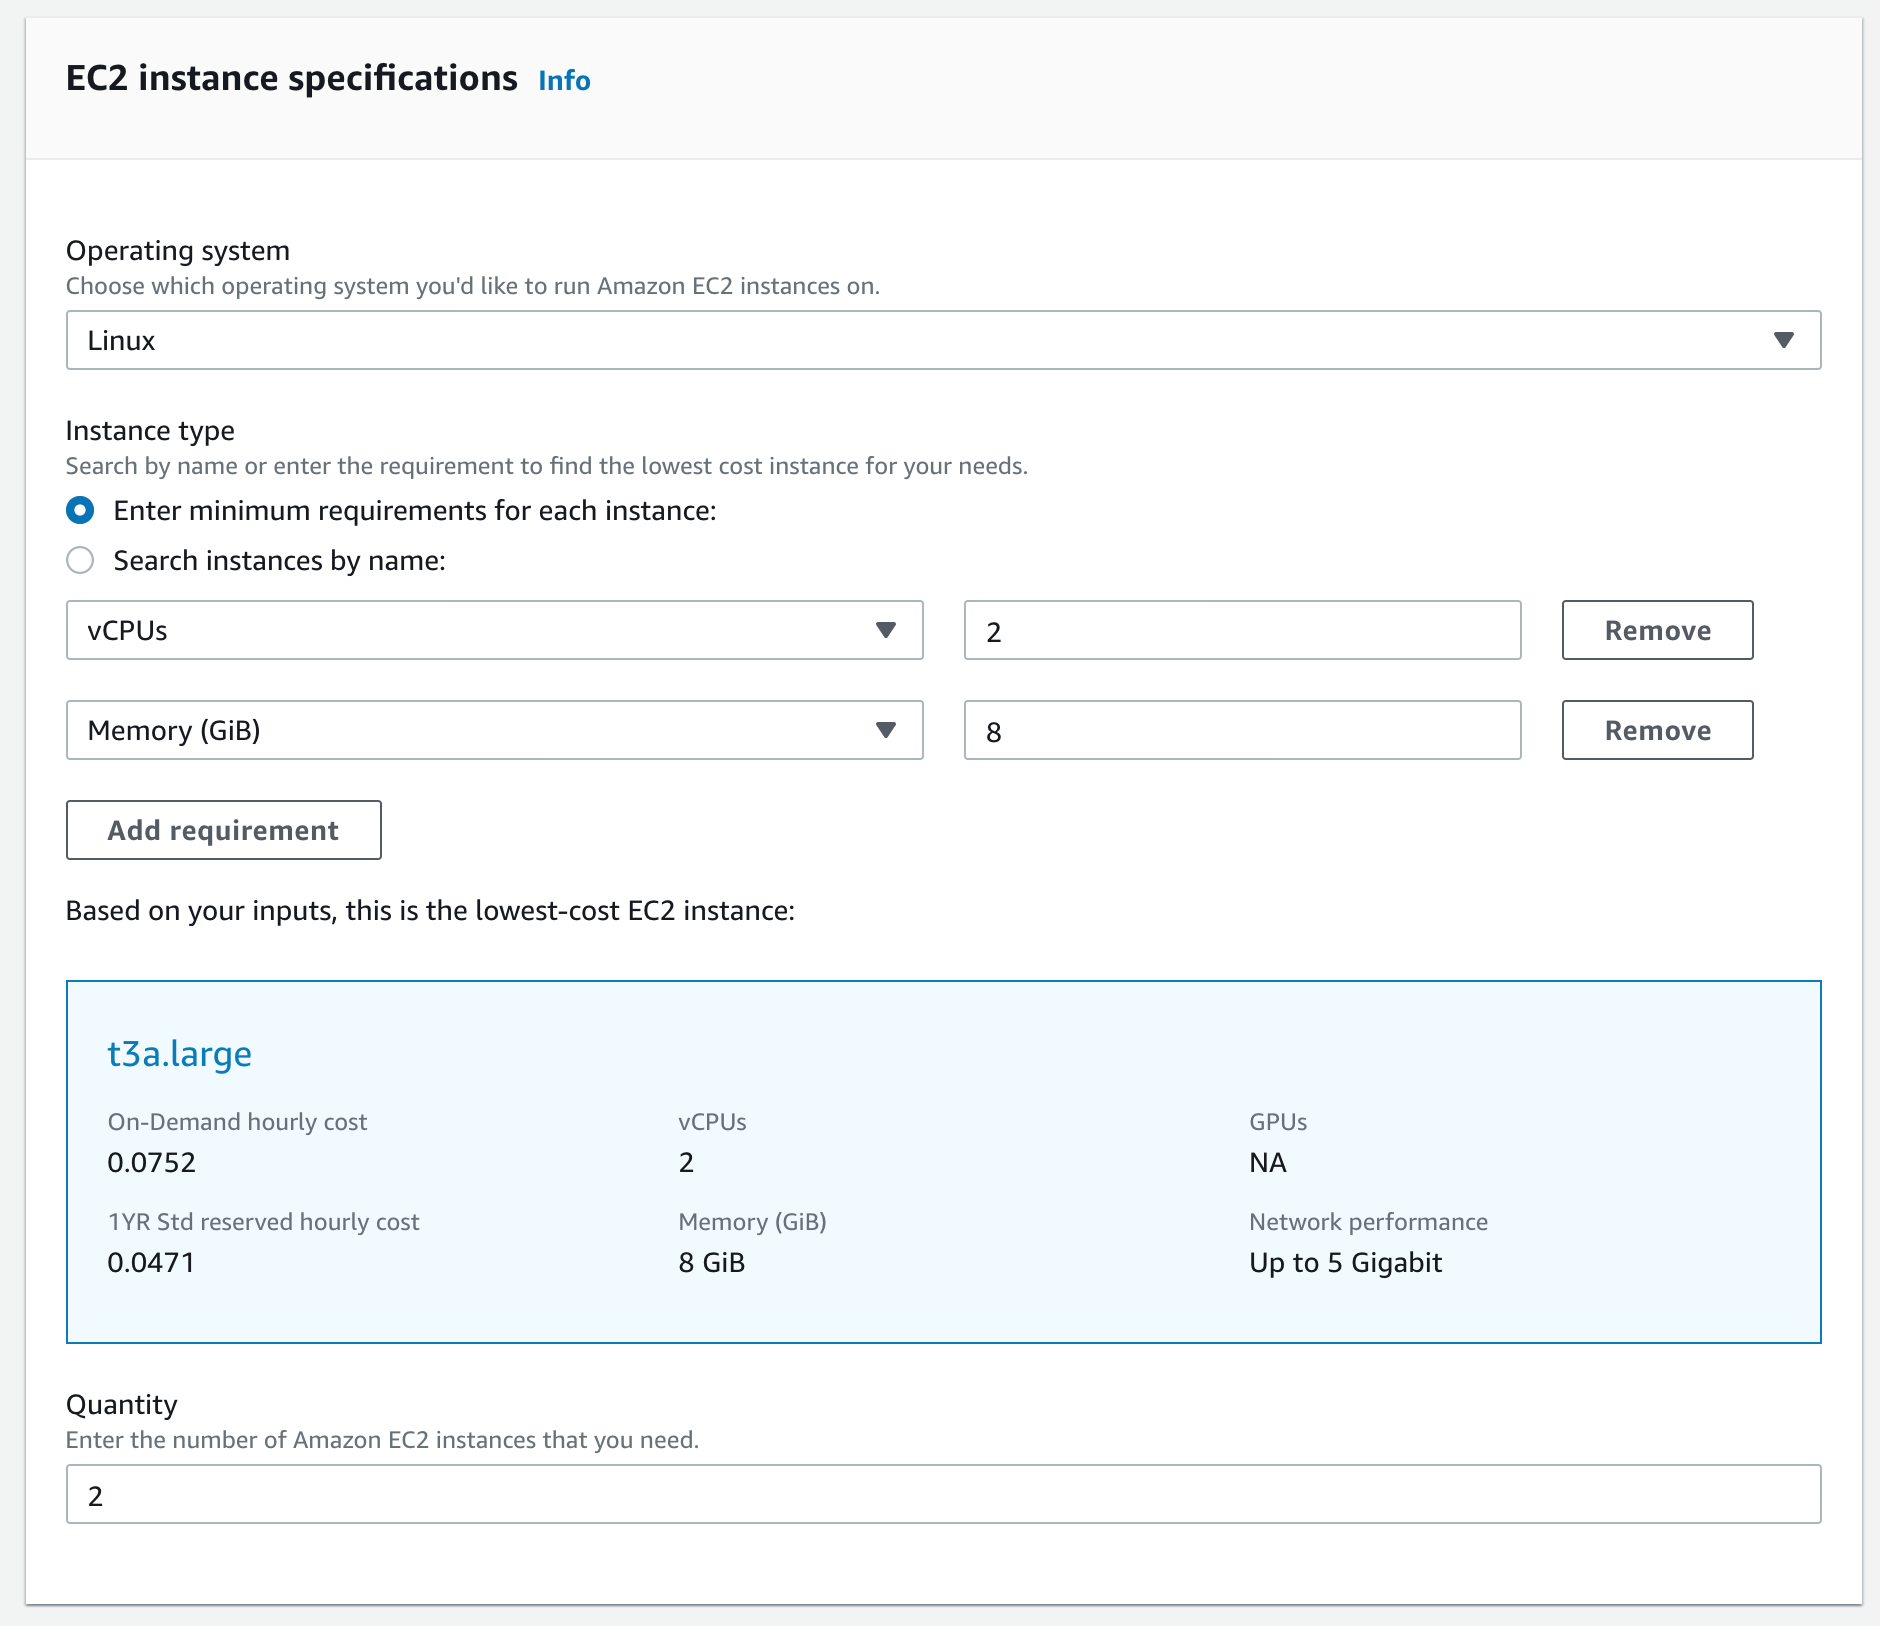
- Specify your EC2 instance type
- Select your operating system: Linux
- Search for an instance type meeting the following minimum requirements
- vCPUs: 2
- Memory (GiB): 8
- The calculator will search for the lowest cost EC2 instance that meets those requirements, in this case a “t3a.large” node. (As-of August 2020).
- Select your quantity: 2
-
Select your pricing model - Many choices here!
- Savings plans - AWS provides a discount if you committee to a certain usage ($/hour) for a 1 or 3 year term
- EC2 Instance Savings Plans
- Compute Savings Plans
- Standard Reserved Instances - AWS provides a significant discount and guarantees capacity if you commit to use an EC2 node for a 1 or 3 year term
- Convertible Reserved Instances - Same concept, but AWS allows you to switch your instance type to another type in the same family (i.e. more or less memory, more or less CPU)
- On-Demand Instances - The standard, pay by the hour, no commitment AWS model
- Savings plans - AWS provides a discount if you committee to a certain usage ($/hour) for a 1 or 3 year term
-
Choose “On-Demand” for your pricing model
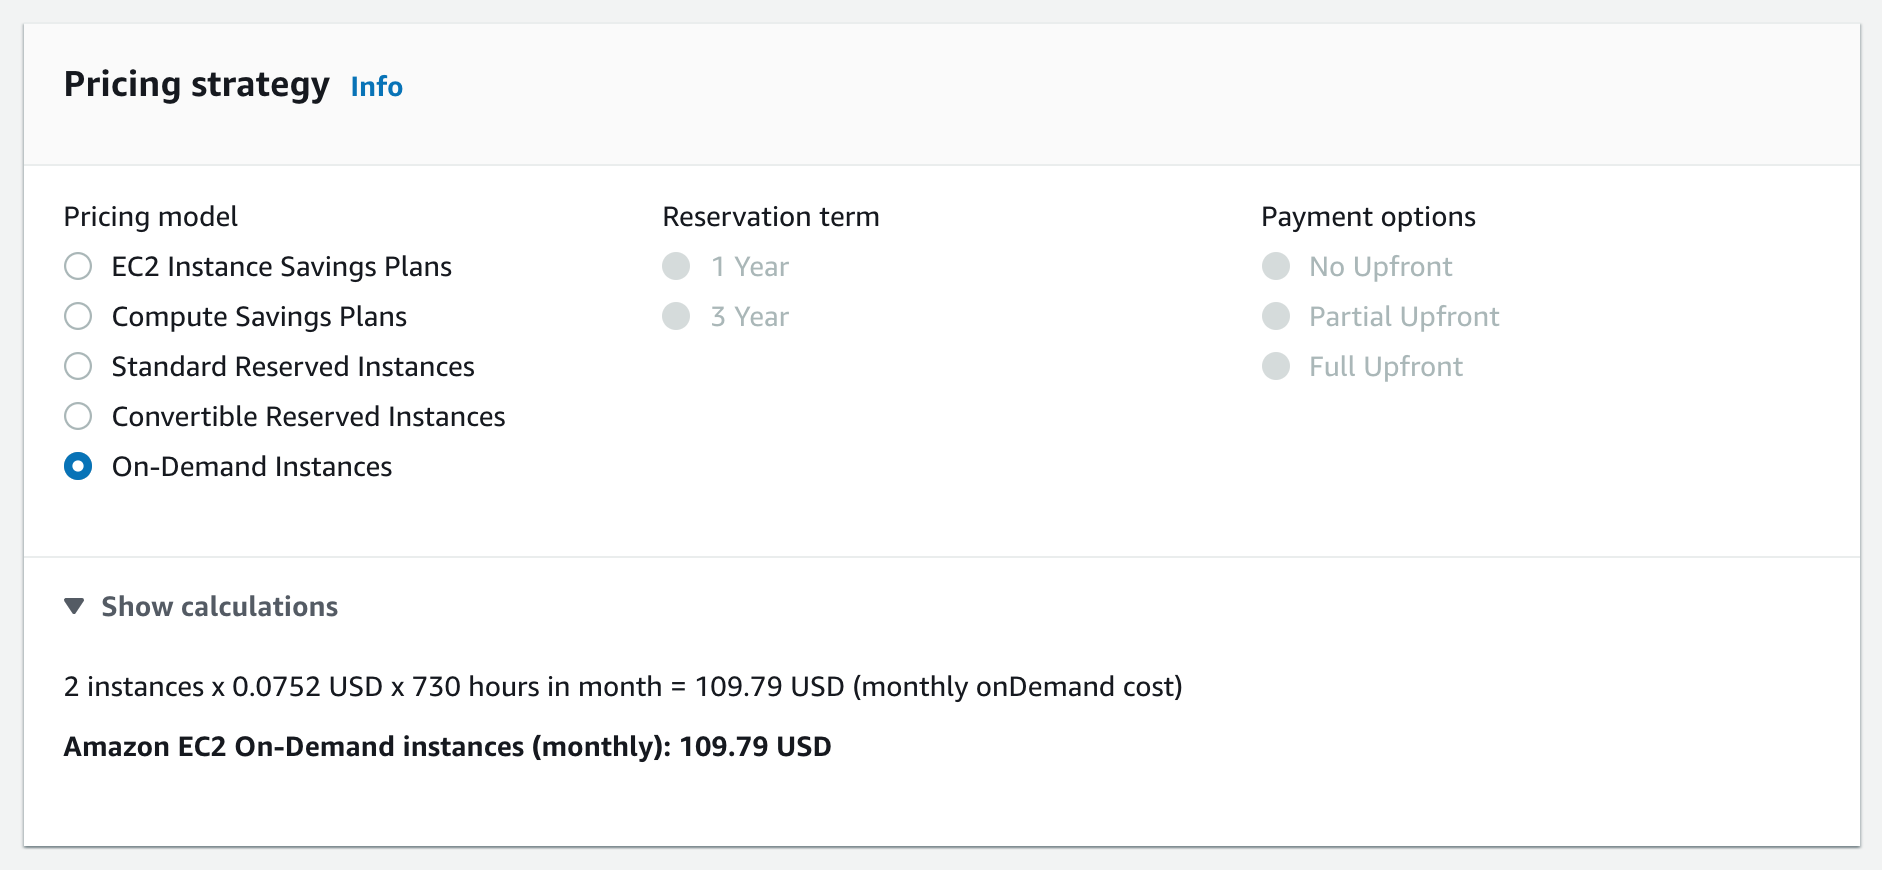
- Expand the “Show calculations” panel to see the math
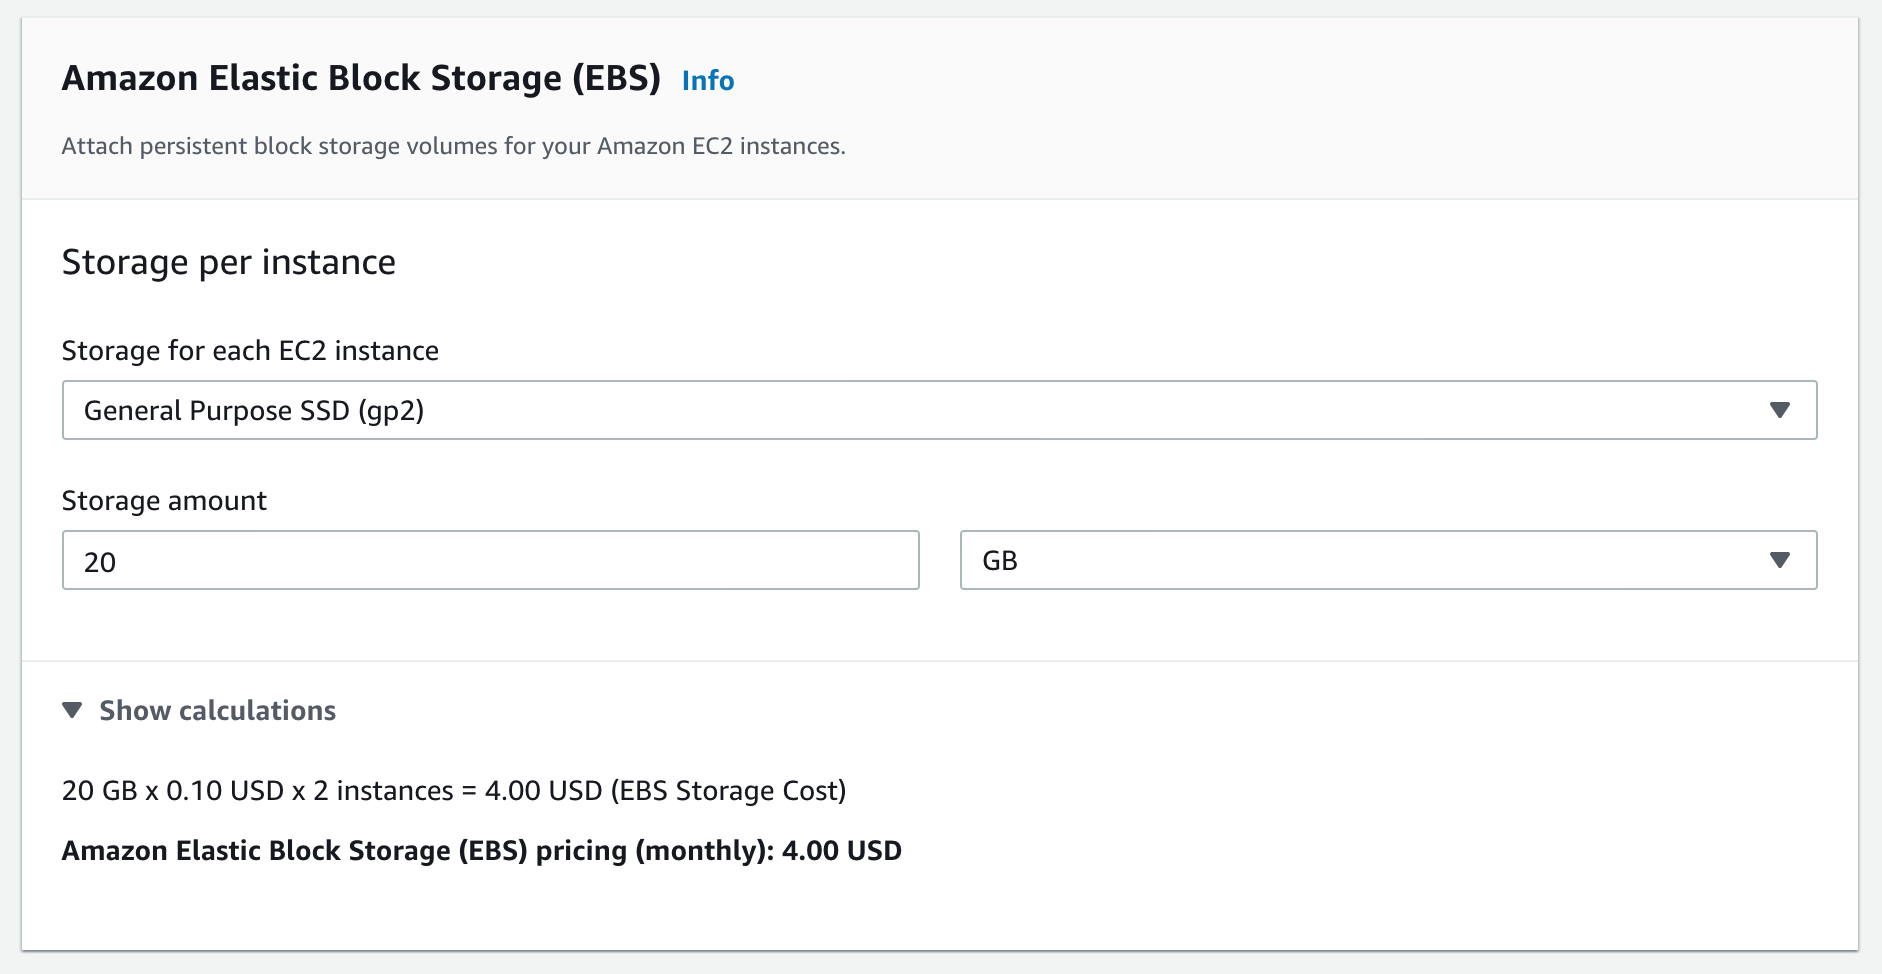
- Specify your storage per instance - This EBS storage is persistent storage on the network that survives a shutdown and relaunch of the instances:
- Type of storage: General Purpose SSD
- Storage amount: 20 GB
- Expand the “Show calculations” panel to see the math
- When finished, select "Add to my estimate"
Now add a static IP address per instance, so that these servers can be accessed from across the Internet:
- Select “Add service"
- Search for “IP” and select configure under the “Amazon Elastic IP” service
- Specify your service settings:
- Number of EC2 instances: 1
- Number of EIPs per instance: 1
- Number of hours each EIP is attached to an EC2 instance: 730/month
- Number of hours each EIP is associated with a stopped instance or is unattached: 0 / month
- Number of remaps: 0
- Expand the “Show calculations” panel to see the math
- Note something very interesting here: You can have ONE Elastic IP address associated with a running instance for free. But if you stop that instance? Or if you want more than one IP per instance? Then you pay per hour.
- When finished, add this EIP service to your estimate
Finally, add the network traffic:
- Select “Add service"
- Search for transfer and select configure under the “AWS Data Transfer” service
- Inbound Data Transfer
- Data transfer from: Internet
- Amount: 100,000,000 TB per month 🙂
- Intra-Region Data Transfer
- 0 TB/month
- Outbound Data Transfer
- Data transfer to: Internet
- Amount: 1 TB per month
- Expand the “Show calculations” panel to see the math
- Inbound Data Transfer
- When finished, add this service to your estimate
You can select “Save and share” to get a publicly accessible link to this estimate that can be shared, viewed, and modified by the recipient.
As a lab deliverable, use the AWS Pricing Calculator to complete a cost estimate for the following two scenarios. Record both the total upfront cost and total monthly cost, and save and submit the link. Accept the default settings if unspecified in the scenario description.
Scenario 1
- Start with the "Advanced Estimate" panel (so you can edit the snapshot/backup frequency)
- Ten EC2 nodes in the Asia Pacific (Tokyo) region. They should be Linux servers with at least 4 vCPUs and 32GB of RAM. Reserve them for a 3 year term and partially pay for them upfront.
- Each EC2 node has 60GB of Elastic Block Store in the Asia Pacific (Tokyo) region, with a weekly backup snapshot.
- Ten EC2 nodes in the Asia Pacific (Tokyo) region. They should be Windows servers with at least 4 vCPUs and 32GB of RAM. Reserve them for a 3 year term and partially pay for them upfront.
- Each EC2 node has 60GB of Elastic Block Store in the Asia Pacific (Tokyo) region, with a weekly backup snapshot.
- Note the price difference here for Windows instances!!
Scenario 2
- Start with the same requirements as Scenario 1, but via the "Advanced Estimate" panel.
- For the EC2 nodes, apply these additional requirements that are available under the "Advanced Estimate" panel. Rather than purchasing 100% of our peak system requirements, let’s increase and decrease the number of EC2 instances we rent for any given hour based on overall demand. For simplicity, assume a generic work-week load that rises and falls each weekday and remains low over the weekend.
- Daily spike traffic, Monday-Friday
- Baseline instances: 2
- Peak instances: 10
- Duration at peak: 8 hours, 30 minutes
- Ensure that the node type and size is unchanged from the previous scenario. The calculator will try to default you back to a tiny node.
AWS Budgets
As Tiger Enterprises grows, we’ll want to keep an eye not only on the total amount we spend at AWS, but also where that money is being spent on a service-by-service basis. We’ll want a budget, an AWS Budget. From the AWS documentation:
The AWS Budgets system enable you to plan your service usage, service costs, and instance reservations. Budgets provide you with a way to see the following information:
- How close your plan is to your budgeted amount or to the free tier limits
- Your usage to date, including how much you have used of your Reserved Instances (RIs)
- Your current estimated charges from AWS and how much your predicted usage will incur in charges by the end of the month
- How much of your budget has been used -- https://docs.aws.amazon.com/awsaccountbilling/latest/aboutv2/budgets-managing-costs.html
Unfortunately, AWS Academy student accounts do not have access to the billing console, and thus cannot create or use the AWS Budget functionality. Sorry.
AWS CloudWatch - Create a Billing Alarm
AWS CloudWatch allows you to monitor applications, their performance, and their resource utilization. With it you can get a unified view of your cloud usage and react according (for example, by scaling up or scaling down automatically).
In this exercise, we are going to use CloudWatch to create a series of billing alarms to send an email to you when the total estimated bill for this month exceeds certain modest thresholds. This is preferable to being surprised when the final bill arrives. These alerts can be adjusted as TigerEnterprises grows, but remember - the per-student quota for the entire semester is only $100!
Resources:
- Monitoring estimated charges with CloudWatch
- Note that Billing Alerts are already enabled, which is good because student accounts don’t have access to the Billing and Cost Management console to control that feature.
- As some aside reading, you might enjoy this blog post: “The AWS bill heard around the world” - July 26, 2020
To create your first alarm:
- Load the AWS Console
- Go to Services -> CloudWatch (it’s under “Management & Governance”)
- On the left panel, select “Billing” under the Alarms category to load the “Billing alarms” page
- Select “Create Alarm"
- For your alarm, use the following configuration
- Metric Name: EstimatedCharges
- Currency: USD
- Statistic: Maximum
- Period: 6 hours
- Billing metrics at AWS are refreshed every 6 hours, so you want CloudWatch to re-check this metric at the same rate.
- Threshold type: Static
- Whenever EstimatedCharges is…: Greater
- Threshold value: 5 USD
- Select “Next"
- For Configure actions, use the following configuration
- Alarm state trigger: In alarm
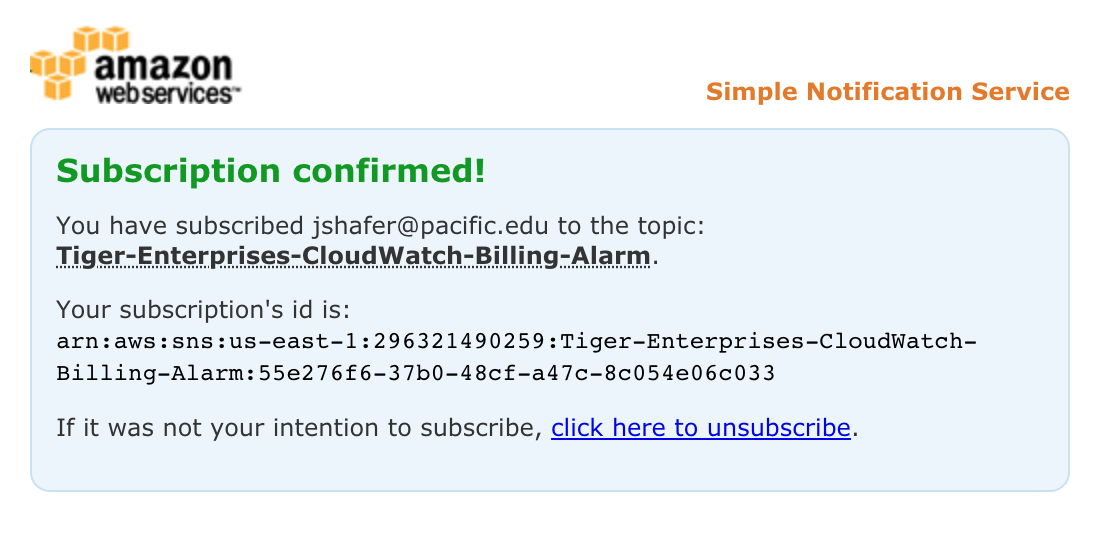
- Select an SNS topic: Create a new topic
- Topic name: Tiger-CloudWatch-Billing-Alarm
- Email endpoint: Your @u.pacific.edu email
- Select the “Create Topic” button
- Switch over to your email and follow the link to confirm your subscription
- Select “Next"
- Specify an alarm name: "Tiger CloudWatch Billing Alarm - Level 1"
- Select “Next” and preview alarm
- Select “Create alarm"
When initially created, the alarm will be in the “Insufficient Data” state, but for only a few minutes until the billing data is refreshed. From now on, you will receive an email when your total estimated bill for the current month exceeds $5 for the first time that month. You will only receive a single email for that event - once your estimated bill exceeds $5, alarm will be triggered and remain triggered until the next month when the bill resets back to $0.
To provide further alerting, copy that alarm in the console (via Actions->Copy) twice and produce two new alarms:
- "Tiger CloudWatch Billing Alarm - Level 2” : Alerts when the estimated bill > $10
- "Tiger CloudWatch Billing Alarm - Level 3” : Alerts when the estimated bill > $15
Lab Deliverables
Upload to the Lab 3 Canvas assignment all the lab deliverables to demonstrate your work:
- Private links to your two saved AWS pricing calculators for scenarios 1 and 2
- A summary of your pricing scenarios 1 and 2
- Total upfront cost in $
- Total monthly cost in $
- Screenshot of the CloudWatch console showing your 3 billing alarms, including their threshold values ($5, $10, $15) and current state of “OK”.