Lab 4 - Web Server (Part 1)
In this lab, you’re going to install a small webserver so Tiger Enterprises, Inc. can get its first online presence. NGINX is a popular open-source web server that can also be used as a load balancer, reverse proxy, and HTTP cache.
Objectives:
- Install an NGINX web server
- Load a simple website for Tiger Enterprises
- Run a security scan of the server's Internet-accessible ports
- Do a system configuration sanity-check
- Confirm that the web server is set to start automatically at bootup
- Confirm that the OS is set to automatically apply security updates
References:
Installation Process
By the end of Lab 4, your AWS configuration for Tiger Enterprises, Inc. should look like Figure 1.
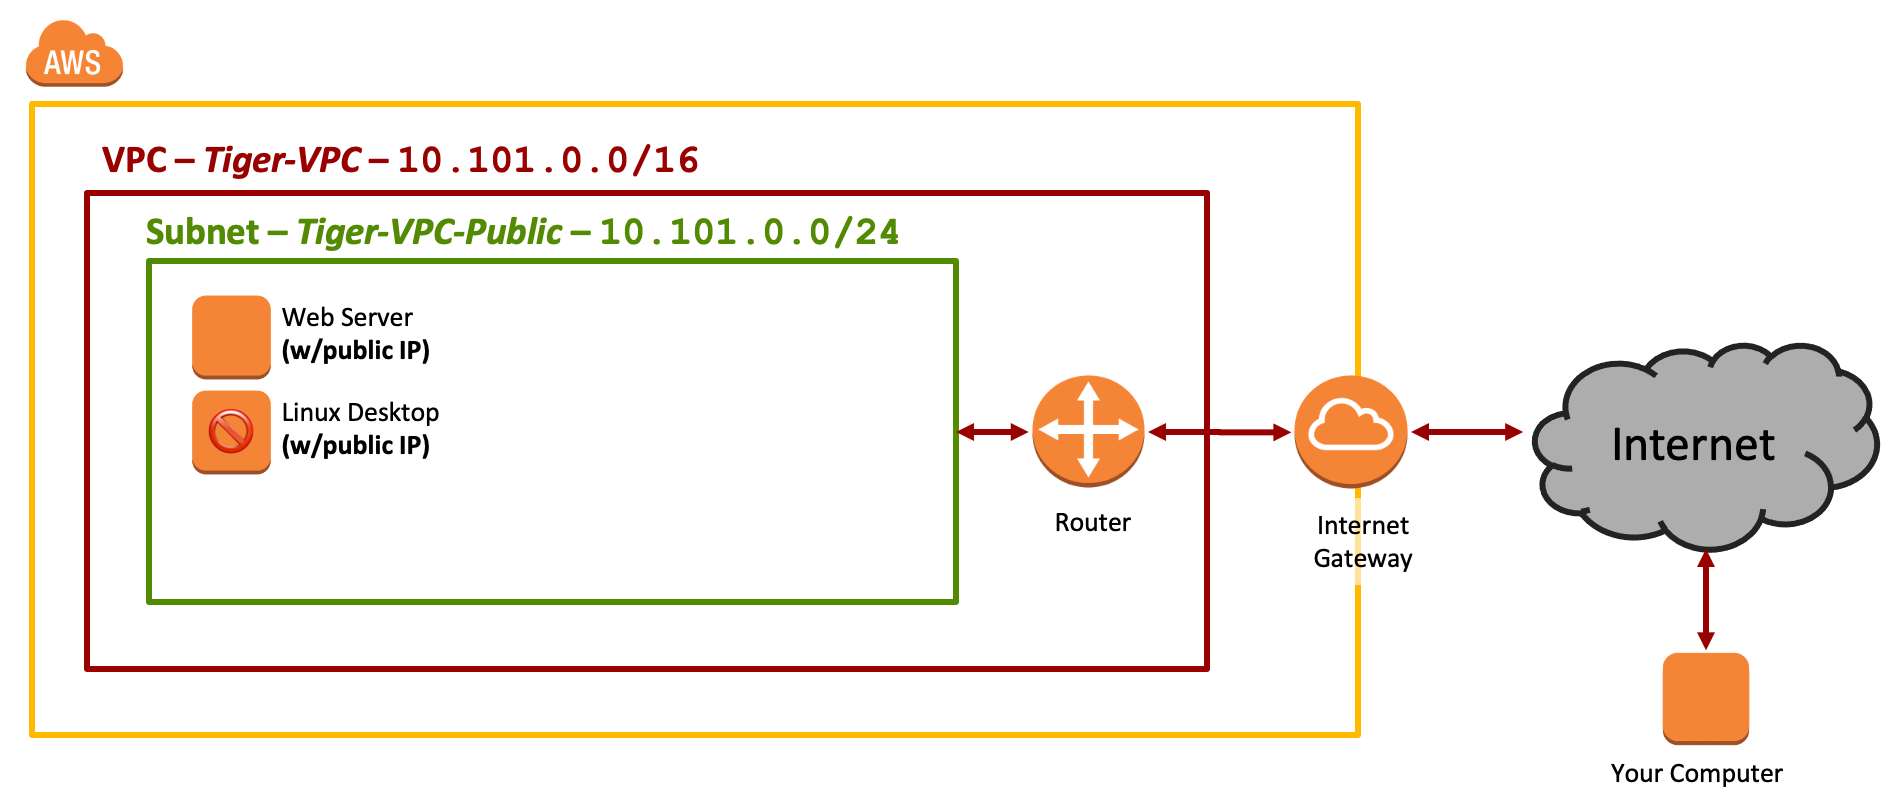
Figure 1: Network Diagram - Lab 4
Create AWS Security Group
Create a new security group at AWS:
- Name:
Tiger-SG-Webserver - Description:
Public Webserver (allow SSH, HTTP, HTTPS) - VPC:
Tiger-VPC - Inbound Rules:
SSHfrom sourceAnywhere-IPv4HTTPfrom sourceAnywhere-IPv4HTTPSfrom sourceAnywhere-IPv4All ICMP - IPv4from sourceAnywhere-IPv4(This permits ICMP pings for network debugging)
- Outbound Rules:
- Leave unchanged! (The default rules allow the instance to initiate traffic to anywhere)
Create AWS Instance
Create a new EC2 instance at AWS meeting the following requirements:
- AMI: Latest Amazon-provided Ubuntu 20.04 image - x86_64
- Instance type: t2.micro (1 vCPU, 1 GiB memory)
- Network: “Tiger-VPC"
- Subnet: “Tiger-VPC-Public"
- Auto-assign Public IP: Use Subnet setting (Enable)
- Storage: 8GiB with "Delete on Termination" enabled
- Tag: Name = "Web Server: Ubuntu"
- Security Group: Use existing security group: “Tiger-SG-Webserver"
- Keypair: Existing keypair / “COMP-175-Lab-1"
Connect to your new instance via SSH.
Install NGINX
Ensure Ubuntu is up-to-date:
$ sudo apt update  # Always good to check for the most recent files FIRST
$ sudo apt upgradeTip: The Ubuntu images have auto-update enabled, and may start updating immediately upon booting. Don't be alarmed if you can't update it manually at this time. It's common to see a message like this:
E: Could not get lock /var/lib/dpkg/lock-frontend - open (11: Resource temporarily unavailable)
E: Unable to acquire the dpkg frontend lock (/var/lib/dpkg/lock-frontend), is another process using it?
The "other process using it" is just the auto-updater running in the background.
Install NGINX from a pre-built package provided with your Linux distribution. Note that this might not always be the most up-to-date feature release, but most packages should receive security updates.
$ sudo apt install nginxWhich version was installed? How does this compare to the current version available for download at nginx.org?
$ sudo nginx -vConfigure NGINX
Pick a Domain Name
Although it won't be functional until a future lab, you should pick a domain name for the website now
so that you can properly enter it in the tiger-website configuration file below.
For consistency across the class, this domain name should be of the format www.STUDENT-NAME.tigerenterprises.org.
Pick what you want STUDENT-NAME to be, and use that in the configuration file shown below.
Suitable examples might be: jeff-shafer, jshafer, or shafer
Tip: Write down what STUDENT-NAME you chose. You'll need that info in the next two labs.
Otherwise, you'll have to go hunting for it in this config file.
The configuration files for NGINX are saved in the /etc/nginx/ directory. Of particular note are:
/etc/nginx/nginx.conf: Main configuration file/etc/nginx/sites-available/: Configuration files of individual websites that are available to be served (but not necessarily enabled)/etc/nginx/sites-enabled/: Symbol links to individual website configuration sites (insites-available) that are actively being served
At the command prompt, change to the sites-available directory
$ cd /etc/nginx/sites-available/You can inspect the existing default configuration file:
$ less default # Press arrow keys to scroll and 'q' to quitCreate a new text configuration file for the Tiger Enterprises website based on the generic example. You can use whatever text editor you want (emacs, Vim, etc...), but nano is the most user-friendly for new sysadmins. The editor needs to be run via sudo, because the entire /etc/nginx/ directory is owned by the root user, not your ubuntu user.
$ sudo nano tiger-websiteThe contents of the tiger-website configuration file:
server {
    # Listen - What ports (IPv4 and IPv6) should the server listen on?
    listen 80;
    listen [::]:80 default_server;

    # Index - What file should be sent if none is specified? (e.g. www.example.com)
    index index.html;

    # Root - Where are the website files on disk?
    root /var/www/tiger-website;

    # Server_Name - What is the DNS name of this site?
    # NOTE: This will be fully configured in a FUTURE LAB
    server_name www.STUDENT-NAME.tigerenterprises.org;

    location / {
        # First attempt to serve request as file, then
        # as directory, then fall back to displaying a 404.
        try_files $uri $uri/ =404;
    }
}
To "save" in the Nano editor is referred to as "Write Out". It's CTRL-O, as shown in the help text at the bottom of the window. Write out the file, and then exit.
Now let's enable this website:
# Enter the sites-enabled directory
$ cd /etc/nginx/sites-enabled/

# Get a directory listing.  You should a symbolic link, where "default"
# points to the default configuration file under sites-available
$ ls -ls

# Disable the old default website by removing the symbolic link to its configuration file
$ sudo rm default

# Enable the new tiger-website by adding a symbolic link to its configuration file
$ sudo ln -s ../sites-available/tiger-website

# Confirm your new symbolic link is present
$ ls -ls
Test the configuration, and if it passes, restart the server so the configuration takes effect. Otherwise, go back and double-check the contents of tiger-website.
$ sudo nginx -t
$ sudo systemctl restart nginx
Load the Demo Website
A demo website is available to use as a suitably generic landing page for Tiger Enterprises. It is heavily based on the "Startup Template" provided by W3Schools.
Instructions:
- Transfer the demo_site.zip file to your server by any means you prefer. Obvious options include using
wgetat the command line to download the file right onto the server, or using a file transfer protcol (SFTP or SCP) to copy it from your local computer to the remote server. - Move the .zip file to the website directory location that was previously specified in the NGINX site configuration file -
/var/www/tiger-website/. Note that this directory does not exist yet - you will need to create it. - Extract the .zip file. The
unzipcommand would be useful here, but it's not installed on your system by default. Take a wild guess at what thesudo apt install XXXcommand would be to obtain it. And if you don't feel like guessing, search the package library for software containing the description or name "unzip" with the commandsudo apt search unzip. - Verify that the
index.htmlfile is directly inside the website directory location, along with the images folderw3images. - Confirm that the site functions correctly by loading it in your web browser at the public IP or public DNS name for your EC2 instance. In other words, http://PUBLIC-IP or http://ec2-XX-YY-ZZ-AA.compute-1.amazonaws.com
Warning - Modern web browsers default to connecting to websites over HTTPS. But, we have not yet configured HTTPS for your website yet. Make very sure in the URL bar that you are connecting to http:// and NOT https://
Document your successful configuration of the website with a screenshot of your web browser clearly showing the page (with images) and the URL.
Security Scan
As a sanity check, let's ensure there are no unexpected services running on your new server, and no unknown ports open through the AWS Security Group. Nmap is a popular tool for this purpose.
Nmap ("Network Mapper") is a free and open source (license) utility for network discovery and security auditing. Many systems and network administrators also find it useful for tasks such as network inventory, managing service upgrade schedules, and monitoring host or service uptime. Nmap uses raw IP packets in novel ways to determine what hosts are available on the network, what services (application name and version) those hosts are offering, what operating systems (and OS versions) they are running, what type of packet filters/firewalls are in use, and dozens of other characteristics. It was designed to rapidly scan large networks, but works fine against single hosts. Nmap runs on all major computer operating systems, and official binary packages are available for Linux, Windows, and Mac OS X. --nmap.org
Requirements:
- Run an Nmap scan of your server (and only your server) by IP address or hostname. You can install Nmap in your native OS, or if you have a Linux virtual machine lying around from another class, install it via the package manager in your Linux system.
- The Nmap scan should be an "ALL" scan, which in addition to checking if ports are open, also runs OS and Service detection algorithms to learn more about the targeted server. At the command line, this would be
nmap -Afollowed by the IP address or hostname (or even subnet or list of systems) you wish to scan.
This Nmap scan should be done external to your AWS instance and VPC. The scan needs to be run through the public Internet - you cannot submit a Nmap result of the web server scanning itself.
Document your results as a text file for a lab deliverable, and then copy and paste the text into the Canvas question for submission.
Configuration Sanity Check
Finally, before declaring the system "good to go", let's do a basic configuration sanity-check:
Confirm that the web server is set to start automatically at bootup
Systemd is a system and service manager for Linux. You can obtain a list of all running services via:
# nginx.service should be in this list along with ssh.service, since you know both are currently running
$ systemctl --type=service --state=running
To check the nginx service is enabled to start at boot, run:
$ systemctl is-enabled nginxIn the future, if you want to enable or disable a service from starting at boot, you can control it via
$ sudo systemctl enable <SERVICE NAME>
$ sudo systemctl disable <SERVICE NAME>
Confirm that the OS is set to automatically apply security updates
The package manager on Ubuntu and Debian-based distributions is "Apt". To check if Apt is set to automatically check for updated packages and install updated packages, view the file /etc/apt/apt.conf.d/20auto-upgrades. You should see the following lines in it:
APT::Periodic::Update-Package-Lists "1";
APT::Periodic::Unattended-Upgrade "1";
Document your configuration sanity checks with screenshot(s), showing that
(a) NGINX is set to automatically start, and
(b) The OS is set to automatically apply security updates.
Lab Deliverables
After submitting the Canvas assignment, you should STOP your virtual machine, not terminate it. We'll use this instance again in future labs, and thus want to save the configuration and OS data.
Upload to the Lab 4 Canvas assignment all the lab deliverables to demonstrate your work:
- Short Answer: Which version of Nginx was installed from the Ubuntu package manager? How does this compare to the current available version at nginx.com? (Note that nginx.org is the open-source project page, not the corporate site, and makes it a bit easier to find the latest version number)
- Screenshot of the website successfully viewed by your web browser
- Short Answer: Provide the text output of the Nmap security scan of your web server in "ALL" mode (which runs OS and Service Detection)
- Essay Question: How does the output of the Nmap scan compare to what you know about the system you just finished creating?
- Screenshot: Provide screenshot(s) documenting that the web server is set to start automatically at system boot, and that the OS is set to automatically apply security updates on a regular schedule.
- Essay Question: What are the tradeoffs between having a server OS automatically apply security updates versus having an administrator manually install updates?