Lab 5 - Web Server (Part 2)
In this lab, you’re going to continue to configure the online presence for Tiger Enterprises, Inc., to make it more robust, scalable, and secure for future growth.
Concern from “The Boss”
- What’s going to happen when our website is too popular for a single server to manage?
- What happens if our single webserver fails? Is our site suddenly inaccessible?
Objectives:
- Install an NGINX load balancer in front of (what could be) a pool of individual web servers
- Change the security group for the existing webserver, since it no longer needs to be accessible from the public Internet.
- SSH to the now publicly-inaccessible webserver by pivoting through the load balancer
- Assign hostnames so machines are clearly identified at the command prompt
Installation Process
By the end of Lab 5, your AWS configuration for Tiger Enterprises, Inc. should look like Figure 1.
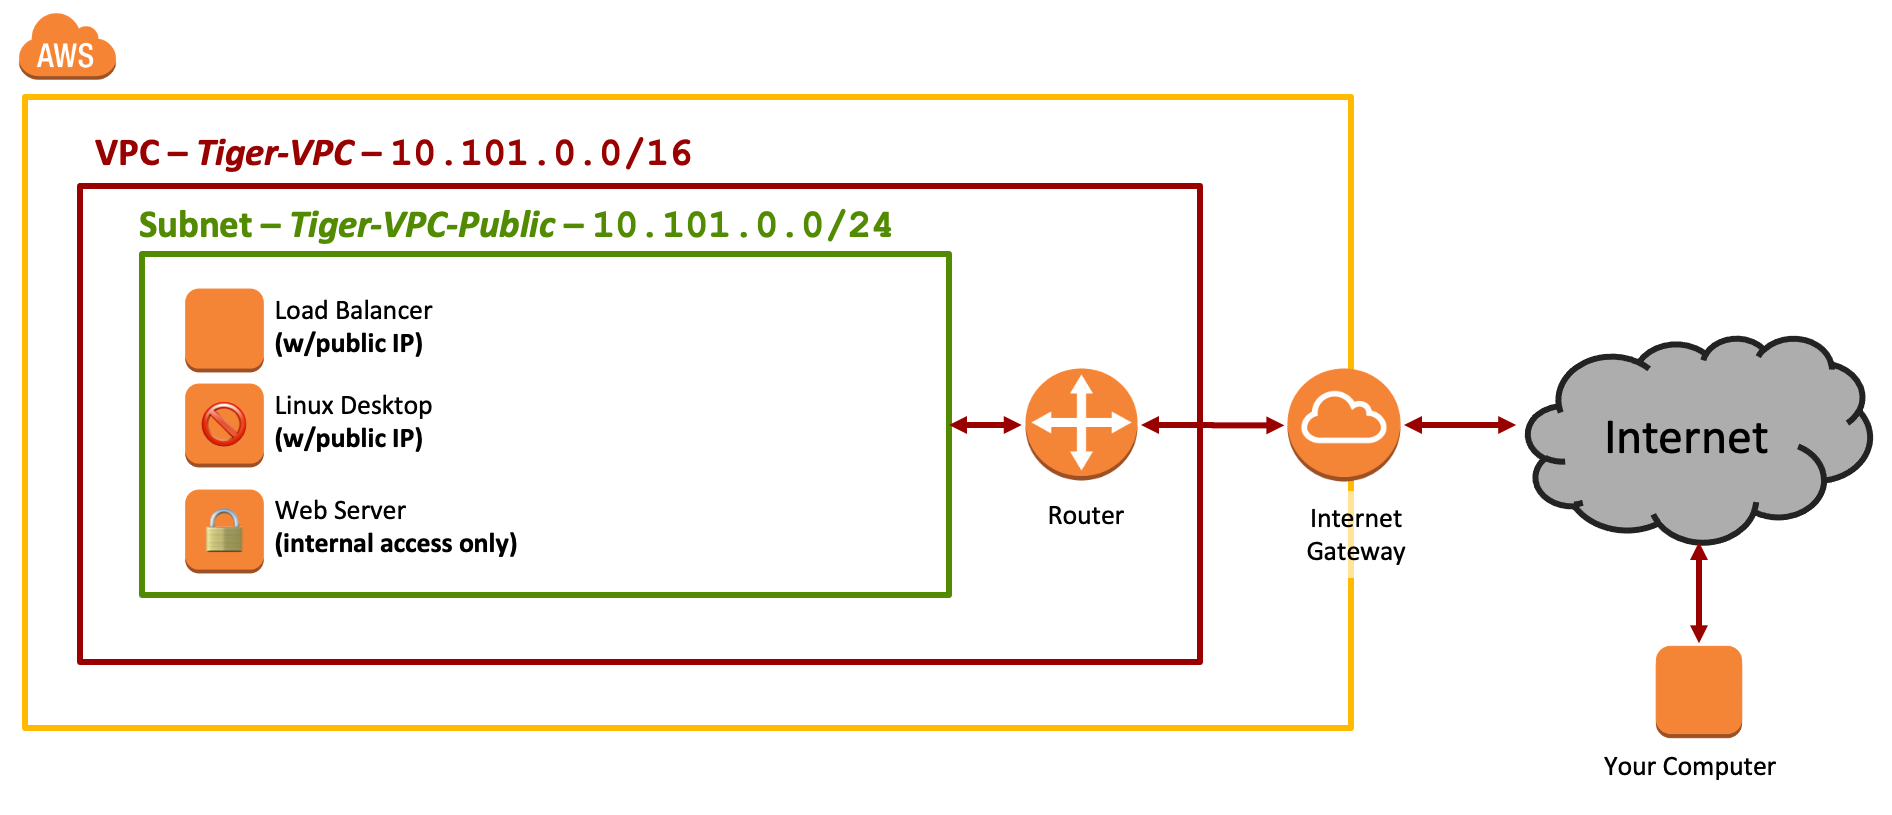
Figure 1: Network Diagram - Lab 5
Part 1 - Design and Pricing
Before we begin implementation, let’s think about the design of this system.
Elastic IP: Our public server (the load balancer, in this case) needs a fixed IP address that can be configured in DNS. At Amazon, this would be an "Elastic IP" - a reserved IPv4 address that is saved even when an EC2 instance is shut down.
What is this going to cost us? Price out two scenarios at https://calculator.aws:
Scenario 1 - We reserve the IP but barely use it
- Region: US East (N.Virginia)
- ElasticIP
- 1 EC2 instance
- 1 EIP per instance
- 10 hours/month attached to a running instance
- 720 hours/month associated with a stopped instance
- 0 remap
What is the MONTHLY COST of just having this IP address saved but barely used?
Scenario 2 - We reserve the IP and keep it attached to a running 24/7 instance of the second-smallest, second-cheapest server AWS offers
- Region: US East (N.Virginia)
- ElasticIP
- 1 EC2 instance
- 1 EIP per instance
- 730 hours/month attached to a running instance
- 0 hours/month associated with a stopped instance
- 0 remap
- EC2
- Linux
- vCPUs: 2
- Memory: 1GB (there’s a cheaper server with 0.5GB of RAM, but that’s really tiny)
- t3a.micro
- Qty: 1
- On-Demand pricing
- 8GB of EBS
It’s almost as cheap to keep the load balancer / gateway system running... (And with reserved instances with upfront payment, it would cheaper still).
Deliverables
- Cost estimate for Scenario 1 ($$/month) plus a link to the saved calculation
- Cost estimate for Scenario 2 ($$/month) plus a link to the saved calculation
Part 2 - Change Security Group of Web Server
The original web server from the previous lab was publicly accessible, since it was intended to be accessed by clients across the public Internet. In the new network design, however, the only publicly accessible web host is the load balancer, and all the web servers should not be accessible from the Internet.
Create a new security group at AWS:
- Name:
Tiger-SG-Webserver-Private - Description:
Private Webserver (allow SSH, HTTP, HTTPS internally) - VPC:
Tiger-VPC - Inbound Rules:
SSHfrom sourceCustomin CIDR block10.101.0.0/24(e.g. the Tiger-VPC-Public subnet)HTTPfrom sourceCustomin CIDR block10.101.0.0/24HTTPSfrom sourceCustomin CIDR block10.101.0.0/24All ICMP - IPv4from sourceAnywhere-IPv4(This permits ICMP pings for network debugging)
- Outbound Rules:
- Leave unchanged! (The default rules allow the instance to initiate traffic to anywhere)
Then, go find the existing web server, and change the security group applied to it.
Under the EC2 console, go to Instances:
- Locate the Web Server instance. If you followed the instructions in the previous labs and tagged your machines, this volume should have the Name tag “Web Server: Ubuntu"
- Right-click and choose Security->Change Security Groups
- Click the "Remove" button associated with the previous security group "Tiger-SG-Webserver"
- Enter the new security group name in the search box ("Tiger-SG-Webserver-Private") and click "Add security Group"
- Confirm that you want to "Save" your changes
Part 3 - Install NGINX Load Balancer
Next, install NGINX as a load balancer into a new VM. Yes, NGINX can be used as a load balancer in addition to a web server.
Resources:
Create a new EC2 instance at AWS meeting the following requirements:
- AMI: Latest Amazon-provided Ubuntu 20.04 image - x86_64
- Instance type: t2.micro (1 vCPU, 1 GiB memory)
- Network: “Tiger-VPC"
- Subnet: “Tiger-VPC-Public" # Ensure the load balancer is in the public subnet
- Auto-assign Public IP: Use Subnet setting (Enable)
- Storage: 8GiB with "Delete on Termination" enabled
- Tag: Name = “Web Load Balancer"
- Security Group: Use existing security group: “Tiger-SG-Webserver"
- Keypair: Existing keypair / “COMP-175-Lab-1"
Connect to your new system via SSH.
Install NGINX on the load balancer.
$ sudo apt update
$ sudo apt upgrade
$ sudo apt install nginx
Following the process from the previous lab, create a NGINX configuration file called load-balancer with the following contents:
load-balancer:
upstream tigerweb1 {
    # Balancing method:  ip_hash
    # With ip-hash, the client’s IP address is used as a hashing key
    # to determine what server in a server group should be selected
    # for the client’s requests. This method ensures that the requests
    # from the same client will always be directed to the same server
    # except when this server is unavailable.
    # See: http://nginx.org/en/docs/http/load_balancing.html
    ip_hash;
    server IP-OF-PRIVATE-WEB-SERVER;
    # There could be a long list of servers here to load balance between
    # server …
    # server …
    # server …
}

server {
    # Load balancer will listen on port 80
    listen 80;

    # DNS name for this web site
    server_name www.STUDENT-NAME.tigerenterprises.org;

    location / {
        # Set proxy headers
        proxy_set_header        Host $host;
        proxy_set_header        X-Real-IP $remote_addr;
        proxy_set_header        X-Forwarded-For
        $proxy_add_x_forwarded_for;

        # Load balancer will proxy all requests to the list of “upstream”
        # servers previously defined
        proxy_pass http://tigerweb1;
    }
}
Be sure to replace IP-OF-PRIVATE-WEB-SERVER with your actual internal IP (10.101.0.???)
Be sure to replace STUDENT-NAME with the actual DNS name you chose in the previous lab
When finished, activate this configuration. You should also deactivate the default configuration.
NGINX Configuration steps:
- Create the configuration file
- Be sure to update
server_nameto be your desired hostname. Pick a variation of your name so it’s easy to tell, across the class, whose system it is. You’ll communicate this name to the instructor in the next lab which focuses on DNS. (Note that the hostname will be nonfunctional until then) - Be sure to update
serverto be the IP of the private web server. You can find this 10.101.0.x address in the EC2 console.
- Be sure to update
- Activate the
load-balancerconfiguration - Deactivate the
defaultconfiguration - Test the NGINX configuration
- Restart NGINX and ensure that it successfully starts
On your personal computer, launch a web browser and try to access http://PUBLIC-IP-OF-LOAD-BALANCER
Deliverables:
- Screenshot of the EC2 console showing two instances running AND their public IP AND their private IP. You can use the gear icon to enable the “Private IP address” column in the table.
- Screenshot of your website as accessed via the URL http://PUBLIC-IP-OF-LOAD-BALANCER
Part 4 - SSH Pivoting
We want to SSH from our personal computer, to the load balancer, and then through the load balancer to the web server (which is not publicly accessible). But there’s a catch - we need the security key (on local disk) in order to authenticate with the web server. You could just drop the file on the load balancer. But what a horrible security risk that would be! What if an attacker gains access to that single system? You’ve left the entire keys to the kingdom just lying there to be taken! There must be a better way that keeps your private keys on your system.
References:
Windows users will need to configure MobaXTerm via the GUI to use an SSH Agent.
- Go to the global Settings->Configuration
- Select the "SSH tab"
- Enable “Use internal SSH agent "MobAgent"
- Enable “Forward SSH agents”
- Click the "+" button and specify that your COMP-175-Lab-1.pem key should be loaded automatically at MobAgent Startup
- Restart MobaXTerm.
- Now, your SSH agent will always have your private available to login with.
Reference: http://docs.gcc.rug.nl/hyperchicken/ssh-agent-forwarding-mobaxterm/
As another option, Windows 10 users could also enable Windows Subsystem for Linux to have the same “OpenSSH” commands as Linux or Mac users.
Mac and Linux users can use the agent via the command line.
On your computer, add the private AWS key to your “SSH agent”: ssh-add -k COMP-175-Lab-1.pem
Note that the SSH agent only stores your key in memory for security. When you reboot your computer, this will be wiped and you'll need to add the key to your agent again.
Verify that the agent is now tracking this key: ssh-add -L
Now when you log onto your EC2 instance, you don’t need the -i COMP-175-Lab-1.pem part of the command. Instead, use the -A flag instead to ask the agent to use your stored credential
$ ssh -A ubuntu@ec2-AA-BB-CC-DD.compute-1.amazonaws.com (Update command based on your public IP or hostname)
Now that your key has been loaded into your agent, SSH into your load balancer with the agent enabled.
Now here’s the neat part. Since the agent has access to your credential, you can ask the agent on the load balancer to communicate with the agent on your computer to access the credential on your behalf. While you are at the command prompt on the load balancer, invoke SSH and the agent to log onto the web server.
$ ssh -A ubuntu@AA.BB.CC.DD # Use the private 10.x.x.x IP of your web serverSuccess! Now you have SSH’d from your computer, to the load balancer, and then via the load balancer SSH’d into the private web server.
As long as we have console access to both the load balancer and the web server, let’s do something about their internal hostnames, which are shown on the command prompt. “ip-10.101.0.10” (or similar) is not a very helpful hostname, don’t you think? What about load-balancer and web1 instead?
Change the hostnames for the load balancer and web server to load-balancer and web1, respectively. Helpful instructions are available on how to accomplish this task on Ubuntu. Be sure to change the hostname using hostnamectl, and also make the suggested edits to the /etc/hosts and /etc/cloud/cloud.cfg files too.
$ sudo hostnamectl set-hostname NEW-NAME-HERE

$ sudo nano /etc/hosts
# Add line at the top: 127.0.0.1  NEW-NAME-HERE
# Afterwards, your file should look like:
#    127.0.0.1 localhost
#    127.0.0.1 NEW-NAME-HERE
#    ... Other lines follow ...

$ sudo nano /etc/cloud/cloud.cfg
# Change preserve_hostname from false to true
When finished, log out and log back in. Your command prompt should show the new hostname, and the output of hostnamectl should look like this example for the load balancer:
ubuntu@load-balancer:~$ hostnamectl
   Static hostname: load-balancer
         Icon name: computer-vm
           Chassis: vm
        Machine ID: 5a346ab28fc04d858ec8cd085c7fc28d
           Boot ID: 1a5870397cb24c86839a0c1d08b77e5f
    Virtualization: xen
  Operating System: Ubuntu 20.04.1 LTS
            Kernel: Linux 5.4.0-1021-aws
      Architecture: x86-64

ubuntu@load-balancer:~$ hostname
load-balancer
Deliverables:
- Screenshot showing you SSH’d to the load balancer, and from there pivoted (via SSH) to connect to the web server. On each server (load balancer and web server), run the command
ip addr - Screenshot(s) showing the command prompt of the load balancer and the web server with the hostnames changed to
load-balancerandweb1
Lab Deliverables
After submitting the Canvas assignment, you should STOP your virtual machines, not terminate them. We'll use them again in future labs, and thus want to save the configuration and OS data.
Upload to the Lab 5 Canvas assignment all the lab deliverables to demonstrate your work:
- Part 1 - Design and Pricing
- Answers to the two pricing calculator questions
- Part 3 - NGINX load balancer
- Screenshot of the EC2 console showing two instances running AND their public IP AND their private IP. You can use the gear icon to enable the “Private IP address” column in the table
- Screenshot of your website as accessed via the URL http://PUBLIC-IP-OF-LOAD-BALANCER
- Part 4 - SSH Pivoting
- Screenshot showing you SSH’d to the load balancer, and from there pivoting (via SSH) to connect to the web server. On each server (load balancer and web server), run the command “ip addr"
- Screenshot(s) showing the command prompt of the load balancer and the web server with the hostnames changed to
load-balancerandweb1