Lab 7 - VPN
In this lab, you’re going to provide remote VPN access to private systems of Tiger Enterprises, allowing employees to access critical work resources remotely.
Installation Process
By the end of Lab 7, your AWS configuration for Tiger Enterprises, Inc. should look like Figure 1.
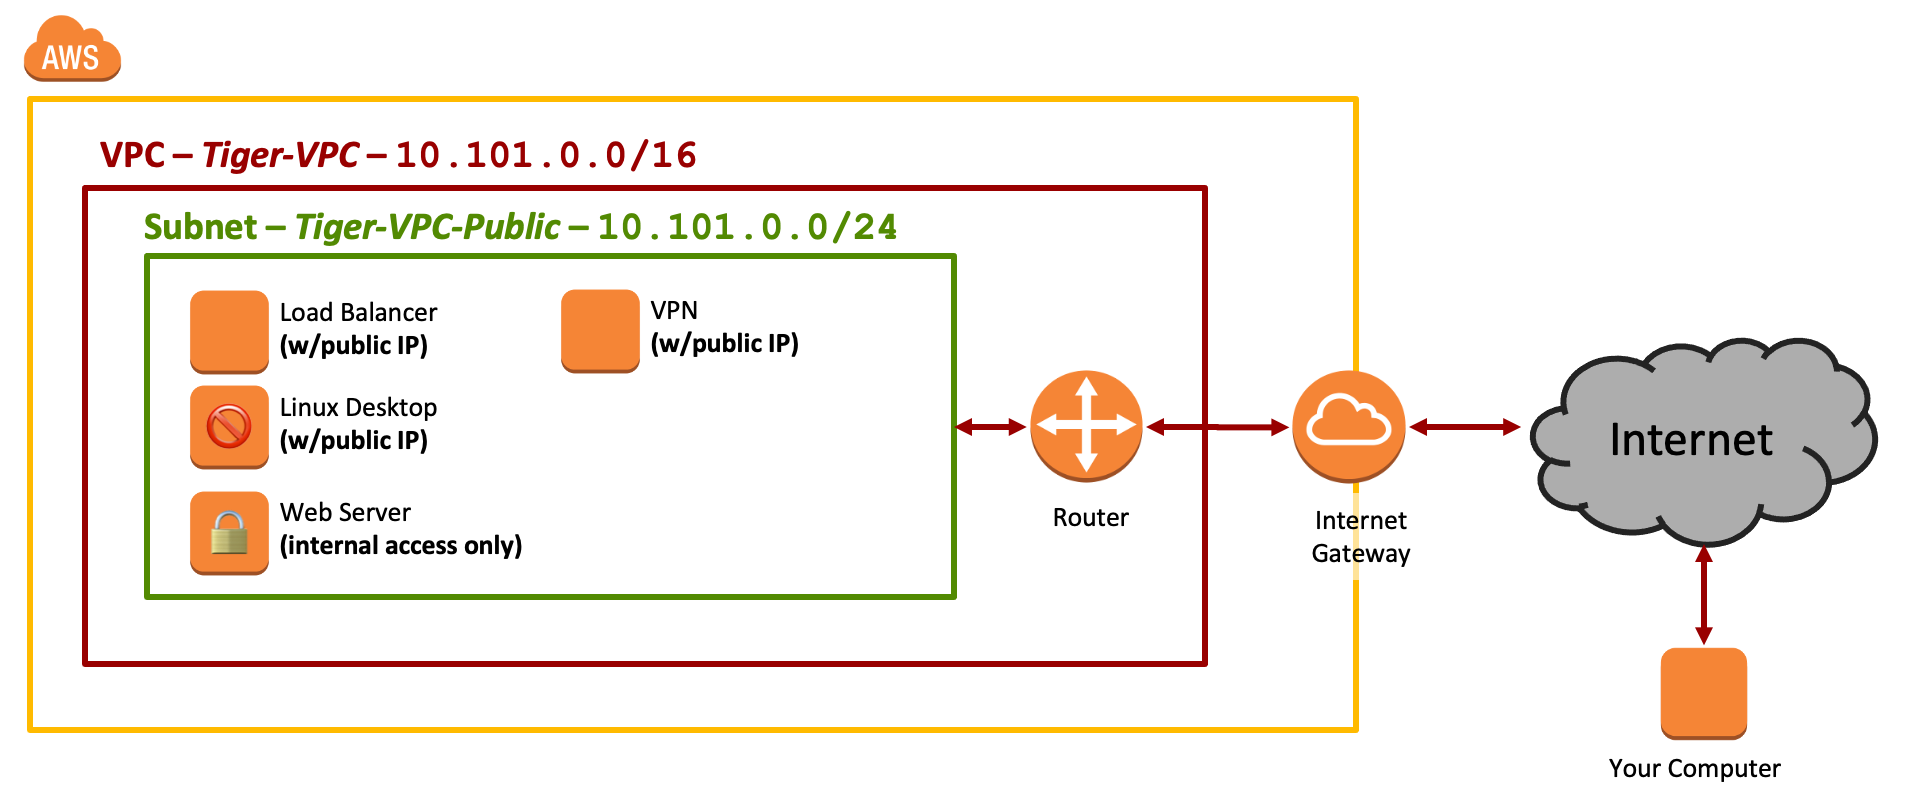
Figure 1: Network Diagram - Lab 7
Part 1 - VPN Server Configuration

For the VPN, we are going to use WireGuard, a new VPN that was written with the goals of being simple, high performing, cryptographically sound, and having a minimal attack surface. Let’s make a VPN server for Tiger Enterprises.
References:
- Getting started with WireGuard VPN: Important Concepts
- How to set up WireGuard VPN server on Ubuntu 20.04
You will configure the VPN to create a new "virtual" (or "overlay") network with its own set of IP addresses. This overlay network will allow access to private systems in Tiger-VPC that are not publicly accessible.
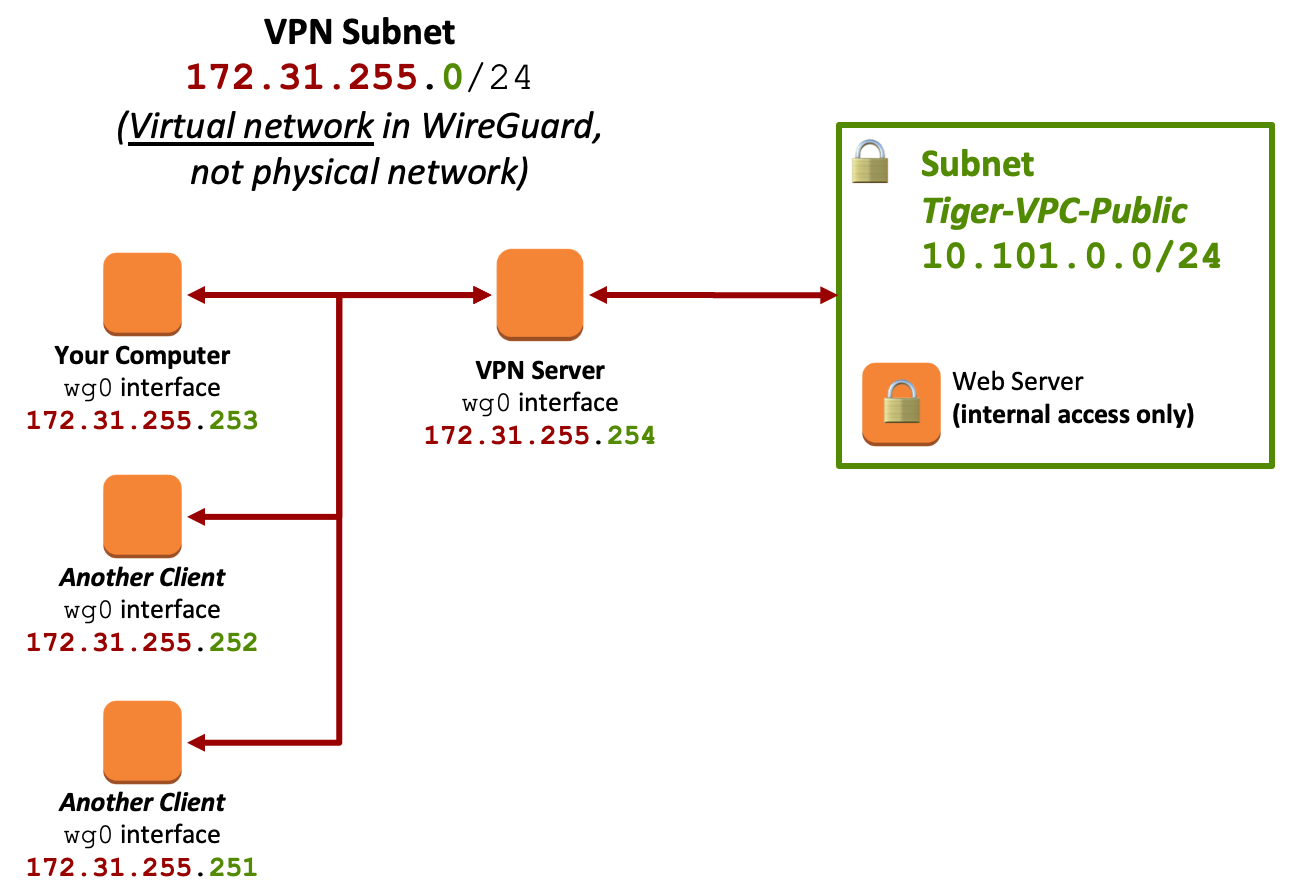
Figure 2: Network Diagram - Lab 7 - VPN Network
Create a new Security Group meeting the following requirements:
- Name:
Tiger-SG-VPN - VPC:
Tiger-VPC - Inbound rules:
SSHfrom sourceAnywhere-IPv4Custom UDPon port51820from sourceAnywhere-IPv4(UDP port 51820 is the WireGuard port)All ICMP - IPv4from sourceAnywhere-IPv4(This permits ICMP pings for network debugging)All trafficfrom sourcecustomwithin CIDR block10.101.0.0/24, which is the entire Tiger-VPC-Public subnet
- Outbound Rules:
- Leave unchanged! (The default rules allow the instance to initiate traffic to anywhere)
Create a new EC2 instance at AWS meeting the following requirements:
- AMI: Latest Amazon-provided Ubuntu 20.04 image - x86_64
- Instance type: t2.micro (1 vCPU, 1 GiB memory)
- Network: “Tiger-VPC"
- Subnet: “Tiger-VPC-Public” # Select the PUBLIC subnet
- Auto-assign Public IP: Use Subnet setting (Enable)
- Storage: 8GiB with "Delete on Termination" enabled
- Tag: Name = “VPN: Ubuntu 20.04"
- Security Group: Use existing security group: “Tiger-SG-VPN"
- Keypair: Existing keypair / “COMP-175-Lab-1"
Assign this server a domain name (vpn.STUDENT-NAME.tigerenterprises.org) in the Route53 console:
- Select the existing hosted zone for your part of tigerenterprises.org (e.g. STUDENT-NAME.tigerenterprises.org)
- Select "Create record"
- Record name:
vpn(.STUDENT-NAME.tigerenterprises.org) - Record type: “A - Routes traffic to an IPv4 address"
- Endpoint: IP Address or another value
- Enter the public IP address of your VPN instance
- TTL: 300 seconds
- Routing policy: Simple Routing
- Select "Create records"
SSH to your new VPN server using the domain name you just created: vpn.STUDENT-NAME.tigerenterprises.org
Install Wireguard on the server:
$ sudo apt update
$ sudo apt upgrade
$ sudo apt install wireguard
Generate public and private keys for the server:
# Make the directory (-p will make the entire path of directories all at once)
# The directory, and the files, should all be owned by root
$ sudo mkdir -p /etc/wireguard/keys
#
# Make private key
# You'll get a warning here about "writing to a world accessible file".
# Ignore the warning, as the key will be secured later.
$ sudo bash -c "wg genkey > /etc/wireguard/keys/server.key"
#
# Make public key from private key
$ sudo bash -c "wg pubkey < /etc/wireguard/keys/server.key > /etc/wireguard/keys/server.pub.key"
Print the private key on the screen - you’ll need it in a moment
$ echo "SERVER PRIVATE KEY (SUPER SECRET):"
$ sudo cat /etc/wireguard/keys/server.key
Copy the private key somewhere temporarily….
Create a configuration file for the WireGuard VPN. In this configuration file, you’re going to specify:
- The internal IP and subnet that the VPN endpoint will take. This should be something completely different from Tiger-VPC - think of it as a different network entirely, one that is only used by all the WireGuard VPN peers to communicate amongst themselves. Let’s use something in the 172.16.0.0/12 private subnet, specifically 172.31.255.254/24.
- Listen on UDP port 51820, which is Wireguard’s default
- Use the private key already created
- Use network address translation (NAT) to translate between internal VPN IPs and the normal Tiger-VPC IP addresses
- Save any changes made using the CLI to this configuration file later (so changes will persist after a reboot)
$ sudo nano /etc/wireguard/wg0.conf[Interface]
Address = 172.31.255.254/24
ListenPort = 51820
PrivateKey = YOUR_SERVER_PRIVATE_KEY
PostUp = iptables -A FORWARD -i %i -j ACCEPT; iptables -t nat -A POSTROUTING -o eth0 -j MASQUERADE
PostDown = iptables -D FORWARD -i %i -j ACCEPT; iptables -t nat -D POSTROUTING -o eth0 -j MASQUERADE
SaveConfig = trueFor security, ensure that the configuration file and the server private key are only readable by the root user:
$ sudo chmod 600 /etc/wireguard/wg0.conf /etc/wireguard/keys/server.keyActivate the “WireGuard Interface” wg0
$ sudo wg-quick up wg0
# Should see output like this:
[#] ip link add wg0 type wireguard
[#] wg setconf wg0 /dev/fd/63
[#] ip -4 address add 172.31.255.254/24 dev wg0
[#] ip link set mtu 8921 up dev wg0
[#] iptables -A FORWARD -i wg0 -j ACCEPT; iptables -t nat -A POSTROUTING -o eth0 -j MASQUERADE
Check the status of the wg0 interface
$ sudo wg show wg0
# Should see output like this:
interface: wg0
  public key: KUHE+UQfxkfBj49qOQyioGcSATYGGQGUz+uYmQa8rlk=
  private key: (hidden)
  listening port: 51820
Start the Wireguard interface automatically at boot
$ sudo systemctl enable wg-quick@wg0Enable IP forwarding to start automatically at boot
$ sudo nano /etc/sysctl.conf
# Find the line #net.ipv4.ip_forward=1
# UNCOMMENT IT
# (thus, setting ip_forward = 1)
Then, apply the changes after saving the file, so it takes effect immediately:
$ sudo sysctl -pPrint the public key on the screen - you’ll need it in a moment
$ echo "SERVER PUBLIC KEY (OK TO SHARE WITH CLIENTS):"
$ sudo cat /etc/wireguard/keys/server.pub.key
Change the hostname of this system to vpn using the process from a previous lab. Remember, you’ll need to use or edit
hostnamectl/etc/hostsfile/etc/cloud/cloud.cfgfile
Part 2 - VPN Client Configuration
WireGuard has many clients available (WIndows, macOS, Android, iOS, etc…). Go the the WireGuard Installation Page and download the client for your OS.
References:
- Note that these are good tutorials, but written for a generic VPN (where ALL network traffic goes through the VPN). In our use case, we only want traffic for the Tiger VPC Private subnet to go through the VPN. Be sure to use the configuration file below for that use case.
- How to Configure a WireGuard MacOS client
- How to Configure a WireGuard Windows 10 client
For your client configuration:
- The client Address should also be an unused IP in that same 172.16.0.0/12 subnet. Let’s pick 172.31.255.253/24. (To clarify, your VPN server is .254 in this subnet. Clients of the VPN server will be .253, .252, , .251, etc...)
- The client AllowedIPs should be the Tiger VPC Public - The only destination addresses we want the client to reach over the VPN tunnel are those in the Public subnet.
- The Endpoint should be the DNS name of your VPN server, as created previously.
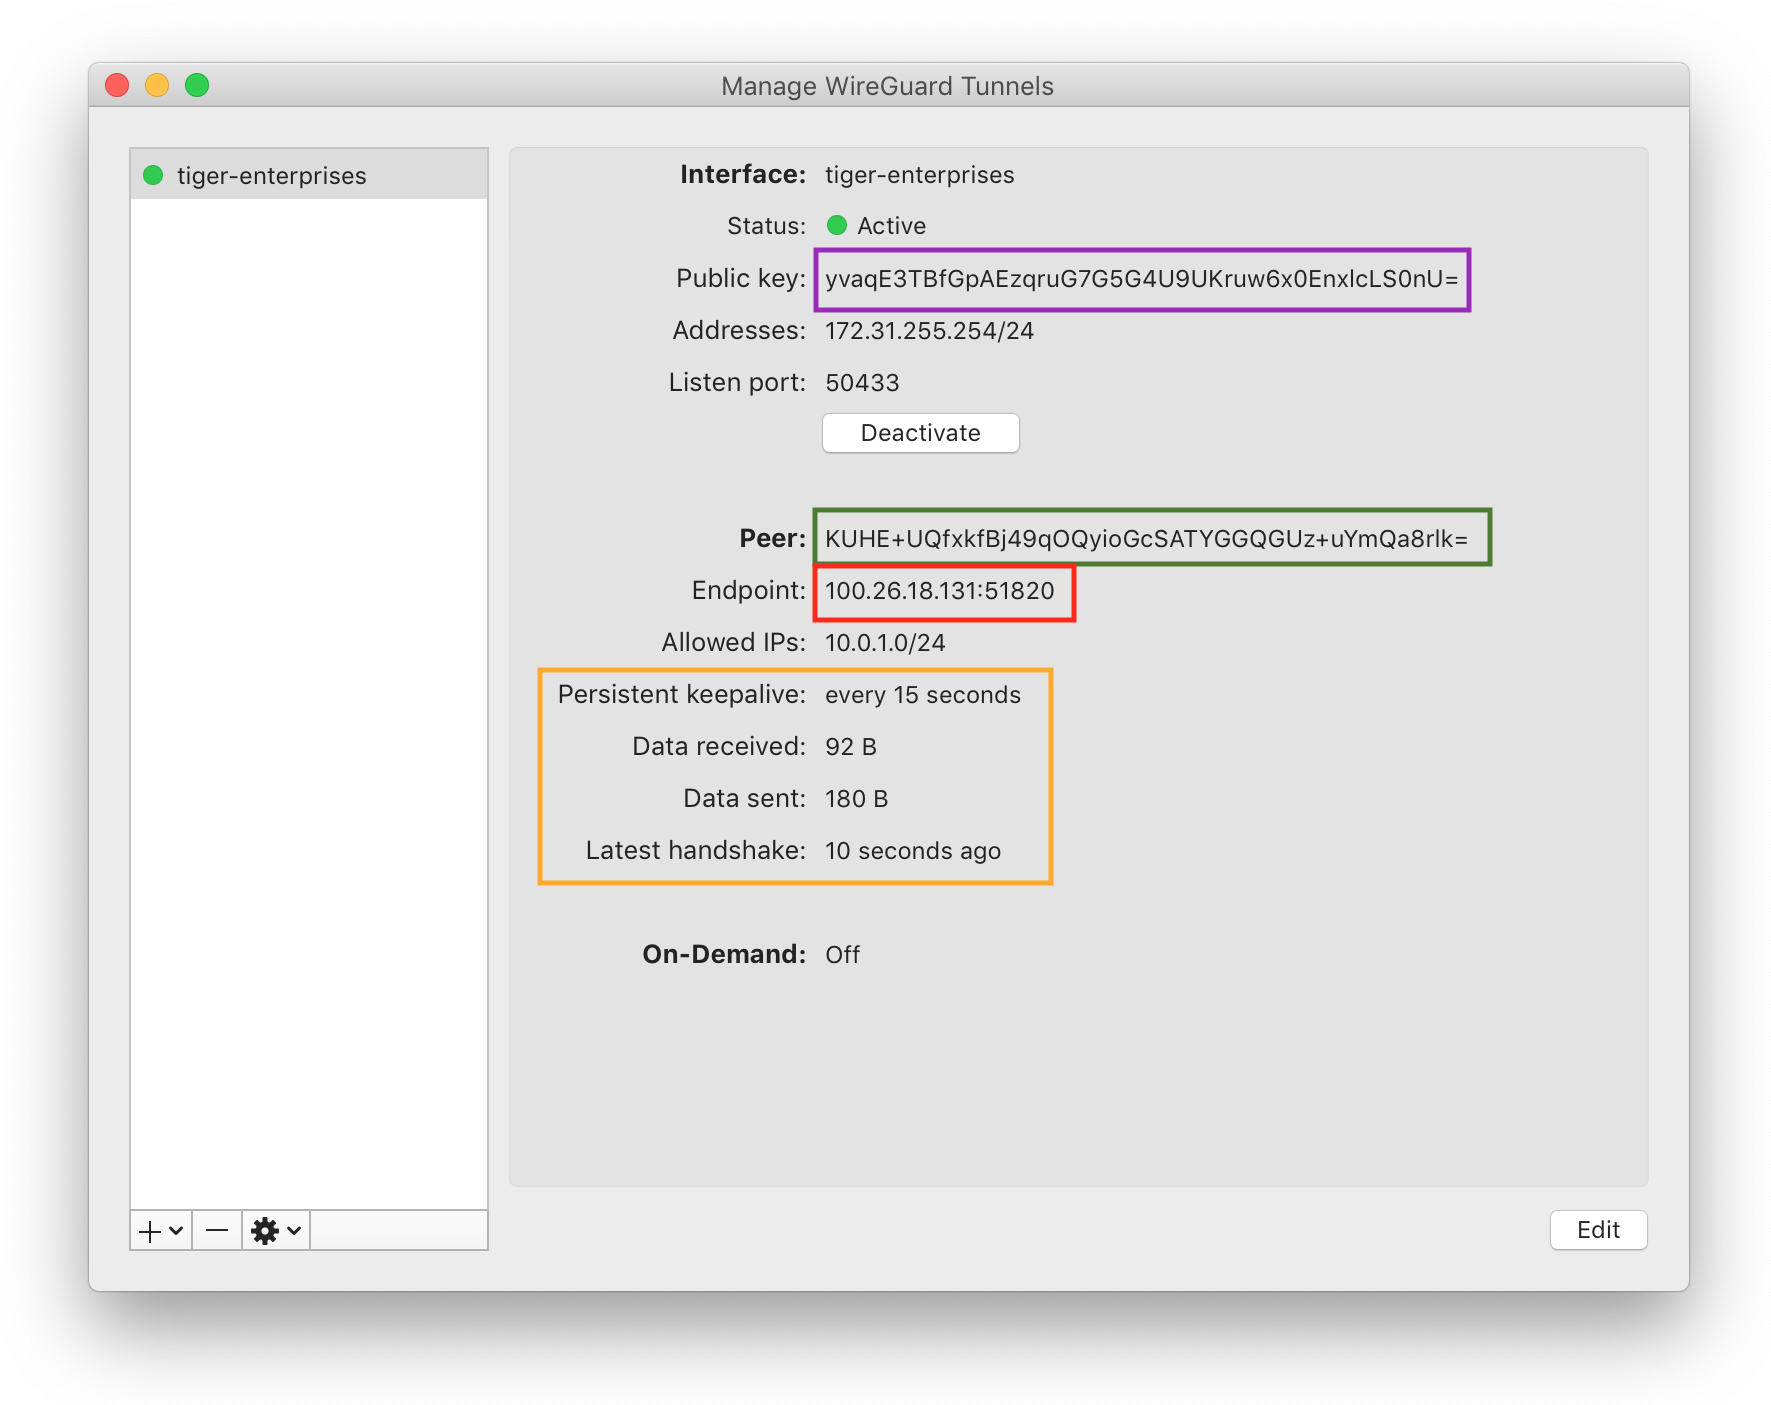
In the WireGuard GUI, create a new empty tunnel configuration. It should look something like this:

Note that the client has created a private key and corresponding public key for you automatically. Don't delete it - you'll need this.
Now complete your client configuration file. Below is an example that can you adapt for your system. Leave the PrivateKey alone (as the GUI created for you), copy the rest of the configuration lines as-is, and update YOUR-SERVER-PUBLIC-KEY and STUDENT-NAME as appropriate to match your system.
[Interface]
PrivateKey = YOUR-CLIENT-PRVIATE-KEY
Address = 172.31.255.253/24

[Peer]
PublicKey = YOUR-SERVER-PUBLIC-KEY
AllowedIPs = 10.101.0.0/24
Endpoint = vpn.STUDENT-NAME.tigerenterprises.org:51820
PersistentKeepAlive = 15
Then, on your SERVER, run this command to activate this client-specific profile.
(In this case, the client VPN IP is 172.31.255.253/32, meaning only that exact IP is allowed to send & receive traffic on this VPN tunnel.)
# Run this on the VPN SERVER in order to activate the specific client you just configured
$ sudo wg set wg0 peer YOUR-CLIENT-PUBLIC-KEY allowed-ips YOUR-CLIENT-VPN-IP

# Tip: Did you make a mistake and add a peer that you'd like to remove?  Try this!
# Observe the public key for the client you want to remove:
#    sudo wg show wg0
# Remove it:
#    sudo wg set wg0 peer CLIENT-PUBLIC-KEY remove
Verification Tip: I experienced a problem where the server config file (wg.conf) wasn't reliably updated with the results of the wg set wg0 peer command. It's supposed to happen whenever the interface is disconnected, e.g. when the server shuts down. That's the point of the SaveConfig=true line. But if you wanted to manually trigger that process, and verify that it worked, you might save yourself a debugging problem later.
$ sudo wg-quick save wg0
$ sudo cat /etc/wireguard/wg0.conf
# Look for the [Peer] section at the bottom.
# It should have the PublicKey and AllowedIPs
# that you just added using the "wg set wg0" command.
# If not, try repeating that step again.
Part 3 - VPN Testing
At this point, you can test your VPN.
First, find the public IP address of your VPN server in the AWS Console.
Second, query DNS for the IP address associated with your VPN server. On Linux you could use the dig command (e.g. dig vpn.STUDENT-NAME.tigerenterprises.org), or on Windows you could use the nslookup command (e.g. nslookup vpn.STUDENT-NAME.tigerenterprises.org).
Do these IP addresses match? If not, your DNS entry (in Route53) is out of date and needs to be updated. Remember that, every time you boot an EC2 instance, Amazon will assign you a new public IP from their pool. It won't stay the same unless you pay extra for an "ElasticIP".
Once you are confident that DNS is correct for the vpn name, go ahead and activate your VPN tunnel via the client GUI.
Next, on the VPN server, check the WireGuard service (via sudo wg show wg0) to confirm that you have a connected client that is able to send and receive data. For example:
$ sudo wg show wg0
# Should see output like this:
# interface: wg0
#   public key: YOUR-SERVER-PUBLIC-KEY
#   private key: (hidden)
#   listening port: 51820
#
# peer: YOUR-CLIENT-PUBLIC-KEY
#   endpoint: PUBLIC-IP-OF-VPN-SERVER:56624
#   allowed ips: 172.31.255.253/32
#   latest handshake: 29 seconds ago          <- **This will appear when connected**
#   transfer: 1.68 KiB received, 916 B sent   <- **This will appear when connected**
Did the "latest handshake" line appear, along with some small amount of data transferred? That's a good sign that your client (on your computer) has connected to your VPN server.
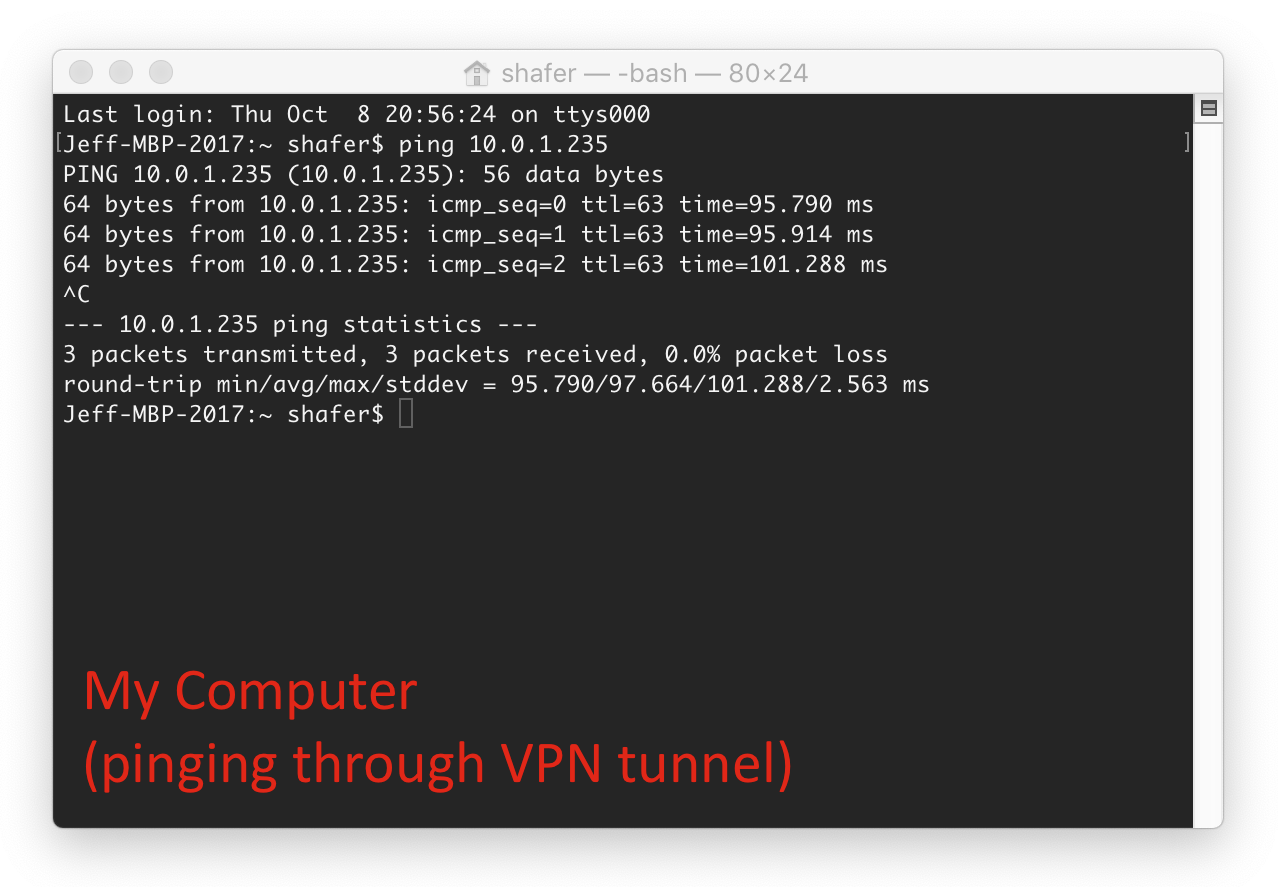
Once you are confident that your client is connected to the VPN server, it is time to test your VPN. Do these two operations, both from your local computer:
- Ping the private IP of your private web server from your computer
- SSH into the private IP of your private web server from your computer
You’ll need to ensure that the web server is running for these test. The only reason you should be able to ping this IP and SSH directly into this system is if your VPN tunnel is working correctly. Otherwise, you have no way to access the private IP (inside Tiger-VPC) from across the public internet.
Warning - Ensure that you do these tests from your computer, and not from the VPN server or another running AWS instance. The VPN client is running on your computer and has established a tunnel between it and the VPN server. Your tests must go through this tunnel in order to verify that the VPN is operational.
Deliverables:
- Text Content of the WireGuard client configuration file from your computer (Windows or Mac)
- Screenshot(s) from your VPN server, showing the hostname at the terminal set to
vpn - Text Content of the WireGuard server configuration file
wg0.conf - Screenshot of
sudo wg show wg0on your VPN server showing a connected peer (with the latest handshake being within a minute or two) - Screenshot showing, from your native command prompt (Windows or Mac), successful pings of the private IP of the private web server.
- Screenshot showing that you have directly SSH'd into your private web server without needing to pivot through the load balancer first. The hostname of
web1should be clearly shown via thehostnamectlcommand.
Lab Deliverables
After submitting the Canvas assignment, you should STOP your virtual machines, not terminate them. We'll use them again in future labs, and thus want to save the configuration and OS data.
Upload to the Lab 7 Canvas assignment all the lab deliverables to demonstrate your work:
- Text Content of the WireGuard client configuration file from your computer (Windows or Mac)
- Screenshot(s) from your VPN server, showing the hostname at the terminal set to
vpn - Text Content of the WireGuard server configuration file
wg0.conf - Screenshot of
sudo wg show wg0on your VPN server showing a connected peer (with the latest handshake being within a minute or two) - Screenshot showing, from your native command prompt (Windows or Mac), successful pings of the private IP of the private web server.
- Screenshot showing that you have directly SSH'd into your private web server without needing to pivot through the load balancer first. The hostname of
web1should be clearly shown via thehostnamectlcommand.
Troubleshooting
Problems with the VPN? Carefully verify your configuration!
- Does the "endpoint" (on client GUI) match the public IP address of your DNS server? If not, your DNS record in Route53 is wrong and needs to be updated...
- Are the client public key and server public key different? If not, you mistakenly copied over the server key and used it in your client config. Redo client config...
- Does the client public key in the client GUI match the public key shown as a "peer" on the server? If not, perhaps you messed up your sudo wg set wg0 peer command...
- Does the peer public key in the client GUI match the server public key shown on the server?
- Does both the client GUI and the server show a handshake (recent?) and at least some data sent and received?
- If you open a command prompt on your system (Mac terminal or Windows cmd.exe), can you ping the private IP of the web server? (through the VPN is the only way to reach it)