Lab 9 - Windows Domain Controller
In this lab, you’re going to create a Windows Domain Controller so that all systems can have a consistent enterprise-wide login, privileges, and files.
Activities
Part 0 - Fall 2021 Bugfix
In Fall 2021, the Linux Desktop (Lab 2) was installed using Amazon Linux. After it was created, however, we were able to use Ubuntu Linux with Amazon Academy accounts. Further, Part 4 of the lab below has instructions that are written specifically for Ubuntu Linux. Thus, before starting Lab 9, you should:
- Terminate your old Linux Desktop instance (with Amazon Linux)
- Follow the Lab 2 instructions to create a new desktop. Note that the instructions have been switched back to Ubuntu Linux for that lab.
Part 1 - Linux Network Time Services
Before working with the domain controller, first take a moment to configure all of your Linux instances to synchronize against a network time source to maintain an accurate clock. Amazon provides the Amazon Time Sync Service, which is simply a standard Network Time Protocol (NTP) server at an internal (private) IP address 169.254.169.123 that is accessible even if an instance otherwise has no network access.
Install and configure Chrony on the Linux-Desktop, VPN, Load Balancer, and Private Web Server.
Install Chrony on Ubuntu 20.04
Install the chrony time manager:
$ sudo apt install chronySpecify the time server in the configuration file:
$ sudo nano  /etc/chrony/chrony.conf
# Add the following line ABOVE the “pool” lines
server 169.254.169.123 prefer iburst minpoll 4 maxpoll 4
Restart the Chrony service. Verify that it is syncing against 169.254.169.123, and check the synchronization statistics.
$ sudo systemctl restart chrony

$ chronyc sources -v
# Should see 169.254.169.123 as the top source in the list of time servers

$ chronyc tracking
# Can see how accurately the service is synchronizing
Deliverables:
- Submit screenshot(s) showing
chronyc sources -vandchronyc trackingon your Linux desktop, VPN, Load Balancer, and Private Web Server instances.
Part 2 - Create Windows Domain Controller
For the server running Active Directory Domain Services (referred to as a Domain Controller), we need Windows. Amazon is happy to rent you a virtual machine image with an active Windows license for a modest per-hour fee.
References:
Create a new Security Group for the Domain Controller:
- Go into EC2 -> Network & Security -> Security Groups
- Create a new security group:
Tiger-SG-Domain-Controller - VPC:
Tiger-VPC - Inbound rules - all of these only allow access from inside Tiger-VPC or via the VPN:
RDPfrom TCP port 3389 from source10.101.0.0/16(for remote desktop protocol - RDP)All ICMP - IPv4from source10.101.0.0/16(for ICMP / pings)DNS (UDP)from UDP port 53 from source10.101.0.0/16(Domain Name Service)DNS (TCP)from TCP port 53 from source10.101.0.0/16(Domain Name Service)SMBfrom TCP port 445 from source10.101.0.0/16(Server Message Block)LDAPfrom TCP port 389 from source10.101.0.0/16(Lightweight Directory Access Protocol)Custom TCPfrom TCP port88from source10.101.0.0/16(Kerberos)Custom TCPfrom TCP port464from source10.101.0.0/16(Kerberos from Linux)Custom UDPfrom UDP port88from source10.101.0.0/16(Kerberos)Custom TCPfrom TCP port135from source10.101.0.0/16(RPC Endpoint Manager)Custom UDPfrom UDP port135from source10.101.0.0/16(RPC Endpoint Manager)Custom UDPfrom UDP port389from source10.101.0.0/16(LDAP)Custom TCPfrom TCP port686from source10.101.0.0/16(LDAP SSL)Custom TCPfrom TCP port1024-65535from source10.101.0.0/16(RPC for LSA, SAM, NetLogon)
- Outbound rules - leave unchanged
Fall 2021 Note: Because this Windows image is Amazon-approved, you can use the normal "Launch Instance" workflow button to create it. No need to search for an AMI first.
Create a new EC2 instance for the Domain Controller. Microsoft recommends a minimum of 2GB of RAM for Windows Server 2019. Thus, a t2.nano will not be sufficient here. The smallest instance that is suitable is a t2.medium (2vCPUs, 4GB RAM), which is still included in the AWS Academy accounts.
- AMI Type: Microsoft Windows Server 2019 Base
- Instance type: t2.medium (2 vCPU, 4 GiB memory)
- Network: "Tiger-VPC"
- Subnet: "Tiger-VPC-Public" (although we're using the public subnet, the security group rules are restricting access)
- NEW: Under the Network interfaces section, for the "eth0" interface, specify the specific Primary IP of
10.101.0.4instead of leaving it as "Auto-assign". We want the domain controller to stay at a fixed network address, and this happens to be the lowest address in the subnet that is not already reserved by AWS for other purposes.- Tip: Do NOT click the “Add Device” button after entering the IP address. You only want the one interface that already exists:
eth0. Just click the "Next: Add Storage" button to advance to the next step of the configuration wizard.
- Tip: Do NOT click the “Add Device” button after entering the IP address. You only want the one interface that already exists:
- Auto-assign Public IP: Enable
- Even though the domain controller is only accessible from within Tiger-VPC, or via the VPN, it still needs a public IP in order to reach the internet itself (for purposes such as Windows Update).
- Storage: 30GiB with "Delete on Termination" enabled
- Yes, ~32GB is the MINIMUM for a bare bones Windows Server install...
- Tag: Name = "Domain Controller: Windows Server 2019"
- Security Group: Use existing security group: “Tiger-SG-Domain-Controller"
- Keypair: Existing keypair / "COMP-175-Lab-1"
Next, get the Windows password that AWS created for you.
- Go to EC2->Instances->Instances
- Right-click on your new desktop instance
- Choose "Security" -> "Get Windows Password"
- Upload your “COMP-175-Lab-1.pem” private key as proof of ownership, and select “Decrypt"
- Make a careful note of your password!
- Make a careful note of your username (“Administrator”)
- Make a careful note of your private IP address
Finally, connect to the new Windows Domain Controller over Remote Desktop. Activate your VPN connection (to gain access into the private subnet) and using a remote desktop client, establish a connection to the Windows Server at its private IP address 10.101.0.4.
Deliverables:
- Submit a screenshot of your Security Group inbound rules for “Tiger-SG-Domain-Controller"
Tips for better remote desktop performance
- Turn off any option that uses full screen by default
- Specify a resolution in your RDP client. 1280x1024 is a reasonable value.
- Enable the remote desktop option "Update the session resolution on resize" (or whatever it is called in your client) so that the Windows desktop has a reasonable scale for your screen size.
Troubleshooting Tips
- Do you want your VPN to work? Then the VPN instance has to be started! (And give it enough time to auto-update DNS)
Part 3 - Configure Domain Controller
A Domain Controller is a Windows server running the Active Directory Domain Services (AD DS) role. It responds to security authentication requests, and is responsible for Active Directory and Group Policy management.
References (these have lots of helpful screenshots of the entire process):
Initial Windows Setup

- Open the "Server Manager" application
- Ignore the ad for “Windows Admin Center"
- Select "Local Server" from the left panel
- Check Firewall Status
- Under "Windows Defender Firewall”, ensure it is set to
Public: On
- Under "Windows Defender Firewall”, ensure it is set to
- Run Windows Update
- Under "Windows Update", click on “Never check for updates” and then “Check for Updates” to run Windows Update now. Let Windows Update download and install updates.
- You don’t need to restart now - we’ll do that in a little bit.
- Change the computer hostname
- Under "Computer Name”, click on the existing gibberish like
EC2AMAZ-4EASABT. Enter a new computer description (Domain Controller - Primary), and then select "Change…" to rename the hostname. Enter a new computer name likeTIGER-DOMAIN(max 15 characters, by convention uppercase) and choose OK.
- Under "Computer Name”, click on the existing gibberish like
- Restart the Domain Controller now. It might take a moment to return (Windows Updates….)
- Reconnect after it reboots. If you’re wondering whether it’s ready or not, you can always choose “Monitor & Troubleshoot->Get Instance Screenshot” from the EC2 console.
Setup Active Directory Domain Controller
The reference listed above has a GUI-based way to add the Domain Controller, along with many example screenshots. Feel free to browse through the process! But, since we’re experts, we’re going to accomplish the same task with a few PowerShell commands instead of the GUI.
- Run
Windows PowerShell(not the ISE) - Get a list of windows features available for installation:
Get-WindowsFeature - Install the Active Directory Domain Controller:
Install-WindowsFeature AD-Domain-Services - Install the Remote Administration Tools for Active Directory Domain Services (AD DS) and Active Directory Lightweight Directory Services (AD LDS), including the snap-in modules for the Server Manager GUI:
Install-WindowsFeature RSAT-AD-Tools
Create a Domain
- Still in PowerShell, promote your new server to be a Domain Controller for a new “forest” that you are creating:
- NetBIOS name of Domain:
TIGER - Fully Qualified DNS name:
STUDENT-NAME.tigerenterprises.org - Full Command:
Install-ADDSForest -DomainName "STUDENT-NAME.tigerenterprises.org" -DomainNetbiosName "TIGER"
- NetBIOS name of Domain:
- After pressing enter, you will be prompted for the “SafeModeAdministatorPassword”. This is used for Directory Services Restore Mode (DSRM). Make this a really good password! It does not need to be the same as the Administrator password you used to log in. In fact, if you were keeping this server beyond the semester, it should be completely different from a password that any human would use to regularly log into the computer with.
- Confirm that YES, you do really want the target server as a domain controller.
- You can ignore the warning about “no static IP address” - Although this server is obtaining its network via DHCP, outside of the server you have already configured AWS to return the same network address all the time.
- You can ignore the warning about “A delegation for this DNS server cannot be created"
- When completed, you’ll get an obvious warning that “You’re about to be signed out” and then the server will restart.
- Reconnect after it reboots. If you’re wondering whether it’s ready or not, you can always choose “Monitor & Troubleshoot->Get Instance Screenshot” from the EC2 console.
Add Users in the Domain
Create the following users in the specified groups in your new Domain. Note that all users are part of the group Domain Users by default. The Administrator group already exists, but the Tiger Remote Desktop group is new, so you'll need to create it!
| Logon Name | First Name | Last Name | Groups |
|---|---|---|---|
| troar | Tiger | Roar | Administrator Tiger Remote Desktop Domain Users |
| pcat | Power | Cat | Tiger Remote Desktop Domain Users |
Here we’re going to use the GUI. The concept is simple but the PowerShell command has myriad options.
 To add a user to the domain:
- Open the “Server Manager” application
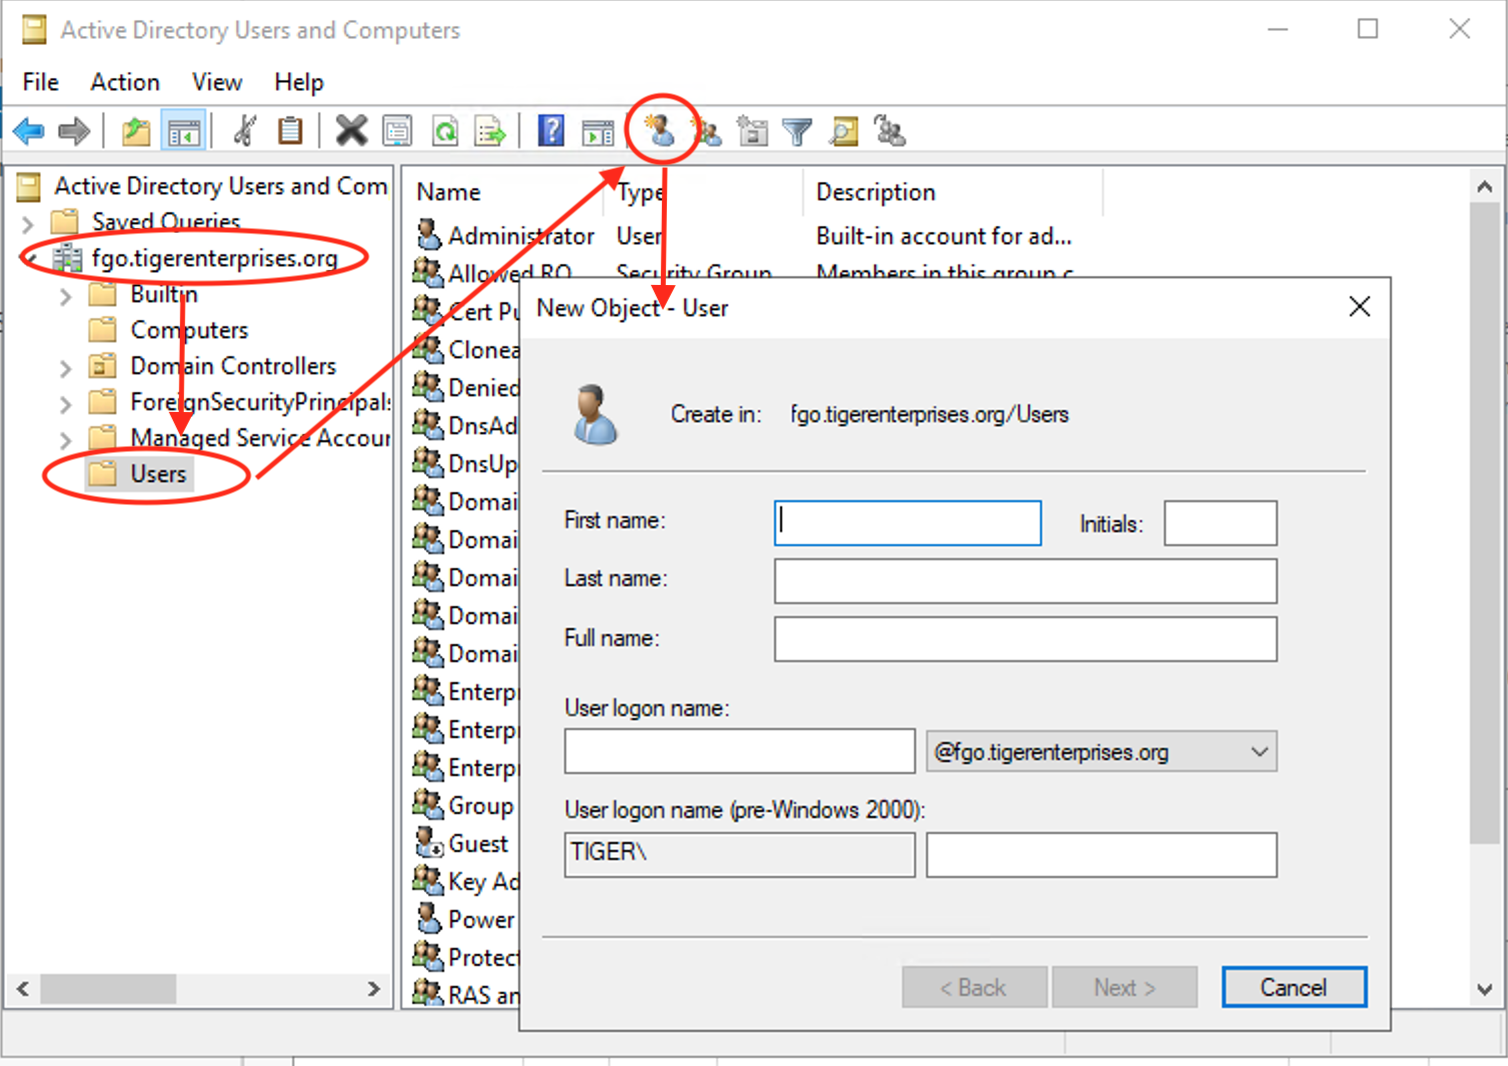
- Under “Tools”, select “Active Directory Users and Computers"
- Expand your domain (STUDENT-NAME.tigerenterprises.org)
- Select Users
- Click the “Create a New User in Current Container” button in the toolbar. (Hence, the need to select your domain and the users container first)
- Enter the first name, last name, and user logon name
- Enter a good password
- Uncheck “Must change password"
- Check “Password never expires"
- Select Next, and then Finish
To create a group in the domain:
- In the Same Active Directory Users and Computers program
- Expand your domain (STUDENT-NAME.tigerenterprises.org)
- Next to Users (but not inside), right-click and choose New Group
- Enter the name of your group
To add a user to a domain group:
- Find the user in your domain
- Right-click and choose “Add to a group"
- Enter the group name in the search field
- Select “OK"
Deliverables:
- Submit a screenshot of PowerShell listing all users in Active Directory with
Get-ADUser -Filter * -Properties memberof | Format-Tableand then, for each user, the groups that they are members of with(Get-ADUser USER-NAME –Properties MemberOf).MemberOf.
Part 4 - Join a Linux Computer to the Domain
Normally we’d join a Windows desktop to the domain, but we don’t have one at the moment. But, we do have the old Ubuntu Desktop from Lab 2, just sitting around unused. Let’s join it to the domain to demonstrate the process and allow domain users to log onto Linux.
References:
- Ubuntu 20.04: Join in Active Directory Domain with Realmd
- How to Join Ubuntu 18.04 to Active Directory
- Netplan configuration examples
Ensure the system is up-to-date
$ sudo apt update
$ sudo apt upgrade
Give the system the hostname LINUX-DESK-1
$ sudo hostnamectl set-hostname LINUX-DESK-1

$ sudo nano /etc/hosts
# Add line at the top: 127.0.0.1  LINUX-DESK-1
# Your file should look like:
#      127.0.0.1 localhost
#      127.0.0.1 LINUX-DESK-1
#      ... and other lines follow ...

$ sudo nano /etc/cloud/cloud.cfg
# Change preserve_hostname from false to true
$ hostnamectl
Static hostname: LINUX-DESK-1
Icon name: computer-vm
Chassis: vm
Machine ID: 87fd302eb09d4233846d621099a3d4be
Boot ID: 0ed7c76d61f24fab8b3938df55981fb5
Virtualization: xen
Operating System: Ubuntu 20.04.1 LTS
Kernel: Linux 5.4.0-1021-aws
Architecture: x86-64Disable the “cloud network configuration” (initialized by AWS)
$ cat /etc/netplan/50-cloud-init.yaml
# This is the existing file that AWS created. Let’s disable it.

$ sudo nano /etc/cloud/cloud.cfg.d/99-disable-network-config.cfg
# Add the line:
network: {config: disabled}
Create a new network configuration that you have control over. In it, specify the domain controller as the first DNS IP to search (10.101.0.4), and then the default AWS DNS (10.101.0.2) as the second choice.
$ sudo nano /etc/netplan/01-netcfg.yaml
# Use the following contents:

network:
    ethernets:
        eth0:
            dhcp4: true
            dhcp6: false
            match:
                macaddress: 06:02:b0:b3:8f:eb
            set-name: eth0
            nameservers:
                addresses: [10.101.0.4, 10.101.0.2]
    version: 2
Apply this new network plan, and confirm that the desired DNS servers now appear under the “Link 2 (eth0)” interface.
$ sudo netplan apply
$ resolvectl status
# Use [SPACEBAR] or [ARROW KEYS] to scroll
# Look for the section titled "Link 2 (eth0)"
# Is the Current DNS Server now 10.101.0.4?  With 10.101.0.2 as the second server?  If yes, you're good.
Install the necessary software packages
$ sudo apt install realmd libnss-sss libpam-sss sssd sssd-tools adcli samba-common-bin oddjob oddjob-mkhomedir packagekit

$ sudo apt install krb5-user
# Specify default realm here:
STUDENT-NAME.TIGERENTERPRISES.ORG
Edit the krb5.conf config file and disable a DNS setting (reverse DNS is not enabled at present)
$ sudo nano /etc/krb5.conf
# In the [libdefaults] section, add
rdns=false
Note that the rdns variable is case sensitive. If not set correctly, you may experience a "Server not found in Kerberos database" error when attempting to join the domain.
Discover the Active Directory domain, and display its type, capabilities, and required packages (on the local system) to enable those capabilities.
$ sudo realm discover STUDENT-NAME.tigerenterprises.org
student-name.tigerenterprises.org
  type: kerberos
  realm-name: STUDENT-NAME.TIGERENTERPRISES.ORG
  domain-name: student-name.tigerenterprises.org
  configured: no
  server-software: active-directory
  client-software: sssd
  required-package: sssd-tools
  required-package: sssd
  required-package: libnss-sss
  required-package: libpam-sss
  required-package: adcli
  required-package: samba-common-bin
Join the Active Directory domain using a domain administrator password (such as the Administrator password for the Domain Controller). Enable verbose mode to get a better sense of what is happening in this complicated process.
Note: Make sure that the realm for the Administrator user is specified in ALL CAPS, otherwise you may get a "KDC reply did not match expectations” error.
$ sudo realm join -U Administrator@STUDENT-NAME.TIGERENTERPRISES.ORG student-name.tigerenterprises.org --verbose
# Enter the password for the Administrator account on the domain controller
A successful enrollment of the computer in the domain should look like this:
 * Resolving: _ldap._tcp.student-name.tigerenterprises.org
 * Performing LDAP DSE lookup on: 10.101.0.4
 * Successfully discovered: student-name.tigerenterprises.org
Password for Administrator@STUDENT-NAME.TIGERENTERPRISES.ORG:
 * Unconditionally checking packages
 * Resolving required packages
 * LANG=C /usr/sbin/adcli join --verbose --domain student-name.tigerenterprises.org --domain-realm STUDENT-NAME.TIGERENTERPRISES.ORG --domain-controller 10.101.0.4 --login-type user --login-user Administrator@STUDENT-NAME.TIGERENTERPRISES.ORG --stdin-password
 * Using domain name: student-name.tigerenterprises.org
 * Calculated computer account name from fqdn: LINUX-DESK-1
 * Using domain realm: student-name.tigerenterprises.org
 * Sending NetLogon ping to domain controller: 10.101.0.4
 * Received NetLogon info from: TIGER-DOMAIN.student-name.tigerenterprises.org
 * Wrote out krb5.conf snippet to /var/cache/realmd/adcli-krb5-OyEy2b/krb5.d/adcli-krb5-conf-efX6Zc
 * Authenticated as user: Administrator@STUDENT-NAME.TIGERENTERPRISES.ORG
 * Looked up short domain name: TIGER
 * Looked up domain SID: S-1-5-21-1218874402-2834467751-2112546744
 * Using fully qualified name: LINUX-DESK-1
 * Using domain name: student-name.tigerenterprises.org
 * Using computer account name: LINUX-DESK-1
 * Using domain realm: student-name.tigerenterprises.org
 * Calculated computer account name from fqdn: LINUX-DESK-1
 * Generated 120 character computer password
 * Using keytab: FILE:/etc/krb5.keytab
 * Found computer account for LINUX-DESK-1$ at: CN=LINUX-DESK-1,CN=Computers,DC=student-name,DC=tigerenterprises,DC=org
 * Sending NetLogon ping to domain controller: 10.101.0.4
 * Received NetLogon info from: TIGER-DOMAIN.student-name.tigerenterprises.org
 * Set computer password
 * Retrieved kvno '2' for computer account in directory: CN=LINUX-DESK-1,CN=Computers,DC=student-name,DC=tigerenterprises,DC=org
 * Checking RestrictedKrbHost/LINUX-DESK-1
 *    Added RestrictedKrbHost/LINUX-DESK-1
 * Checking host/LINUX-DESK-1
 *    Added host/LINUX-DESK-1
 * Discovered which keytab salt to use
 * Added the entries to the keytab: LINUX-DESK-1$@STUDENT-NAME.TIGERENTERPRISES.ORG: FILE:/etc/krb5.keytab
 * Added the entries to the keytab: host/LINUX-DESK-1@STUDENT-NAME.TIGERENTERPRISES.ORG: FILE:/etc/krb5.keytab
 * Added the entries to the keytab: RestrictedKrbHost/LINUX-DESK-1@STUDENT-NAME.TIGERENTERPRISES.ORG: FILE:/etc/krb5.keytab
 * /usr/sbin/update-rc.d sssd enable
 * /usr/sbin/service sssd restart
 * Successfully enrolled machine in realm
Check if you can obtain information on an Active Directory user:
$ id troar@STUDENT-NAME.tigerenterprises.org
# Should see
uid=1451201112(troar@STUDENT-NAME.tigerenterprises.org) gid=1451200513(domain users@STUDENT-NAME.tigerenterprises.org) groups=1451200513(domain users@STUDENT-NAME.tigerenterprises.org),1451201115(tiger remote desktop@STUDENT-NAME.tigerenterprises.org)
Configure PAM (Pluggable Authentication Modules) to create a home directory when a new user logs into this computer:
$ sudo nano /etc/pam.d/common-session
# Add this to the END of the file to create a home directory if needed
session optional        pam_mkhomedir.so skel=/etc/skel umask=077
Try to switch users to the "troar" user. This is not a local user that exists on the system, but only exists in Active Directory.
$ su troar@student-name.tigerenterprises.org
$ whoami      # What is my username?
$ cd          # Go to my home directory
$ pwd         # What is the home directory path?
$ ls -ls /home   # Show the home directories that exist on the system
$ exit        # Exit the ’troar’ Active Directory user and go back to the ‘ubuntu’ local user
Deliverables:
- Submit a screenshot from your Domain Controller of Server Manger -> Active Directory Users and Computers -> Computers showing that LINUX-DESK-1 now appears as a computer in the domain.
- Submit a screenshot from your Linux Desktop (terminal) showing that you have successfully switched from the "ubuntu" user to the "troar" user
Lab Deliverables
After submitting the Canvas assignment, you should STOP your virtual machines, not terminate them. We'll use them again in future labs, and thus want to save the configuration and OS data.
Upload to the Lab 9 Canvas assignment all the lab deliverables to demonstrate your work:
- Part 1 - Linux Network Time Services
- Submit screenshot(s) showing
chronyc sources -vandchronyc trackingon your Linux desktop, VPN, Load Balancer, and Private Web Server
- Submit screenshot(s) showing
- Part 2 - Create Windows Domain Controller
- Submit a screenshot of your Security Group inbound rules for “Tiger-SG-Domain-Controller"
- Part 3 - Configure Domain Controller
- Submit a screenshot of PowerShell listing all users in Active Directory with
Get-ADUser -Filter * -Properties memberof | Format-Tableand then, for each user, the groups that they are members of with(Get-ADUser USER-NAME –Properties MemberOf).MemberOf
- Submit a screenshot of PowerShell listing all users in Active Directory with
- Part 4 - Join a Linux Computer to the Domain
- Submit a screenshot from your Domain Controller of Server Manger -> Active Directory Users and Computers -> Computers showing that LINUX-DESK-1 now appears as a computer in the domain.
- Submit a screenshot from your Linux Desktop (terminal) showing that you have successfully switched from the "ubuntu" user to the "troar" user