Virtual Machine Configuration
Virtualization Setup
To prepare for the virtualization labs, you will need to install a virtual machine manager onto your computer.
Enable Virtualization Extensions
In order for your computer to properly run guest operating systems with reasonable performance, some hardware features of your CPU need to be enabled. For Intel processors, these features are called "VT-X", and for AMD processors, they are called AMD-V. It's hit or miss whether these features are enabled by default on consumer computers - in prior classes about 10% of students had to enable them manually.
If you have a Mac: Congratulations, any modern Mac should already have virtualization enabled.
If you have a Windows PC: Run the Task Manager program. In the Performance tab, look for a line labeled "Virtualization", and confirm that it says enabled. Look here for an example of the desired output along with some alternate methods of confirming CPU virtualization extensions are enabled.
If virtualization extensions are not enabled, you will need to enable them before continuing. The location of the specific button is not in Windows, however. It's buried deep in the BIOS or UEFI software that runs immediately after your computer is powered on, before Windows even starts. The step-by-step process to enable this option is unfortunately very computer dependent. Typically the process involves restarting your computer and immediately starting to repeatedly press the F2 key. Or F10. Or DEL. The correct key varies by vendor. You might see a quick message "Press <some key> to enter Setup" flash very briefly on the screen. Or, you might need to do a search for "Access BIOS" followed by your specific computer make and model. Once you are in the BIOS, you can navigate using the arrow keys (or newer UEFI systems allow you to use the mouse). Navigate through the settings looking for a "Virtualization Extensions" (or similar) option that you can change from Disabled to Enabled. If you can't find anything, you might need to search for instructions for your specific model of computer. Save the BIOS settings (via the keyboard shortcut listed at the bottom of the screen), let the computer reboot, and then check if Windows says that Virtualization is enabled now.
Choose a Virtual Machine Manager
First, download the appropriate software for your computer. You have a few choices here:
- RECOMMENDED CHOICE
- Windows or Linux: VMware Workstation Pro
- As of January 2025, the latest version is 17.6.x
- Mac: VMware Fusion
- As of January 2025, the latest version is 13.6.x
- Windows or Linux: VMware Workstation Pro
- Other options:
- Windows, Mac, or Linux: VirtualBox
Second, register and activate a free Broadcom account at https://profile.broadcom.com/web/registration
Third, choose the relevant download link into the Broadcom support portal. Regardless of platform, you want the "for personal use" download option.
- Windows or Linux (VMware Workstation): https://support.broadcom.com/group/ecx/productdownloads?subfamily=VMware%20Workstation%20Pro&freeDownloads=true
- Mac (VMware Fusion): https://support.broadcom.com/group/ecx/productdownloads?subfamily=VMware%20Fusion&freeDownloads=true
Fourth, install it! (Accepting the default options is generally reasonable)
Fifth, run its own internal "Check for Updates" feature to ensure you have all the latest bugfixes and security fixes!
Virualization Setup FAQs
Which is better - VMware or VirtualBox?
In previous classes, the VMware products typically work more smoothly out of the box. But, the free VirtualBox product can always be setup correctly, it just might take some additional effort. Both are supported methods in this course.
I have an older software version than what is listed above - can I use it?
Using an older virtual machine manger is highly discouraged. These are complex programs that are regularly updated to (a) improve compatibility with their host operating systems, (b) improve compatibility with the guest/virtual operating systems being created, and (c) fix security vulnerabilities that would allow a malicious guest OS to break out into the host OS. These should all be important to you as security professionals, particularly the point about vulnerabilities! Update your virtual machine manager regularly, even if it means giving VMware more money...
Virtual Machines for COMP 178
There are several virtual machines needed to complete the labs in this course:
- Kali Linux - A Linux distribution with software pre-installed for penetration testing, forensics, and reverse engineering
- Metasploitable 2 - An intentionally vulnerable Linux virtual machine designed for training, exploit testing, and general target practice
Kali Linux
Download and configure a Kali Linux virtual machine with tools needed for future labs. The first download choice ("Installer Images -> (Your Processor Architecture) -> Installer") is fine. Avoid the "Weekly" or "NetInstaller" options. As-of January 2025, the current version is 2024.4
Important: Choose the Download link that matches your processor architecture.
- Windows or Mac with Intel processor: Choose "64-bit" download
- Mac with Apple Silicon processor: Choose "Apple Silicon (ARM64)" download
Next, launch your virtual machine manager (either VMware Workstation or VMware Fusion). Within VMware, create a new virtual machine. Use the following virtual machine configuration. You want enough disk/RAM/CPU for Kali to be usuable, but not too generous, because you will also be running other virtual machines (e.g. Metasploitable) at the same time on your computer. The largest programs we will be running are Nessus and OpenVAS, which are both vulnerability scanners. Provide the Kali .iso file you downloaded when prompted, as that contains the installer to run when the VM is booted.
- Disk space: 45GB (The typical 20GB is too small. We need at least 30GB for all users to run the vulnerability scanners and, for Mac users, 45GB to host emulated VMs inside Kali)
- RAM: 4GB
- CPU cores: 3
- OS Type: Linux -> Debian 12.x 64-bit (since VMware won't recognize "Kali" as a major distribution)
- Boot firmware: UEFI
After starting your virtual machine with the Kali .iso file, choose the "Graphical Install" or "Install" option from Boot menu. Walk through the install process as-if you were installing Linux normally, except that you're installing it into your virtual machine instead. The default options are fine. For the GRUB boot loader, specify the installation path /dev/sda or /dev/nvme0n1, as prompted. Let the VM reboot after the installer finishes, and then log into Kali with whatever username and password you specified in the installer.
To update your copy of Kali and its associated tools to the latest version after creating and launching the VM, run the following commands to check for, and then apply, any available updates.
$ sudo apt update
$ sudo apt -y upgrade
To verify the version of Kali you are running, do:
$ lsb_release -aVirtualBox-specific setup instructions:
If you are using VirtualBox, you will have better integration with your host system if you run the following commands to install the host tools inside of Kali:
$ sudo apt update
$ sudo apt install -y virtualbox-guest-x11
$ sudo reboot
# Now you should be able to resize your window...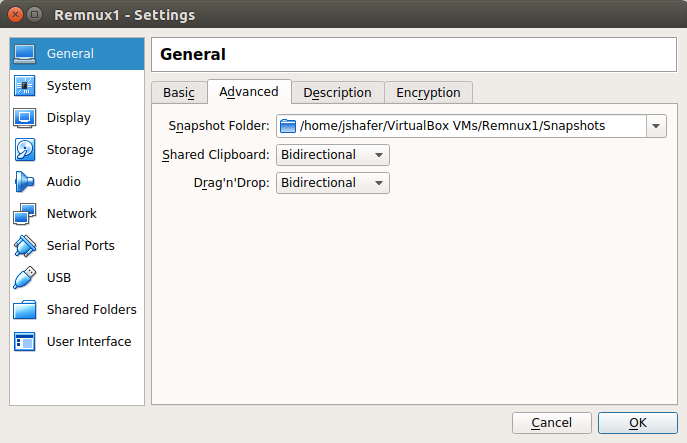 In addition, for VirtualBox, ensure that file Drag and Drop and Clipboard integration is enabled. Go to Settings for your specific VM, select General->Advanced, and ensure both "Shared Clipboard" and "Drag'n'Drop" are set to "Bidirectional" instead of their default setting of "Disabled".
Metasploitable 2 on Intel-based Systems
Download an intentionally vulnerable virtual machine - Metasploitable 2 - from Sourceforge. Note that this file is distributed as a complete VMware virtual machine (.vmx / .vmdk file), not an .iso file like most installers, so you can open it directly in VMware. Download and extract the .zip file to a convenient place on your computer.
Important: Never expose this VM to an intrusted network! Use NAT or Host-only networking mode in your virtual machine configuration.
The default login and password for Metasploitable2 is msfadmin and msfadmin.
After confirming that your Metasploitable2 instance runs and that you can log into it, shut it down. Then, take a snapshot and give it a name like "Original Metasploitable2 snapshot". With a snapshot in place, no matter what happens to this VM, you can always revert it back to its original condition.
VirtualBox-specific setup instructions:
To use Metasploitable 2 in VirtualBox, first create a new virtual machine in VirtualBox. The type should be "Linux", the version should be "Ubuntu (64-bit)", and 512MB of RAM is sufficient. During the configuration, do not create a new virtual disk (like you did for Kali), but instead configure VirtualBox to use the existing Metasploitable vmdk file that you unzipped from the zip file. After that, you should be able to directly launch and run Metasploitable 2 - no "intallation" is neccessary, since it has already been installed to the virtual disk.
VMWare-specific setup instructions:
None! Metasploitable 2 is distributed as a VMWare VM.
Metasploitable 2 on Apple Silicon-based systems
VMware Fusion is only able to virtualize systems. In other words, if you have an Intel system, you can virtualize Intel processors, and if you have an Apple Silicon/Arm system, you can virtualize Arm processors. Unfortunately, Metasploitable2 is only available as a pre-built virtual machine for Intel architecture only. So, what to do? At a performance penalty, you can emulate the Intel processor on your Apple Silicon Mac. Follow this process (based on https://www.hackingloops.com/kvm-virt-manager/) to emulate Metasploitable2 inside of Kali Linux running on an Apple Silicon/Arm Mac:
First, launch Kali and log in.
Next, install the GUI Virtual Machine manager (https://virt-manager.org/) and the necessary QEMU support to emulate Intel (x86 and x64) processors
$ sudo apt install virt-manager qemu-system-x86Next, download Metasploitable2 from https://sourceforge.net/projects/metasploitable/
$ cd ~
$ wget https://sourceforge.net/projects/metasploitable/files/latest/download
$ unzip download   # Despite the lack of a file extension, it’s really a .zip file…
                   # Note that it extracts files into ~/Metasploitable2-linux/
Finally, complete these steps using the GUI:
- Launch the Virtual Machine Manager application via the Kali application launcher
- Enter your password to allow management of “local virtualized systems”
- Click on the "QEMU/KVM" line to ensure it is highlighted
- Go to Edit->Connection Details. Select the "Virtual Networks" tab and ensure that the "Autostart" checkbox is ENABLED for your default virtual network. Hit Apply and close the Connection Details window.
- Back in the main Virtual Machine Manager window, click the “+” icon in the toolbar to create a new VM
- Select “Import existing disk image”
- Under the “Architecture Options” dropdown, set Architecture to “x86_64” and click “Forward”
- Select “Browse” next to “Provide the existing storage path”
- Select “Browse Local”
- Navigate and select the extracted Metasploitable.vmdk file inside of ~/Metasploitable2-linux/
- Under “Choose the operating system you are installing”, type “Generic” and select the "Generic or unknown OS. Usage is not recommended." Click Forward
- Choose “Yes” when prompted about search permissions for the path to the .vmdk file
- Choose 1 CPU and 512MB of RAM to be consistent with the downloaded VM, and click Forward
- Give the new VM a name (Metasploitable2)
- Select “Customize configuration before install”
- Under “Network selection”, choose “Virtual network ‘default’: NAT, and click Finish
- When prompted that the Virtual Network is not active, select "Yes" to start the network now
- Under the customization panel that appears, ensure that Architecture says “x86_64”, and click “Begin Installation” in the upper-left
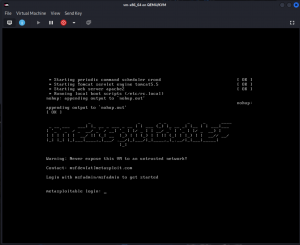
- Your emulated Metasploitable 2 VM should install and launch.

The default login and password for Metasploitable2 is msfadmin and msfadmin.
Project VM ("U" System) on Apple Silicon-based systems
VMware Fusion is only able to virtualize systems. In other words, if you have an Intel system, you can virtualize Intel processors, and if you have an Apple Silicon/Arm system, you can virtualize Arm processors. Unfortunately, the project "U" VM is only available for Intel architecture only. So, what to do? At a performance penalty, you can emulate the Intel processor on your Apple Silicon Mac. Follow this process (based on https://www.hackingloops.com/kvm-virt-manager/) to emulate Metasploitable2 inside of Kali Linux running on an Apple Silicon/Arm Mac:
First, launch Kali and log in.
Next, install the GUI Virtual Machine manager (https://virt-manager.org/) and the necessary QEMU support to emulate Intel (x86 and x64) processors
$ sudo apt install virt-manager qemu-system-x86Next, download and covert the Project VM. Use Firefox and the link provided in the Canvas assignment to download the .ova file. Then:
$ cd ~
$ mkdir projectU
$ cd projectU
$ mv ~/Downloads/COMP-178-System-U.ova .

# Extract the .ova file contents
$ tar xvf COMP-178-System-U.ova #  Despite the file extension, it's just a .tar file.

# Convert the disk image from VMware format (VMDK) to QEMU format (qcow2)
$ qemu-img convert COMP-178-System-U-disk1.vmdk COMP-178-System-U-disk1.qcow2 -O qcow
$ rm -rf COMP-178-System-U-disk1.vmdk   # Don’t need this any longer
Finally, complete these steps using the GUI:
- Launch the Virtual Machine Manger application via the Kali application launcher
- Enter your password to allow management of “local virtualized systems”
- Click the “+” icon in the toolbar to create a new VM
- Select “Import existing disk image”
- Under the “Architecture Options” dropdown, set Architecture to “x86_64” and click “Forward”
- Select “Browse” next to “Provide the existing storage path”
- Select “Browse Local”
- Navigate and select the COMP-178-System-U-disk1.qcow2 file inside of ~/projectU/
- Under “Choose the operating system you are installing”, type “Ubuntu 14.04 LTS” and click Forward
- Choose “Yes” if prompted about search permissions for the path to the .qcow2 file
- Choose 2 CPU and 1024MB of RAM to be consistent with the downloaded VM, and click Forward
- Give the new VM a name (ProjectU)
- Select “Customize configuration before install”
- Under “Network selection”, choose “Virtual network ‘default’: NAT, and click Finish
- Under the customization panel that appears, ensure that Architecture says “x86_64”, and click “Begin Installation” in the upper-left
- Choose “Yes” when prompted to start the virtual network now
- Your emulated ProjectU VM should install and launch.
- Back in the Virtual Machine Manager screen, ensure your new VM is highlighted, and go to Edit->Connection Details. Select the "Virtual Networks" tab and ensure that the "Autostart" checkbox is ENABLED for your default virtual network.
Networking Configuration
In order to enable network communication between virtual machines, VirtualBox requires additional configuration.
VirtualBox-specific setup instructions:
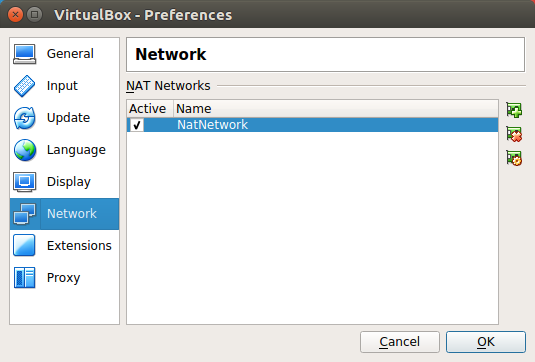 In VirtualBox, you want to use the "NAT Network" mode of operation, not the "NAT" mode of operation.
Create a new shared network that can be used by all or some of your virtual machines. Go to File->Preferences->Network and click the "plus" icon to add a new NAT Network. The default network name of "NatNetwork" is fine. If you click the "gear" icon, you can see the details for this new network, including its "CIDR" (Classless InterDomain Routing, i.e. the subnet) and other settings. The default options (a subnet of 10.0.2.0/24 with DHCP enabled) is fine. OK out of all the Preferences windows.
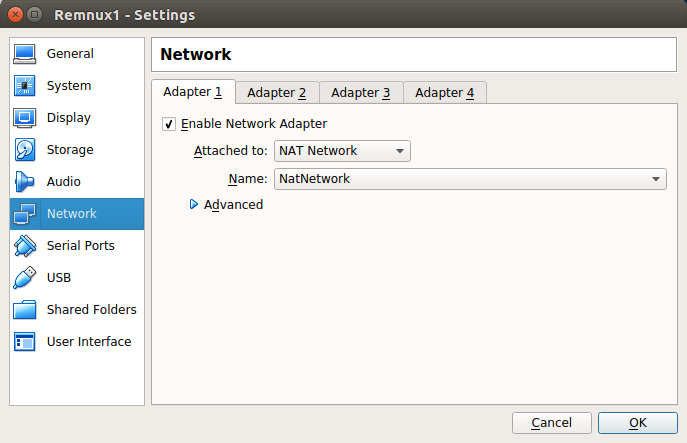 Assign each virtual machine to use this new shared NAT network. For each VM, go to Settings->Network, and for Adaptor 1 (the only one in use), change the "Attached to" setting from the default of "NAT" to the new "NAT Network". For the "Name" field directly below, ensure the name of your new network (e.g. "NatNetwork") is selected. OK out of all Preferences windows.
VMware-specific setup instructions:
No additional VMWare configuration is required.
VMware Networking Troubleshooting:
Is there no networking at all in the guest OS? (Does "ip link" show that the Ethernet link is down?). Here are some troubleshooting tips:
- Shutdown and start (or restart) the virtual machine. Don’t just suspend/resume it
- Restart Windows/Mac
- Check in VMware and install any updates available (and restart the virtual machine afterwards)
- For Windows VMware Workstation Pro only: Go to Edit->Virtual Network Settings. Click “Change Settings” and then “Restore Defaults”. Restart the OS and try again.
You can also try to force the network to an active state.
sudo ip link                 # Check the ethXX or ensXX link - is it down?  Note its *exact name* and use it below
sudo ip link set ensXX up    # Force that link to to run
sudo ip link                 # Is the link running now?
sudo nmcli networking off
sudo nmcli networking on     # Force the network to re-initialize
sudo ip addr                 # Do you see an IP address on the interface now?
ping google.com              # Can you ping google? Should see packets transmitted/received.
                             # CTRL-C to stop pinging