Lab 1 - AWS Quick-Start
In this lab, you will configure and launch a basic Linux Virtual Machine at AWS.
Pre-Lab
Follow the AWS Academy account setup instructions to gain access to the class cloud resources.
Lab
Log into AWS Academy
To log into your AWS Educate classroom and gain access to the AWS console, follow this process:
- Sign in to your AWS Academy Canvas portal at: https://awsacademy.instructure.com/
- Enter the class for COMP 175 - It's named "AWS Academy Learner Lab - Foundation Services"
- Go to Modules
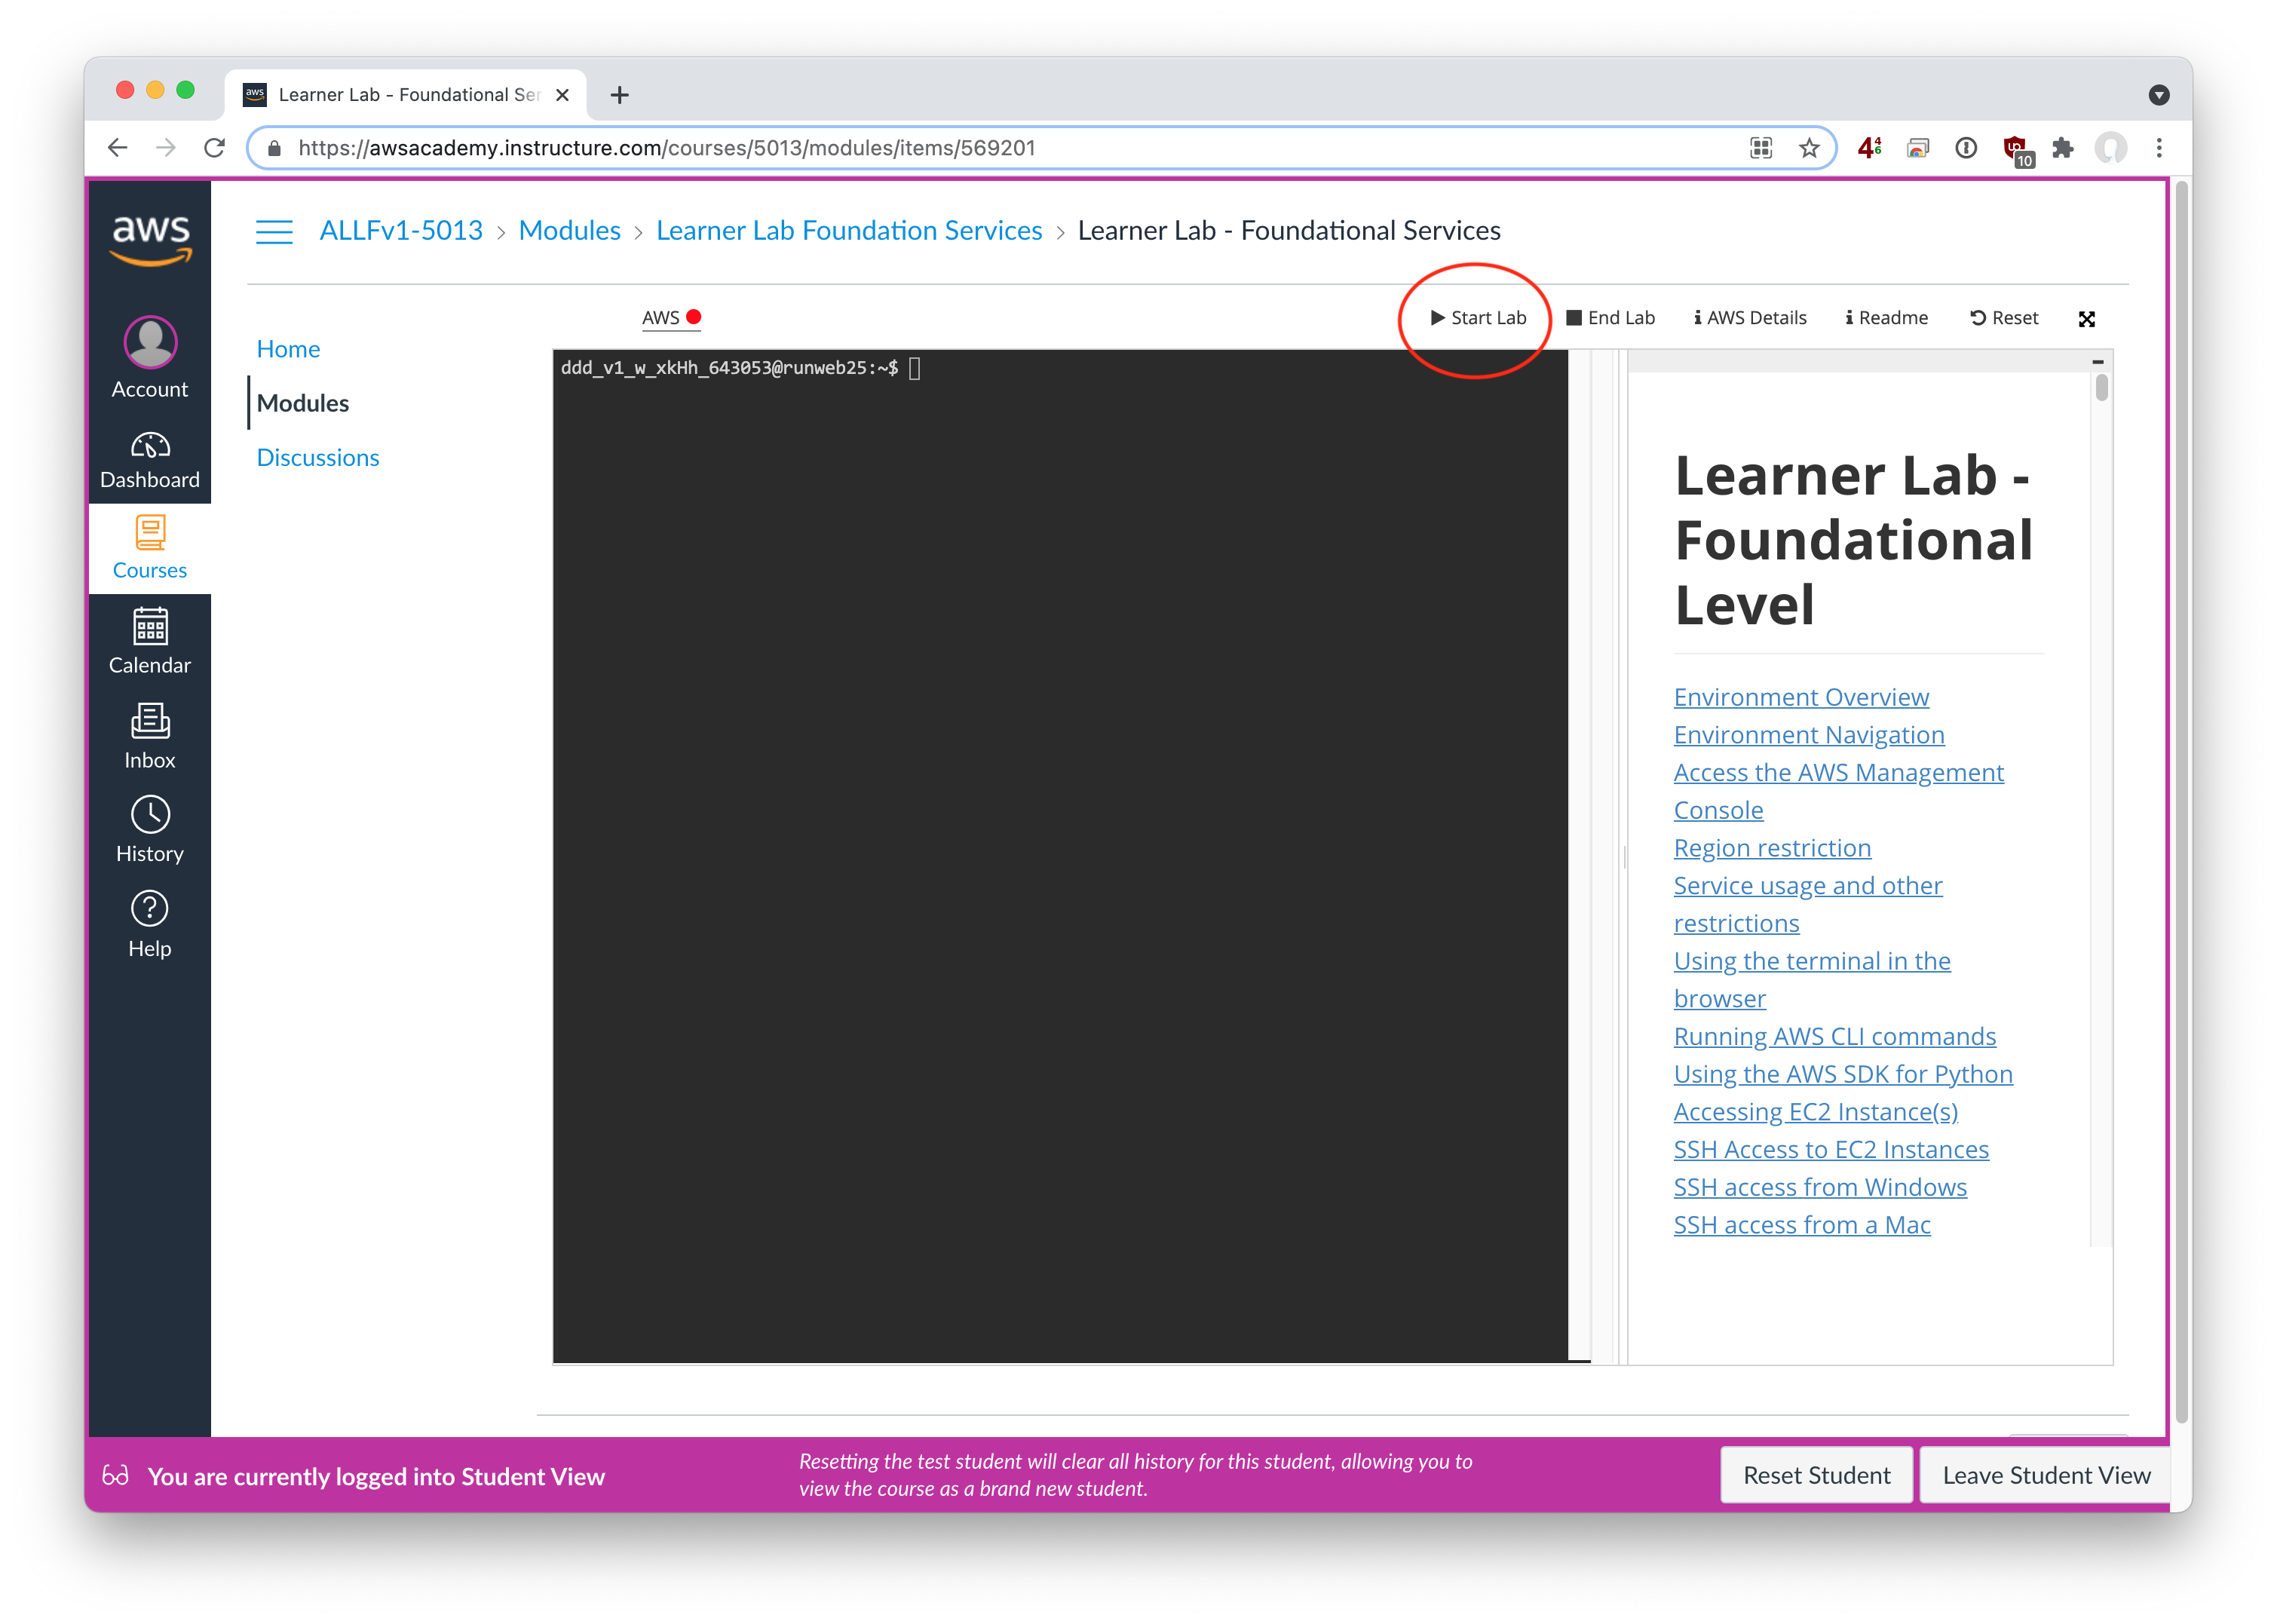
- Select Learner Lab - Foundational Services to enter the Vocareum workbench
- Click the Start Lab button and let it "launch" for a minute or three
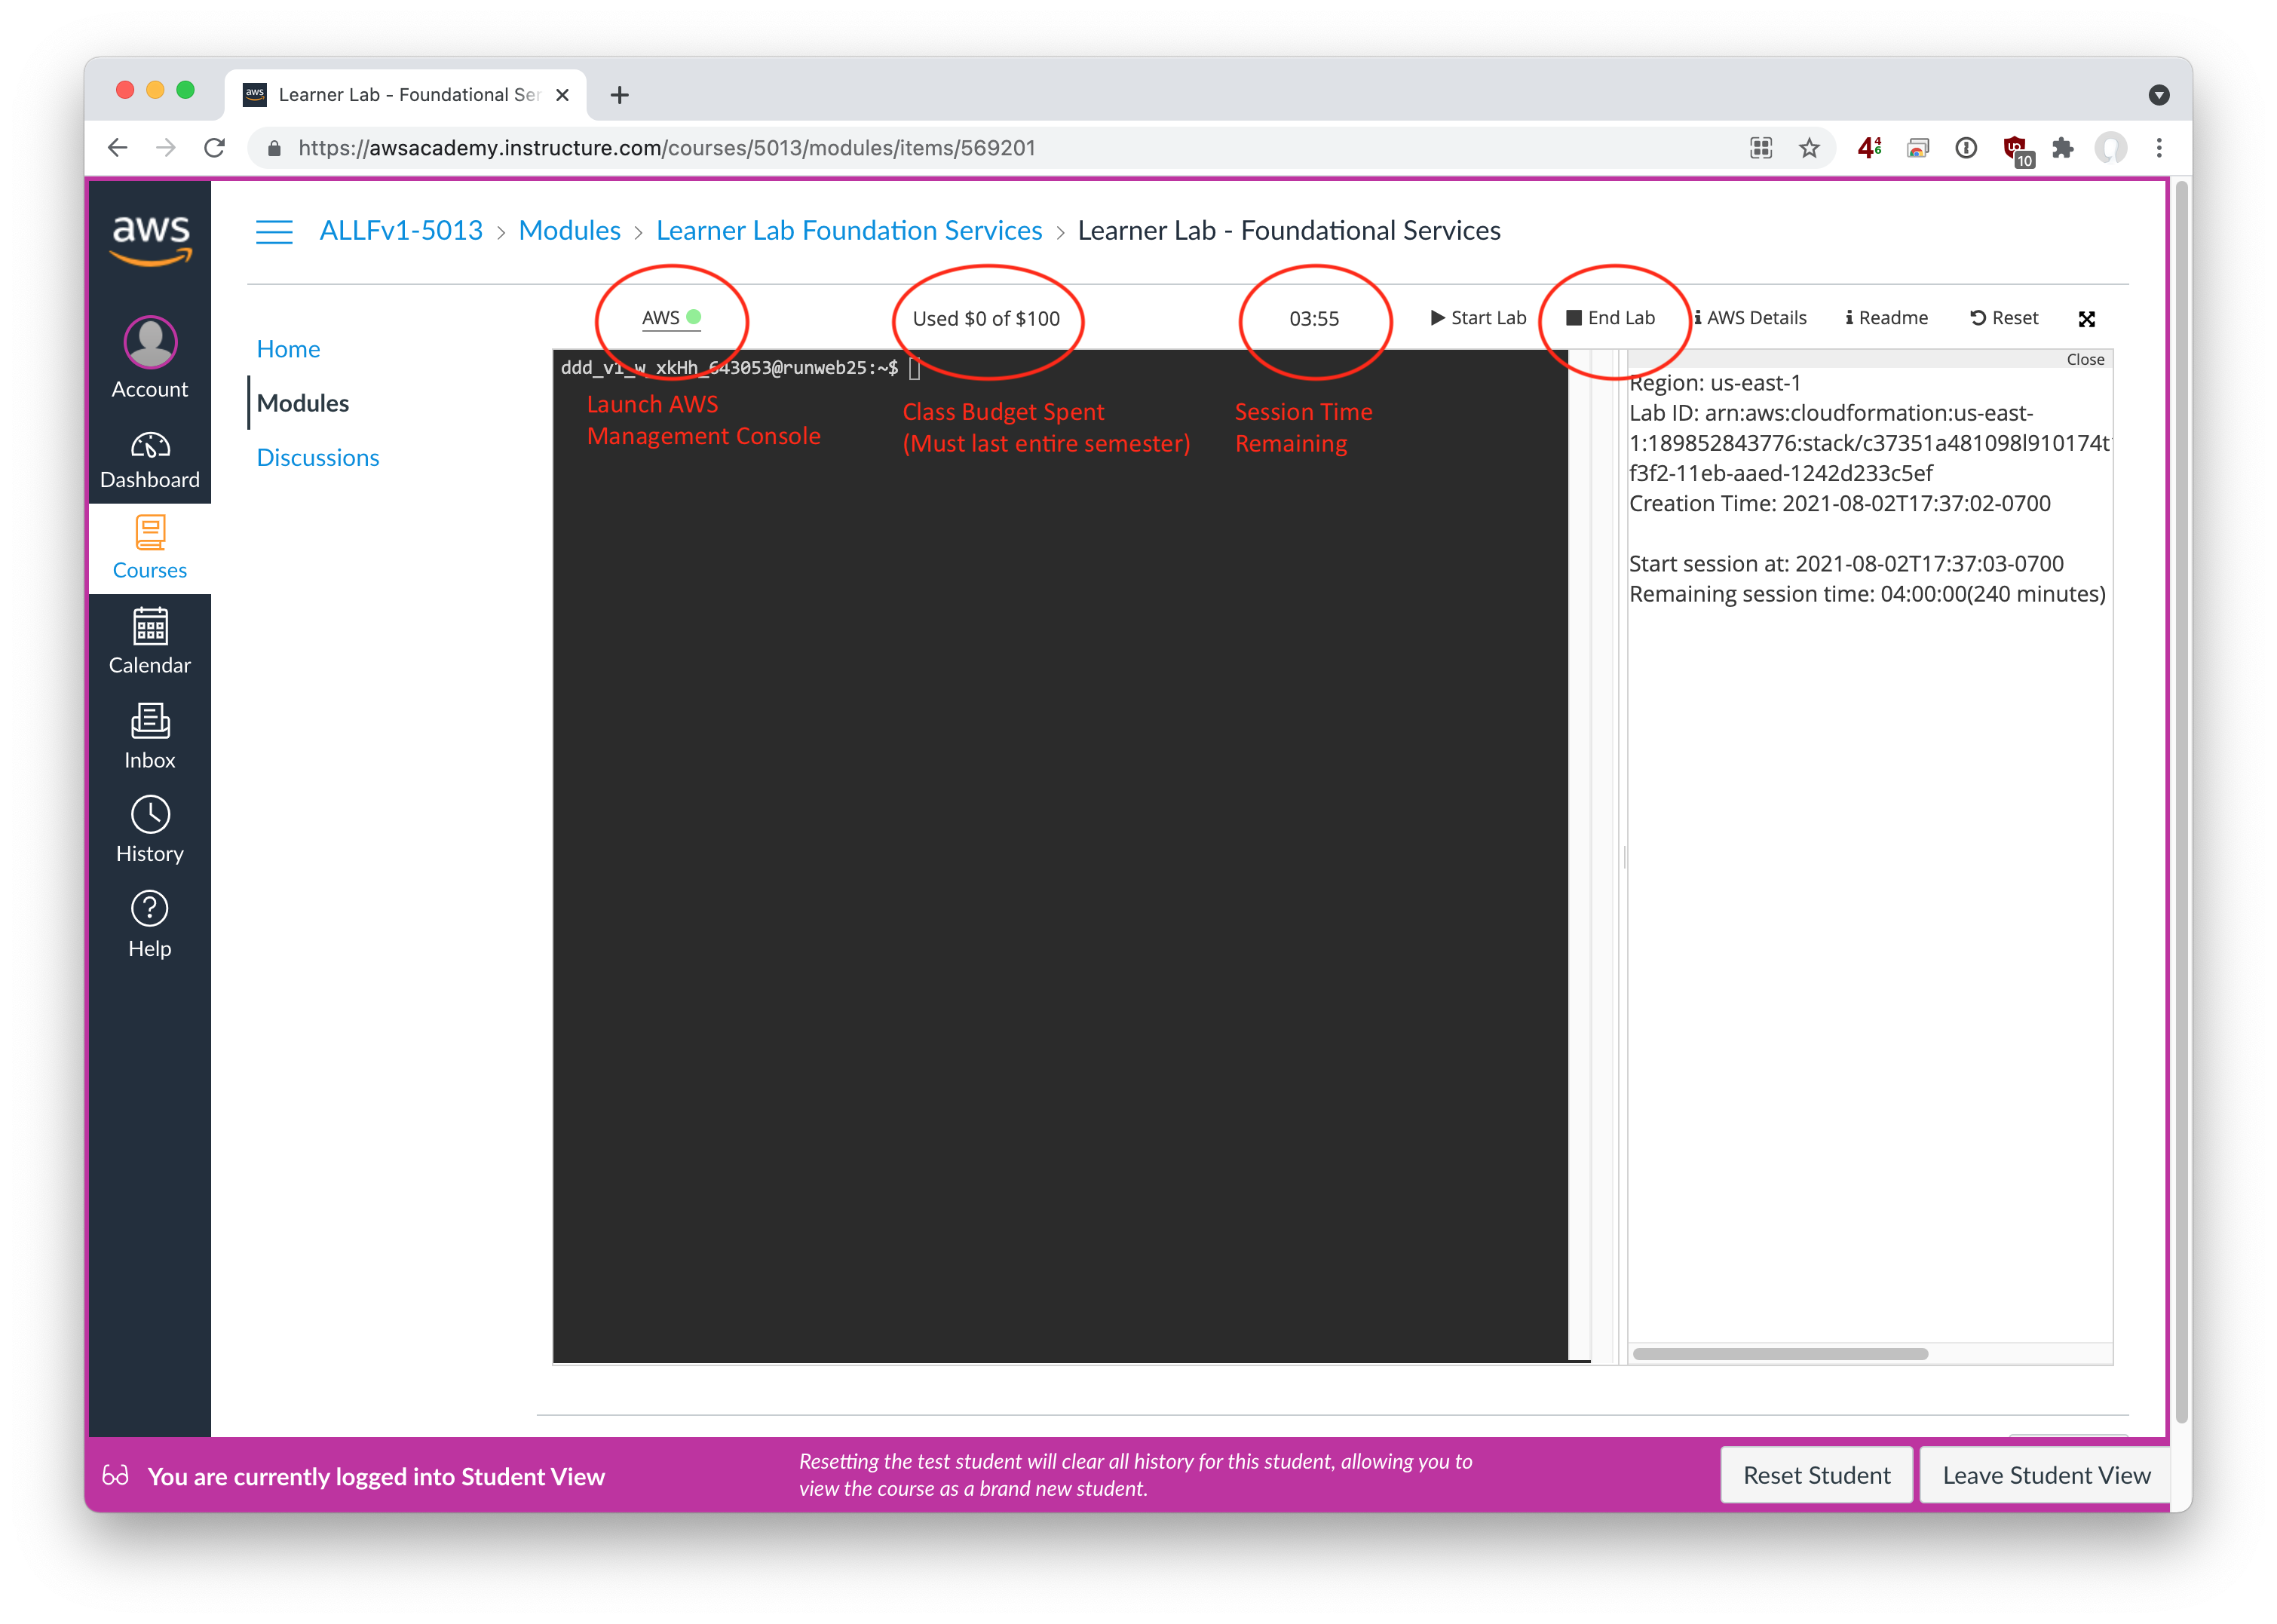
- When the lab is launched, you should see several pieces of information, including
- Total dollars left in your student account (may be a few hours out of sync, since billing is delayed)
- The time left in your 4 hour session
- A button to launch the web AWS Management Console.

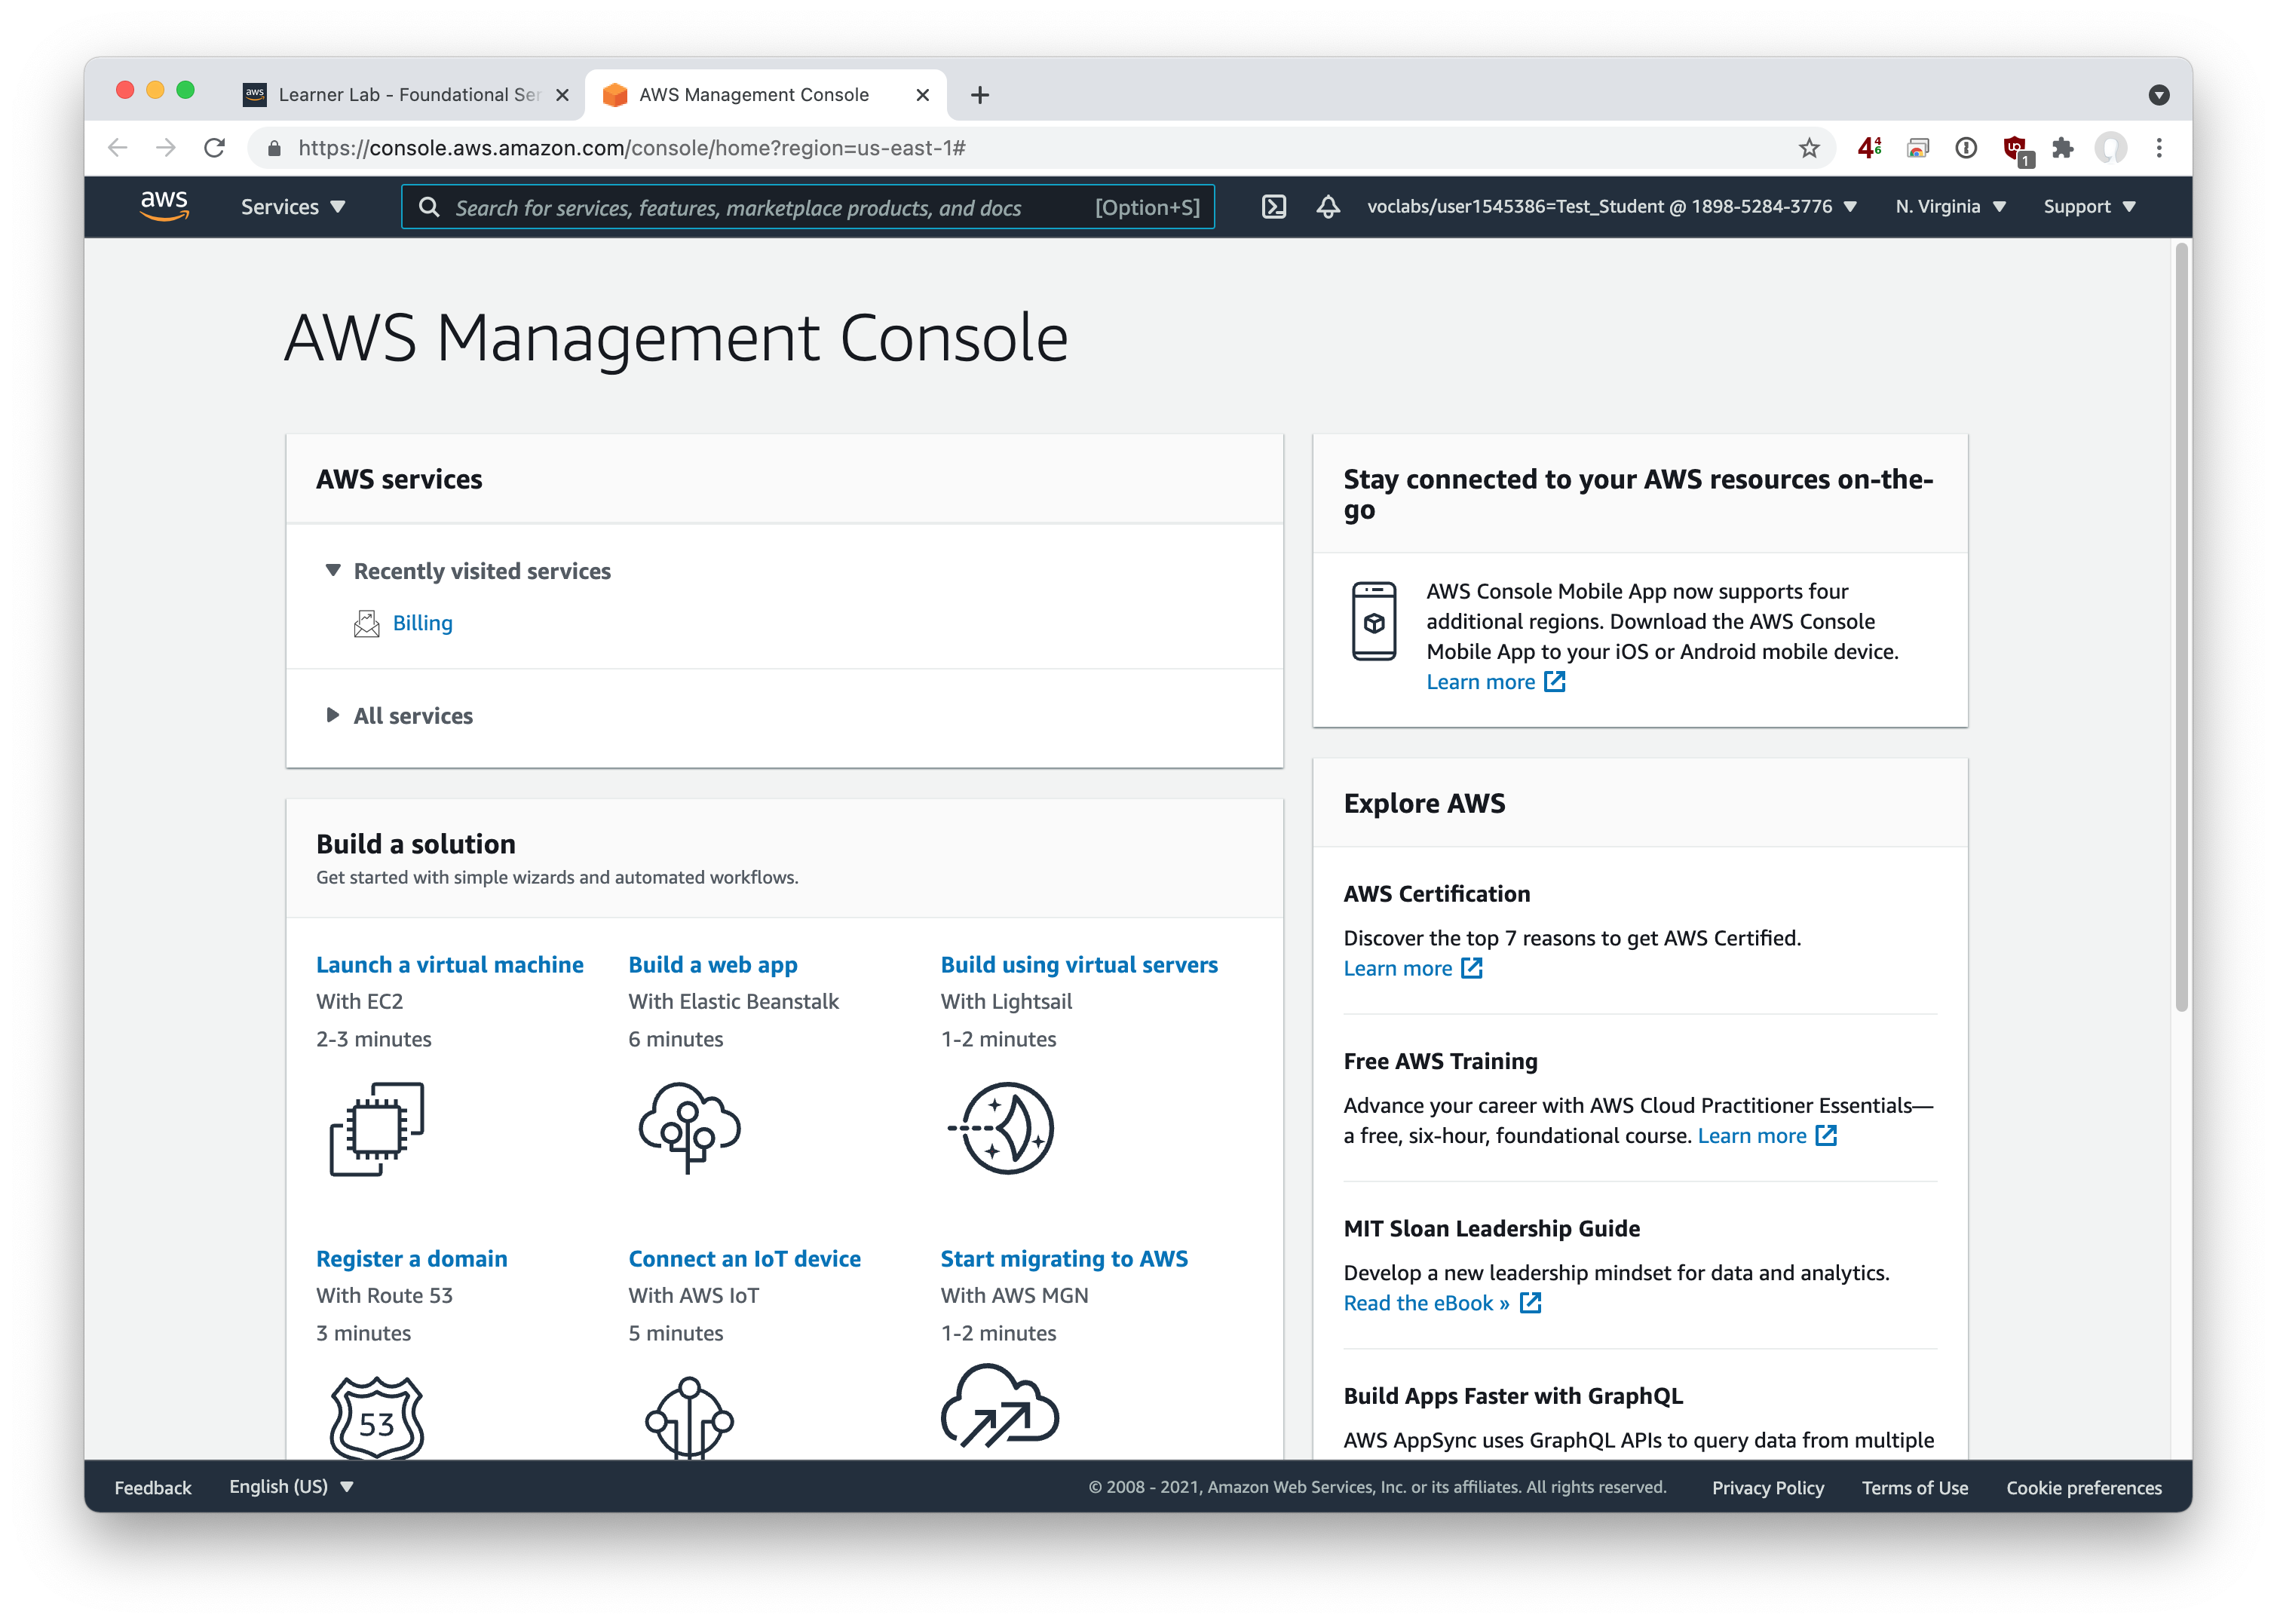
- Click the AWS button and a new tab will open. At this point, you have left the student portal and are now in the full AWS management console. While some features and services may be unavailable to you, the overall interface is the same as a full commercial AWS account paid with real dollars, and any instructions or tutorials you find online will be usable here. In the top bar, you can see your user credential is
voclabs/userXXXXXX, indicating the linkage between the full AWS system and your Vocareum-created credential.
Create Virtual Machine
For this lab, you should create a Amazon Linux 2 virtual machine. Let’s do this the quick and dirty way via the GUI to get started. From the AWS Management Console:
- "Launch a virtual machine" with EC2
- Search for "Amazon Linux 2 AMI (HVM), SSD Volume Type" - it's the first option in the list. Sadly, only the Amazon Linux and Amazon Window images are enabled for your student account.
- Select the
64-bit (x86)variant - Select your machine type - Let’s go SMALL/CHEAP here with the
t2.nano(1 vCPU, 0.5GB RAM, elastic block storage (EBS) only) - Select “Next: Configure Instance Details"
- There’s many options here, but none we need to be concerned with (for now…)
- Select “Next: Add Storage"
- Leave the size at the default 8GB
- For THIS LAB only, leave “Delete on Termination” checked. What that means is, when you terminate your EC2 virtual machine, the corresponding EBS (Elastic Block Store) disk image containing your operating system, all your data, and anything else you did on that virtual machine will be DELETED. For today, that’s fine, we’re just getting our feet wet. For future labs, however, you are going to want your data to be persistent, as we slowly grow the Tiger Enterprises network.
- Select: “Next: Add Tags"
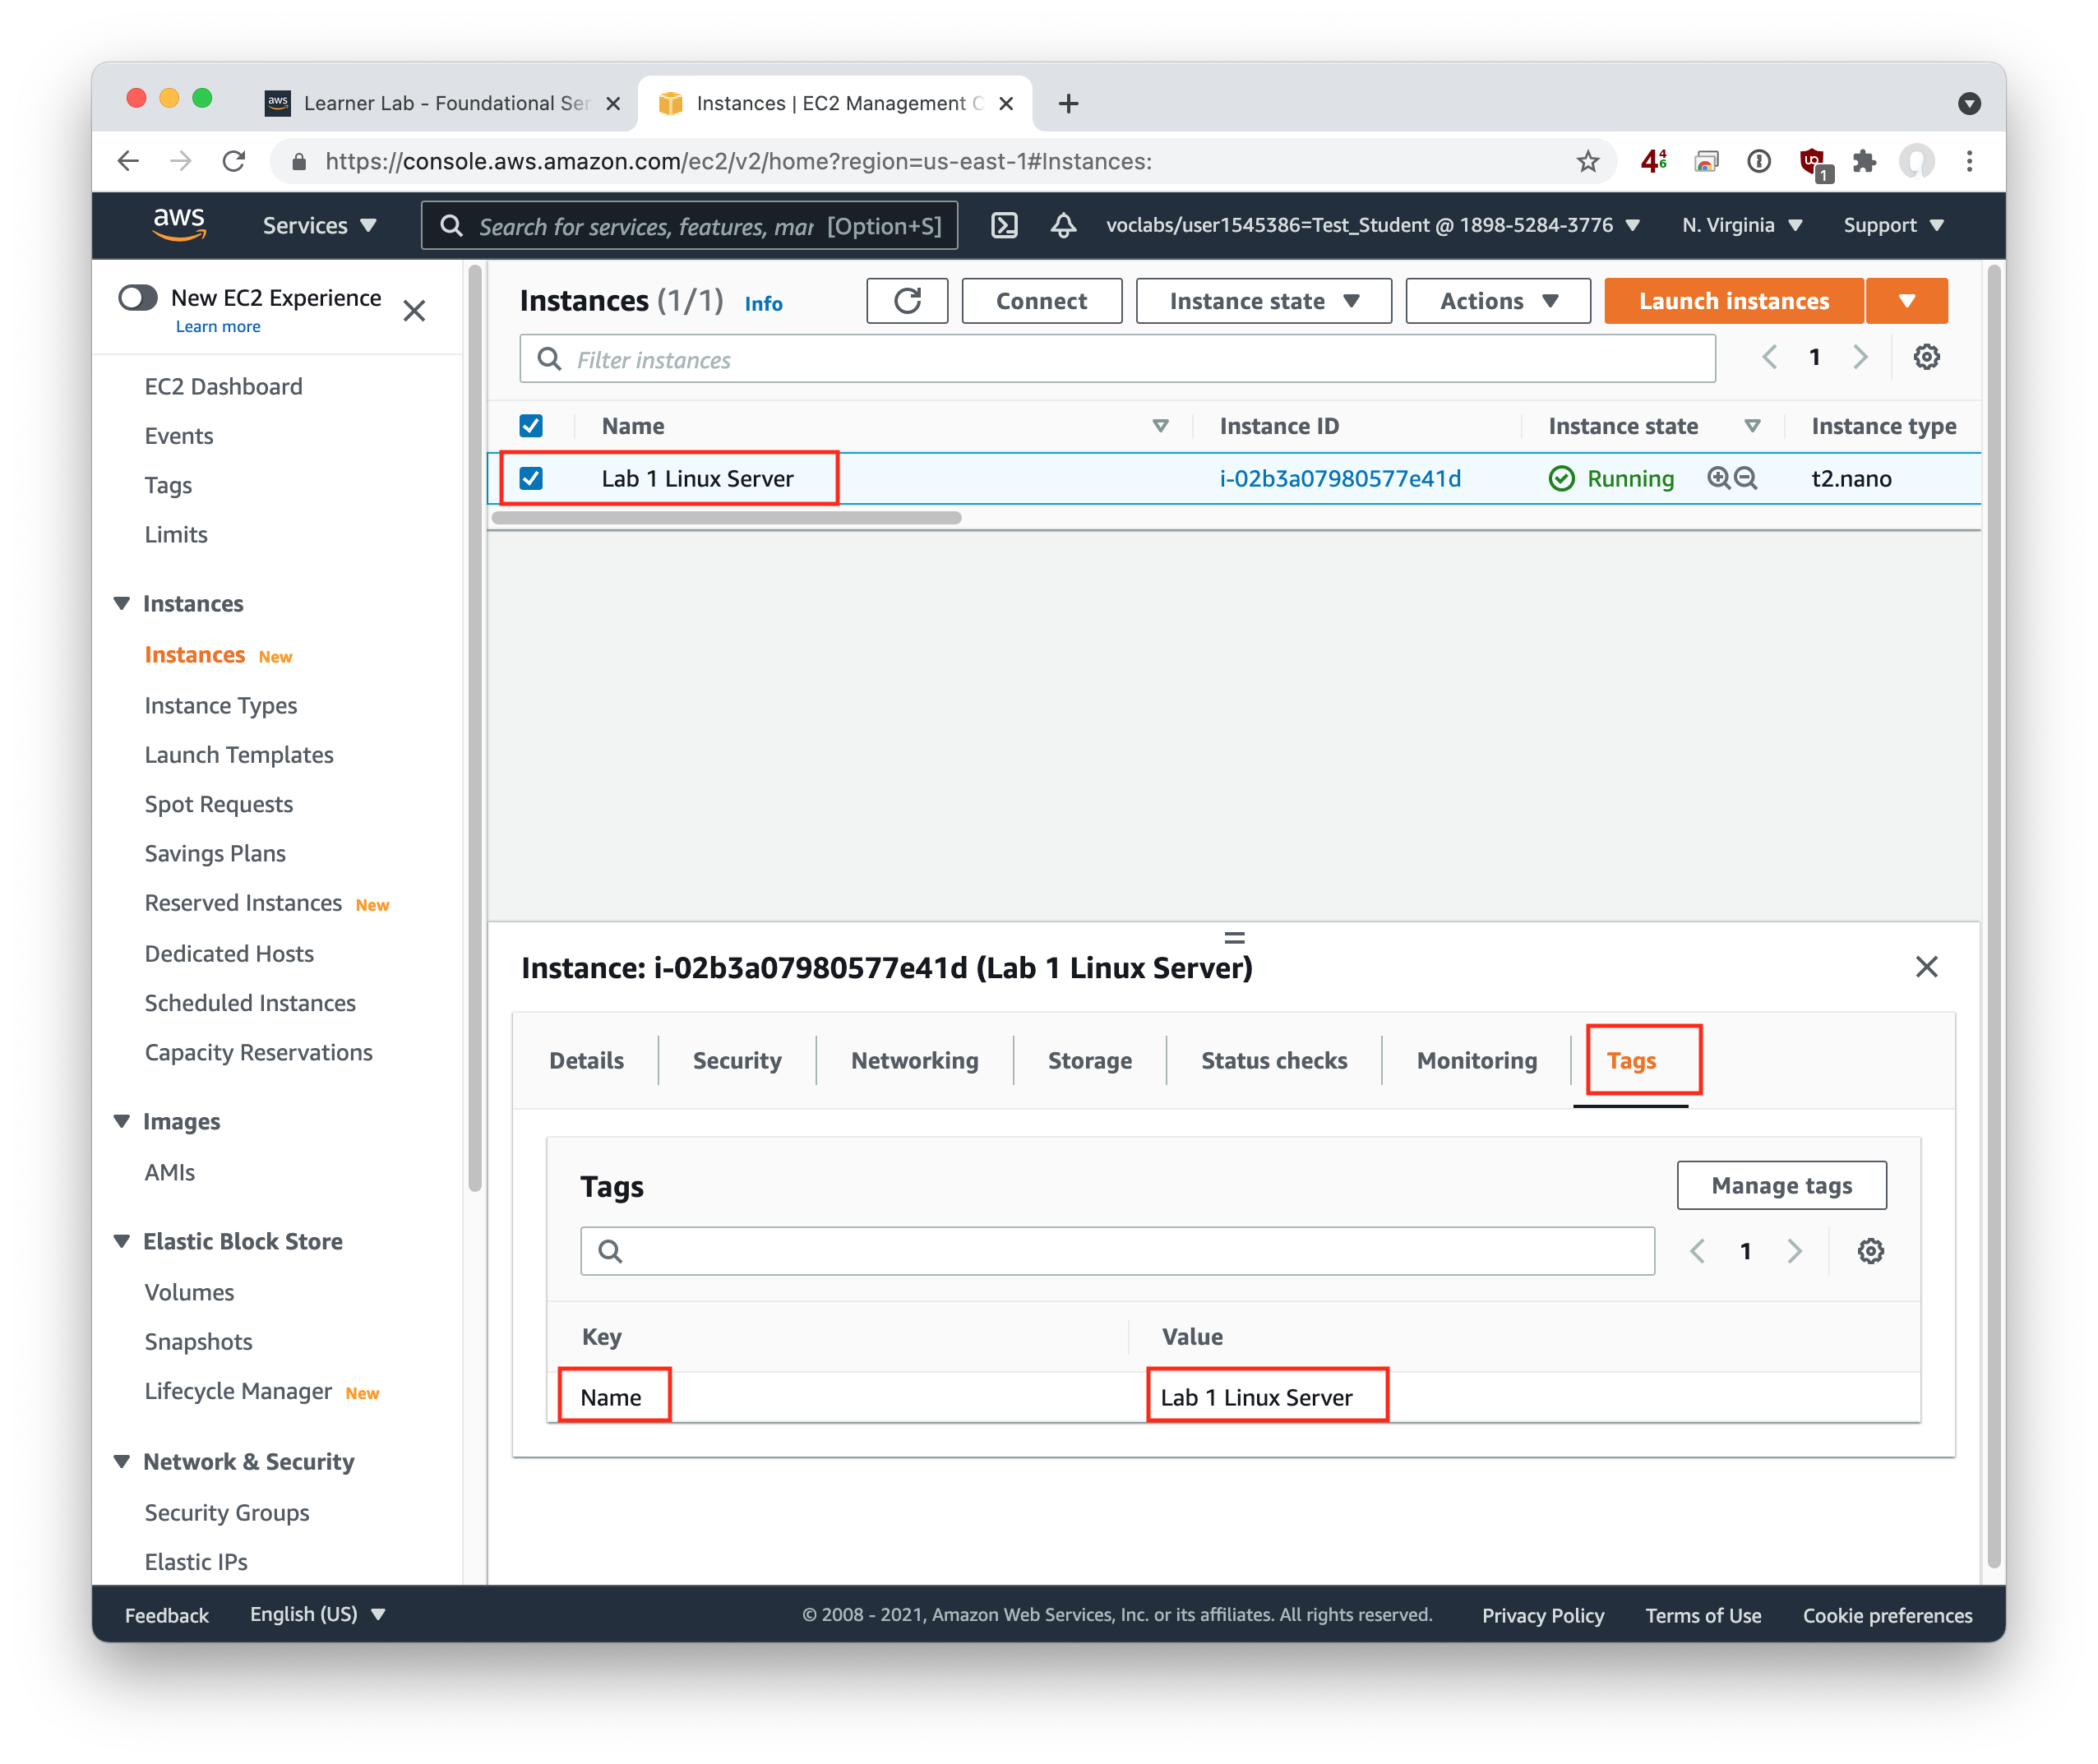
- Create a new tag. For the "Name" tag that we're trying to create here, there's a handy link to "click to add a Name tag" that serves as a shortcut to this common task.
- Key:
Name(the literal word Name, not your name) - Value:
Lab 1 Linux Server
- Select “Next: Configure Security Group"
- Leave the default options here. (The default options will create a new security group, and allow SSH protocol access to the VM from anywhere on the internet)
- Select “Review and Launch"
- Don’t be alarmed when it says your security group is open to the world - We WANT to be able to SSH into this box from outside Amazon’s network
- Don’t be alarmed when it says your instance configuration is not eligible for the free usage tier - You have a dedicated pool of credits for the classroom. (A limited pool!)
- Select “Launch"
- You will be prompted to either select an existing keypair or create a new one.
- What is a key pair? A key pair consists of a public key that AWS stores, and a private key file that you store. Together, they allow you to connect to your instance securely. For Windows AMIs, the private key file is required to obtain the password used to log into your instance. For Linux AMIs, the private key file allows you to securely SSH into your instance.
- Since this is your first instance, you don’t have a keypair yet.
- Select “Create a new key pair"
- For key pair name, enter something memorable: “COMP-175-Lab-1"
- Select “Download Key Pair” to download the file “COMP-175-Lab-1.pem" - DO NOT LOSE THIS FILE! YOU CANNOT OBTAIN THIS PRIVATE KEY AGAIN. It’s PRIVATE.
- You will be prompted to either select an existing keypair or create a new one.
- Select “Launch Instances"
- Select “View Instances” so you can see the state of your newly created VM
While you're viewing your instance, take a moment to confirm that you set the tag correctly. Select your instance, and then click on the "Tag" tab below. An instance can have many tags, and each tag has a "key" and a "value" associated with it. The "key" for this tag should be Name (a reserved word for AWS), and the "value" for the tag should be the human-readable string that you want to appear. Notice how AWS then places your string in the table of all instances under the Name column. You can sort or search on this tag, to make finding the desired instance easier.
SSH to Virtual Machine
Now let’s connect to the virtual machine over Secure Shell (SSH), which provides encrypted access to a command-line interface
- Right-click on the instance you just created. (You should be in the AWS Management Console, in the EC2 service, in the Instances panel. Only one instance should be visible in the table)
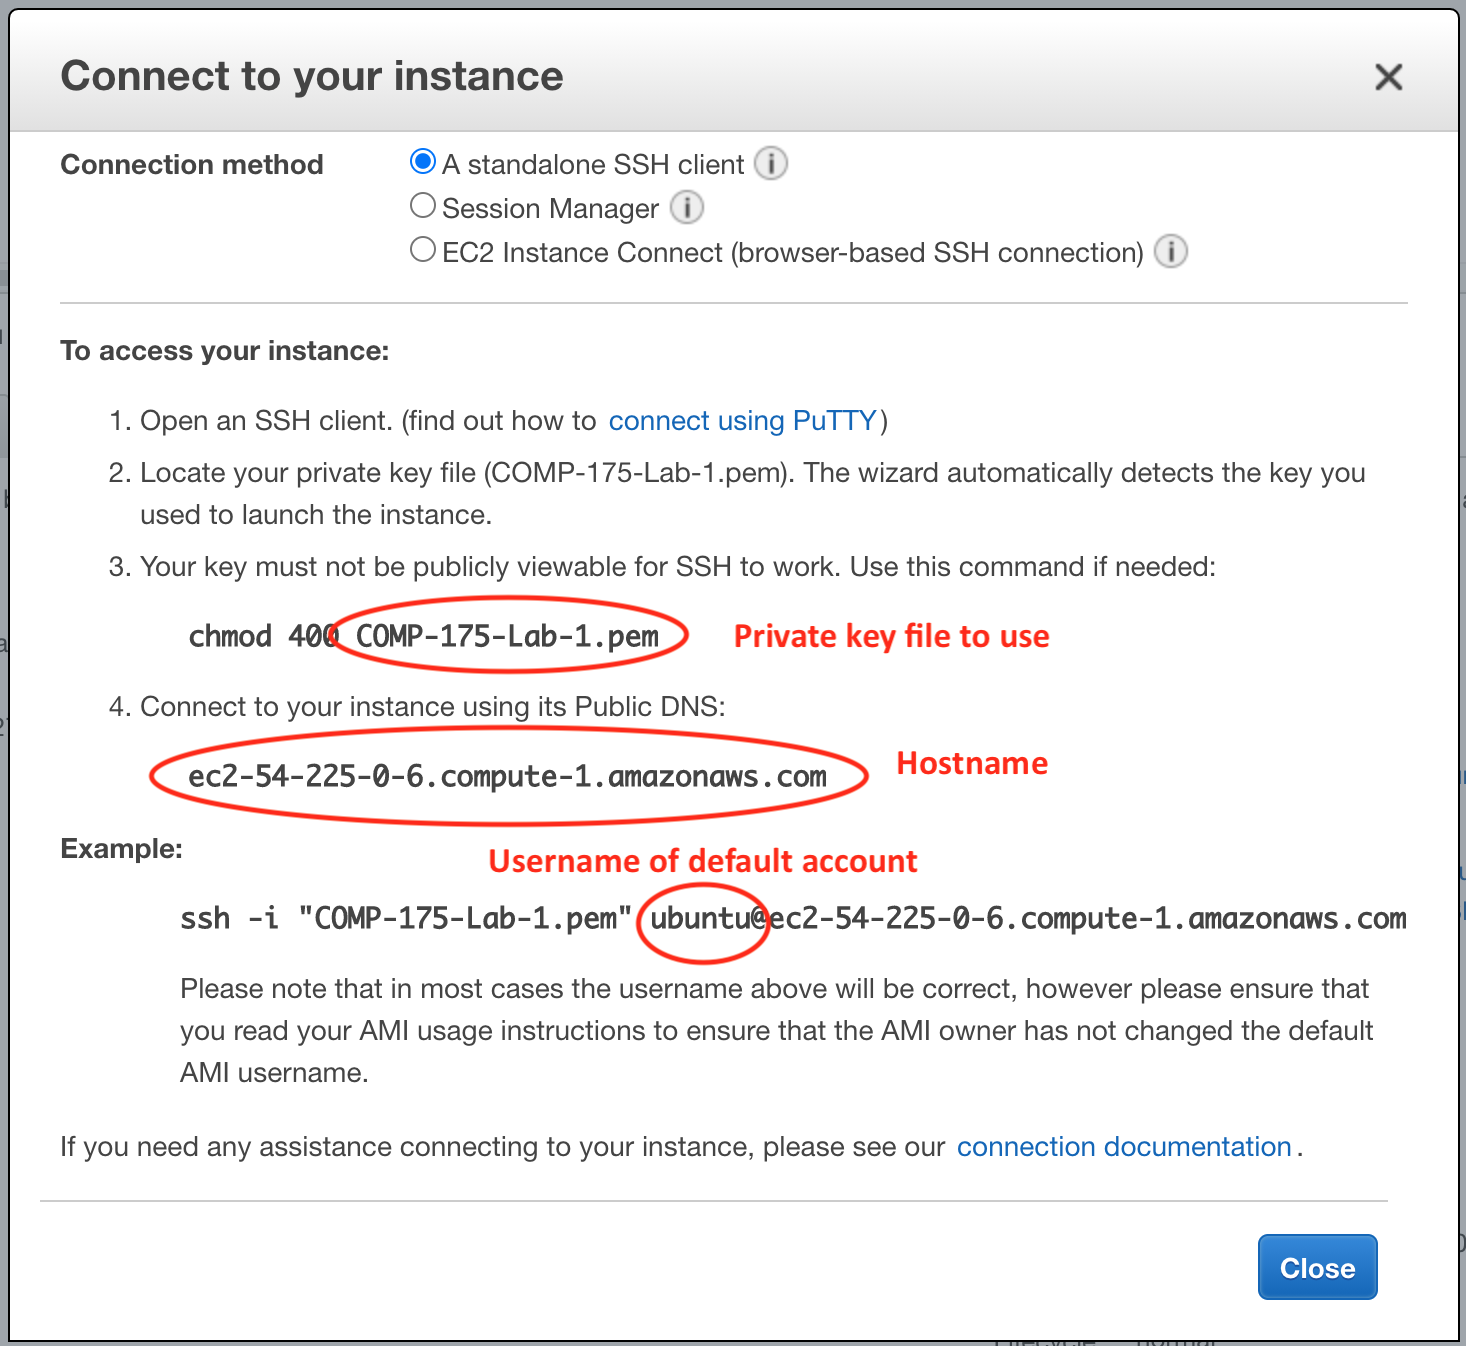
- Choose “Connect” and then “SSH client” as the connection method. Here, AWS helpfully tells you the private key file that instance is expecting, the user name, and the IP address and DNS hostname (interchangeable) of your instance to connect to.

If you’re using a Mac or Linux:
- Launch your own native command prompt / command terminal
- Using the
cdcommand, change directory to wherever YOU stored the “COMP-175-Lab-1.pem” file - Change the file permissions on the .pem file so it is NOT viewable to anyone on your computer except your current logged in user
chmod 400 COMP-175-Lab-1.pem
- Run your native SSH program and paste in the command that AWS suggested (with the private key, username, and hostname filled in already). It should look something like this:
ssh -i "COMP-175-Lab-1.pem" ec2-user@ec2-AA-BB-CC-DD.compute-1.amazonaws.com-i= Use the identity (private key) stored in the file “COMP-175-Lab-1.pem"ec2-user@: Connect with username “ec2-user" - This is the default username for this particular Linux imageec2-AA-BB-CC-DD.compute-1.amazonaws.com: Connect to this hostname - each VM and each student is different!
If you’re using Windows:
- Download MobaXterm (https://mobaxterm.mobatek.net/) to use as your SSH program
- The free "home edition" is sufficient. Either the installer edition or portable edition is fine. (Portable edition would be used in a lab where you don't have permission to install programs)
- Run MobaXterm
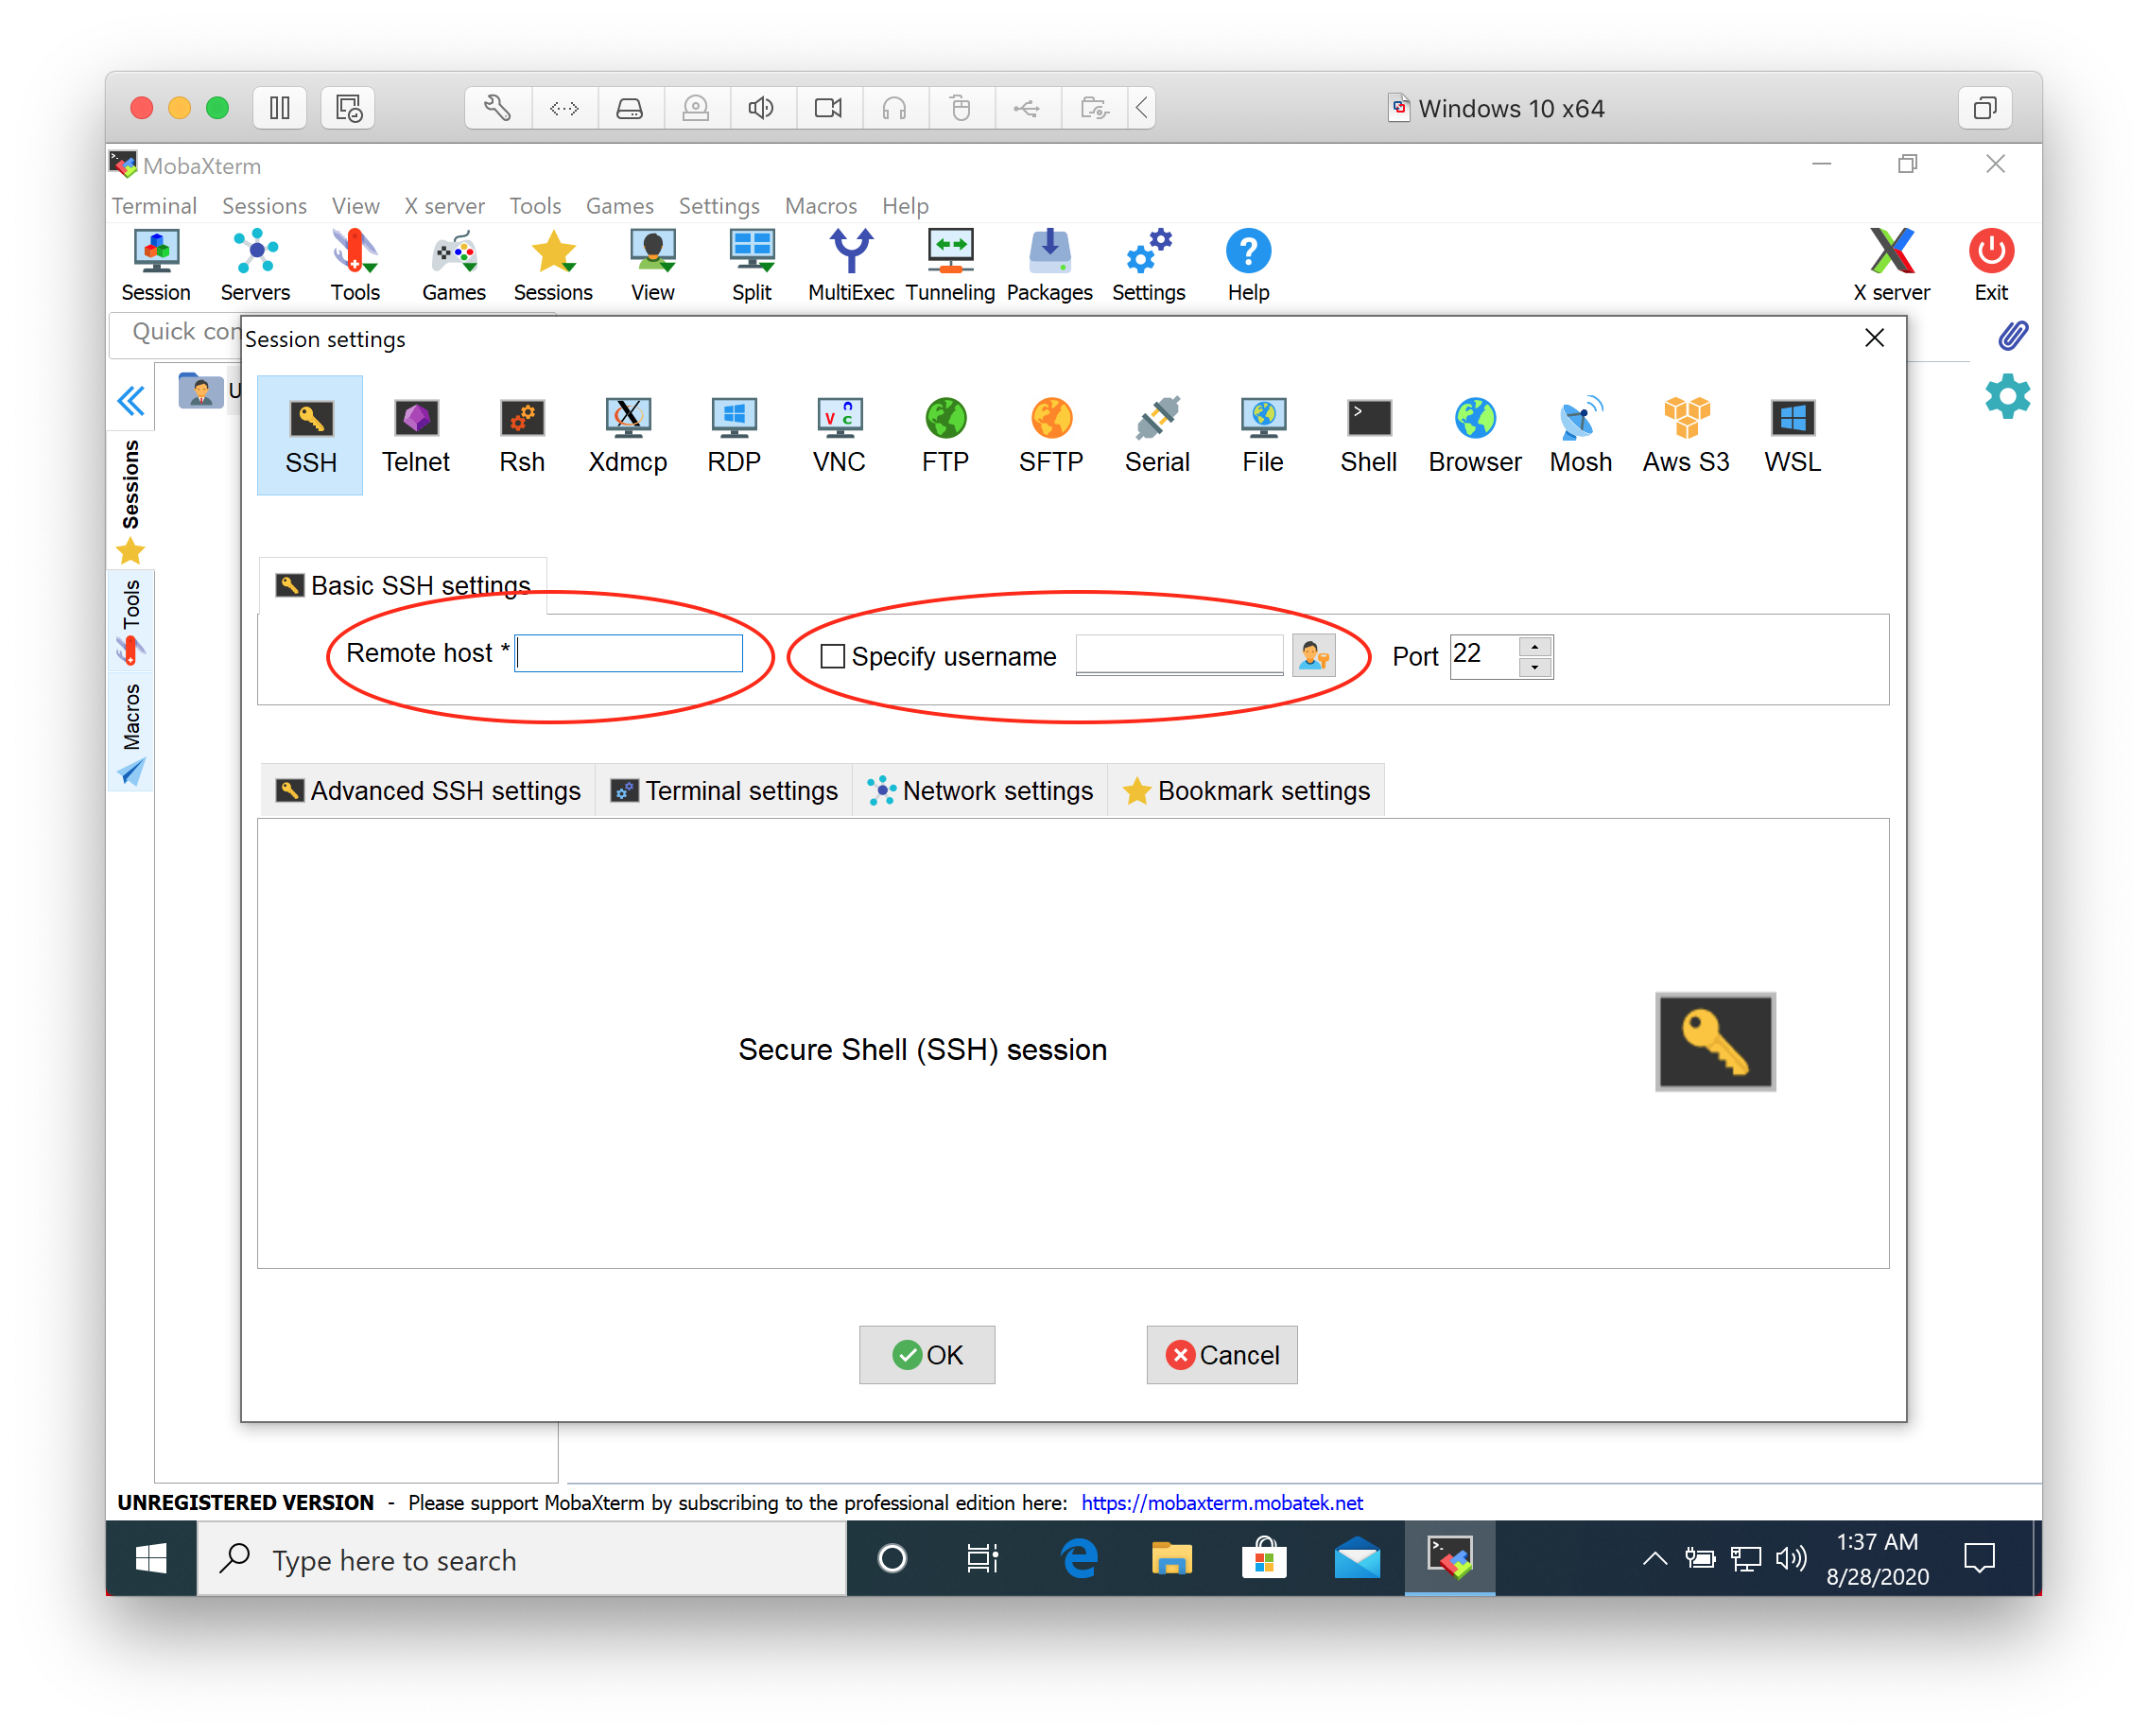
- Click on the "Sessions" button, and then "SSH" to create an SSH session
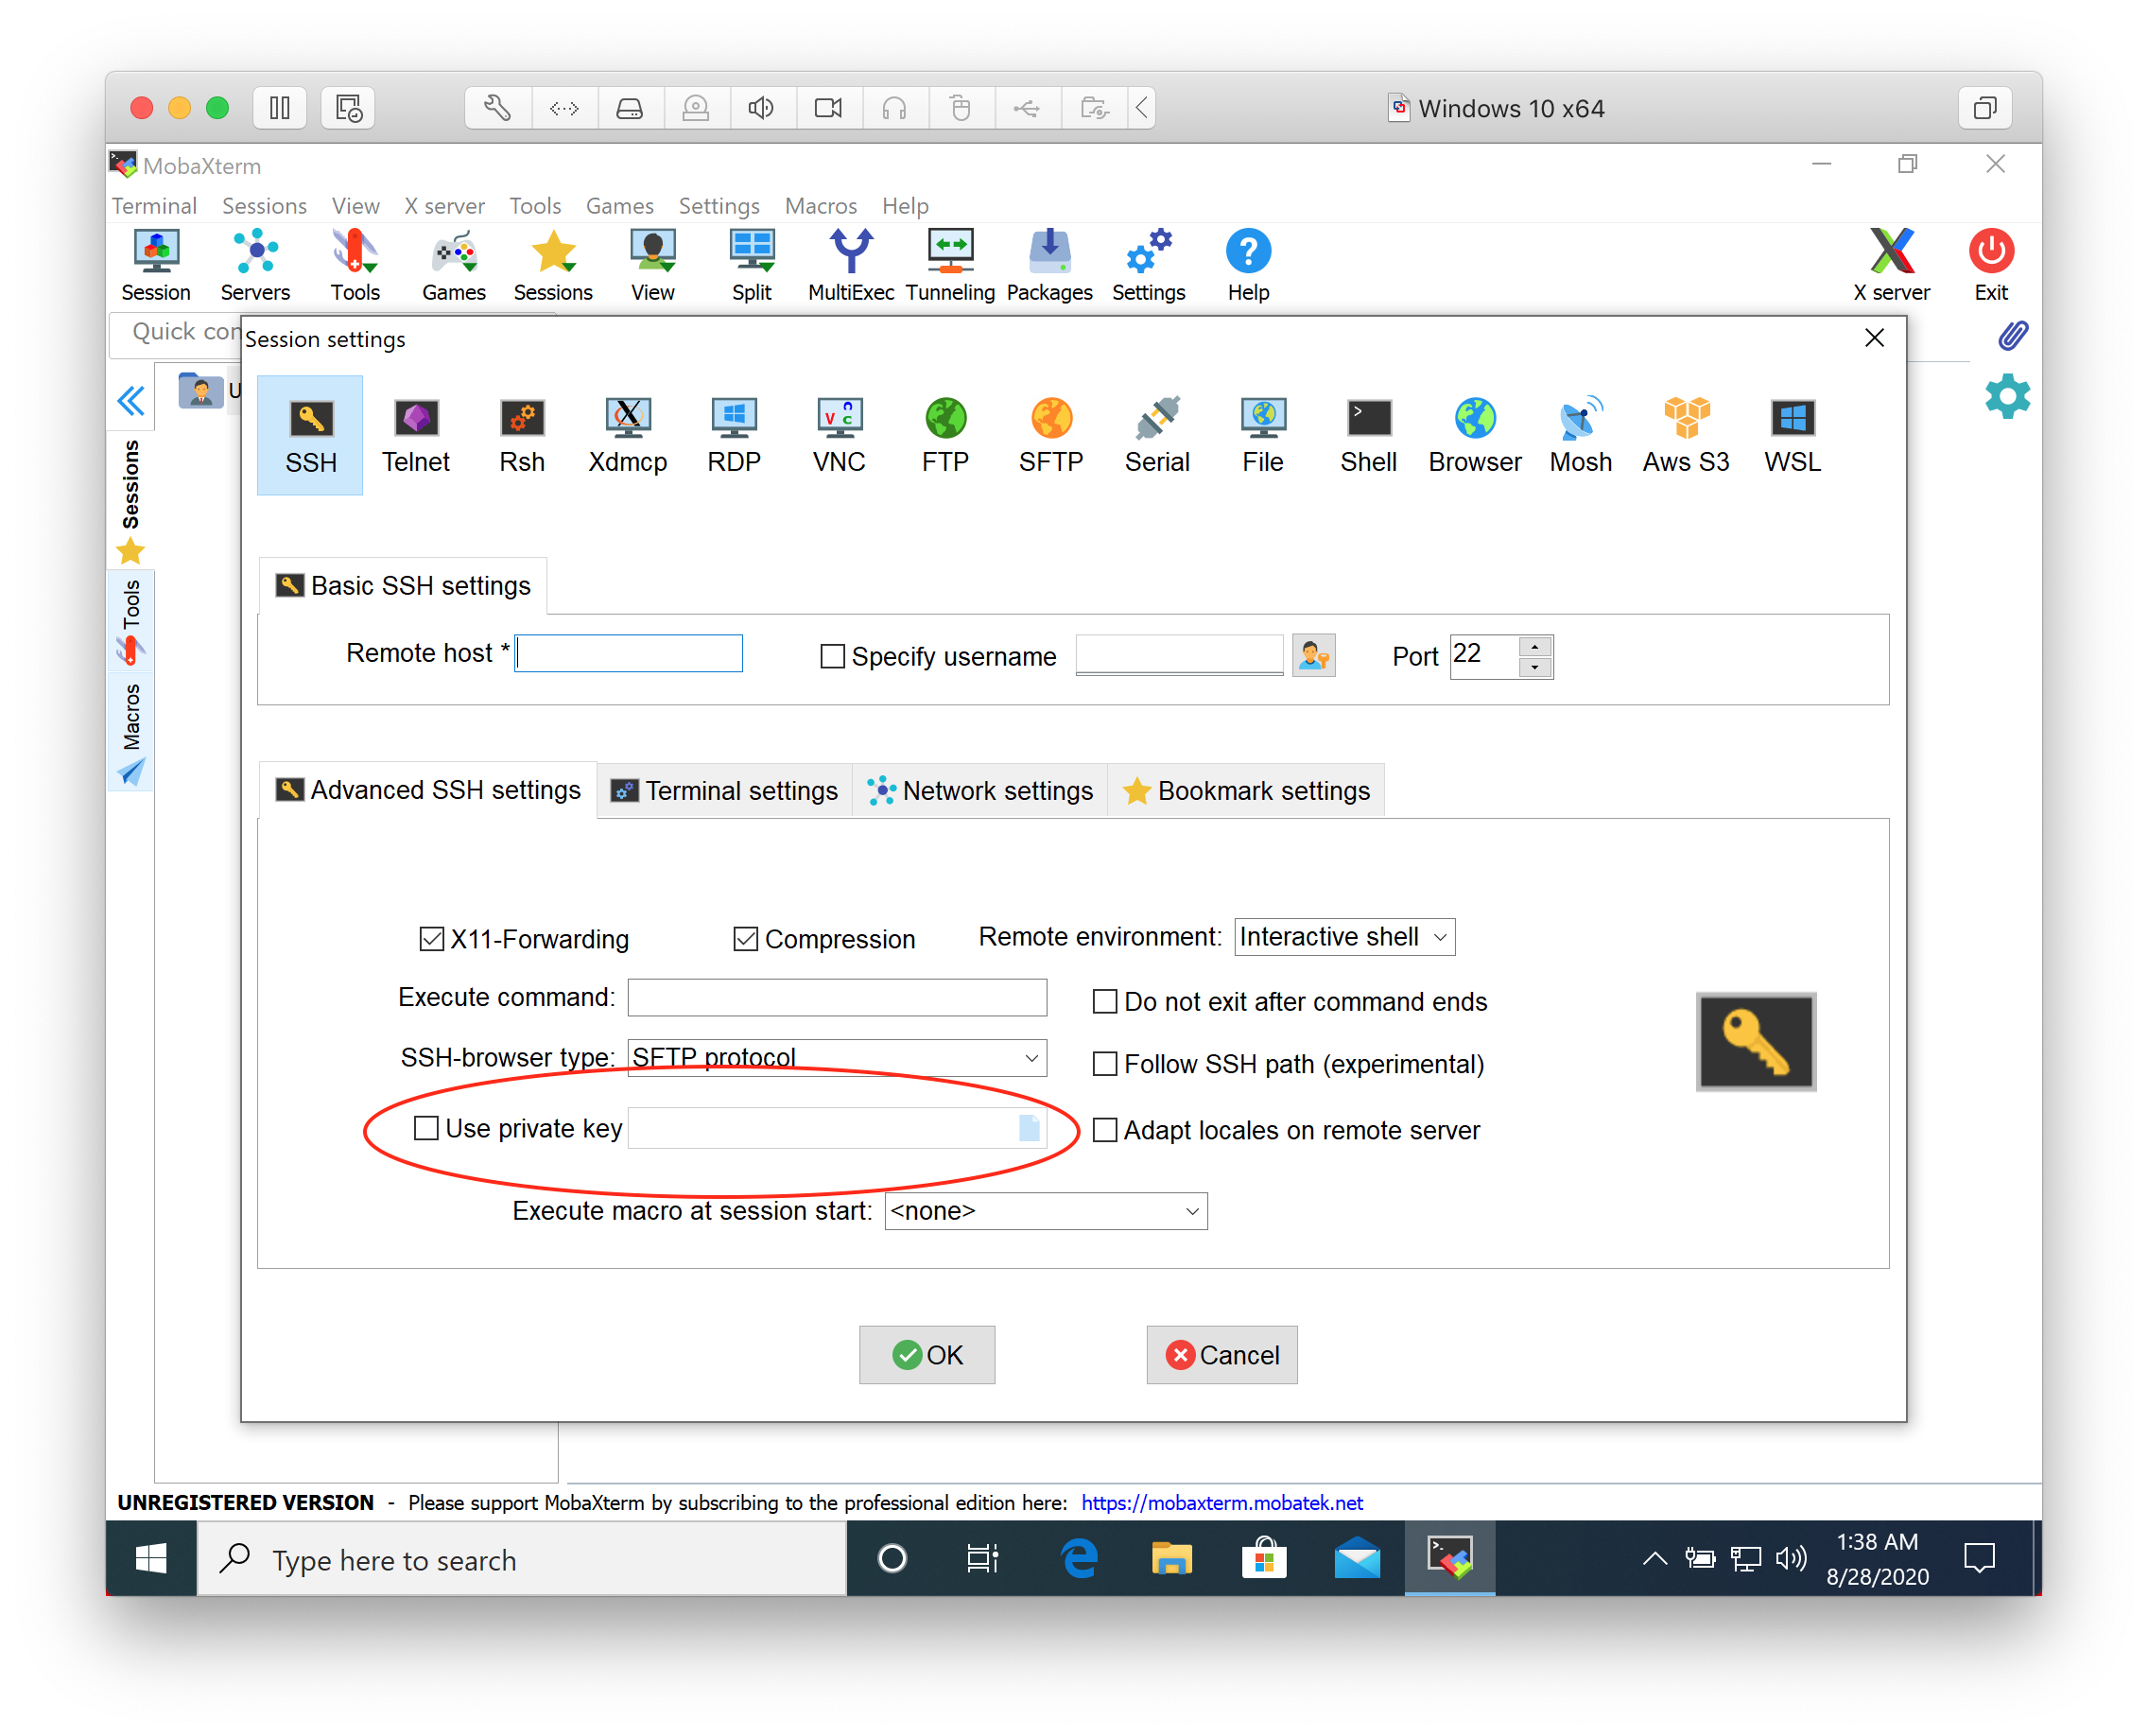
- Using the GUI, specify the hostname, username, and under the "Advanced SSH Settings" tab, the location of the private key file you wish to use in connecting to your VM.
- Press OK to open the connection, and after a few seconds, you should find yourself at a Linux terminal prompt, ready to enter commands in your new virtual machine.
MobaXTerm Configuration:

Lab Deliverables
Upload to the Lab 1 Canvas assignment all the lab deliverables to demonstrate your work:
- Screenshot of the EC2 console showing your running VM
- Screenshot of the EC2 console showing the EBS volume that is the disk image for your VM (Go to Elastic Block Store -> Volumes)
- Screenshot of the SSH console showing you logged into your VM and at the command prompt
- Screenshot of the SSH console showing the following information (enter all these commands in your SSH terminal)
- What is my username?
whoami - What is my private (AWS internal) IP address?
ip addr - What is the hostname of my VM?
hostname - How long has the system been running?
uptime
- What is my username?
After submitting the Canvas assignment, be sure to complete the TERMINATION routine below to avoid paying $$/hour for a virtual machine you no longer need.
VM Termination
Finally, TERMINATE YOUR EC2 VIRTUAL MACHINE to avoid paying AWS money for a virtual machine which you no longer need. As we previously specified in the setup wizard, AWS will DELETE the EBS disk image, so you’re not charged for that storage on a continuous basis either.
- Go to the AWS Console / EC2 / Instances panel
- Right click on your instance
- Select "Terminate Instance"
- Confirm that you do indeed want to terminate your instance and that you’re aware that the default action is for EBS volumes to be deleted when doing so.
- Select “Yes, Terminate"
- You should be able to watch the instance shut down in the Instances panel, and confirm that the EBS image has been deleted in the Volumes panel.
- Go back to the Vocareum dashboard and click the "End Lab" button. There shouldn't be anything running in your lab now, and it'll end after 4 hours automatically, but it's a good practice to stop the lab when you're finished working.
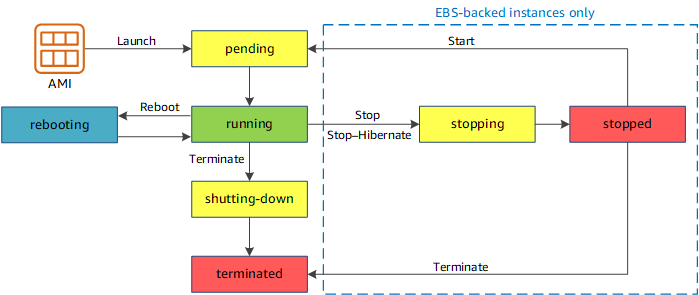
For future reference, in AWS there is a difference between stopping and terminating a virtual machine:
- If you “stop” a virtual machine, you can start it again later via a single click in the GUI. Ephemeral (local) storage will be deleted, but storage on EBS (Elastic Block Storage) will persist. Billing will stop for the EC2 instance, but continue for the EBS disk image.
- If you “terminate” a virtual machine, you can no longer start it again, but will have to create a new VM instead. Ephemeral (local) storage is lost, and depending on the setting you chose when launching the VM, the EBS disk image may also be automatically deleted. Billing will stop for the EC2 instance.
The figure below illustrates the different states your EC2 instance will be in over its lifecycle. For more information, refer to: EC2 User Guide: Instance Lifecycle